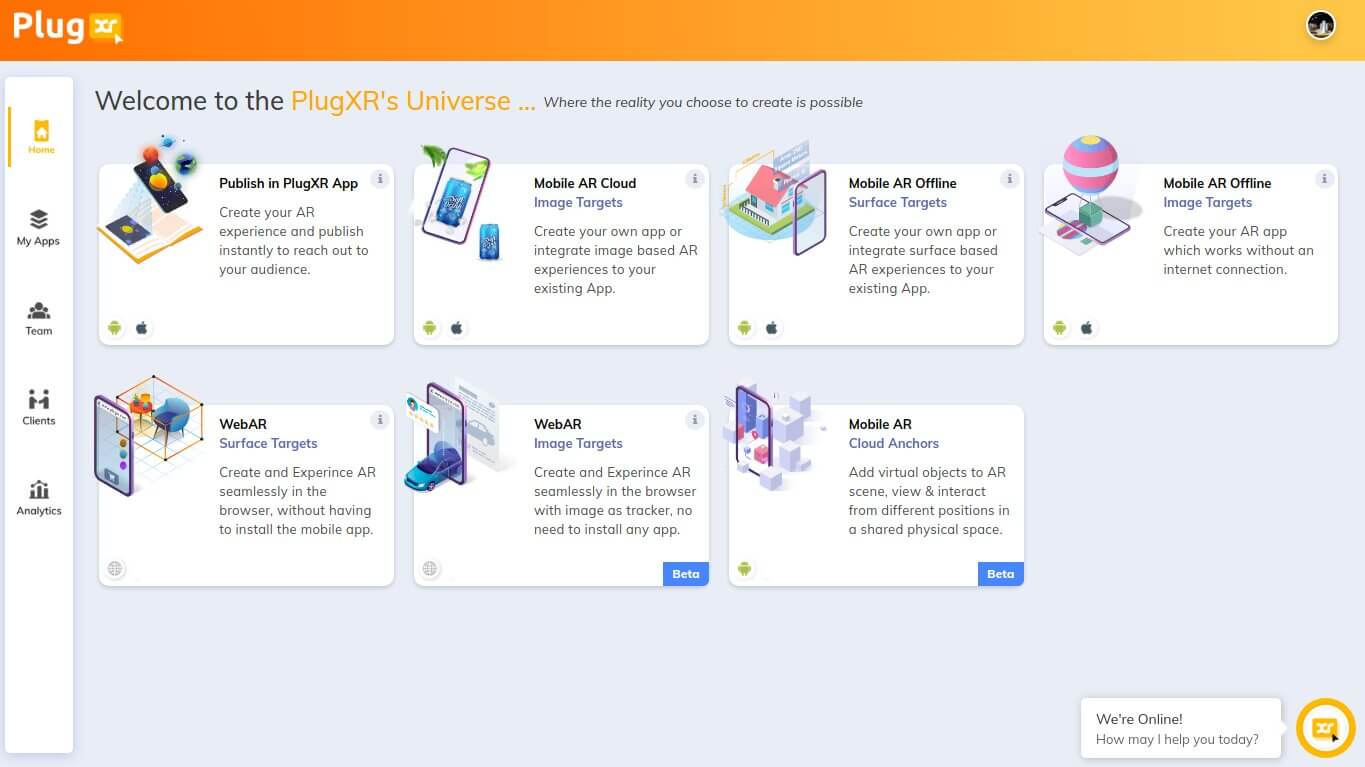
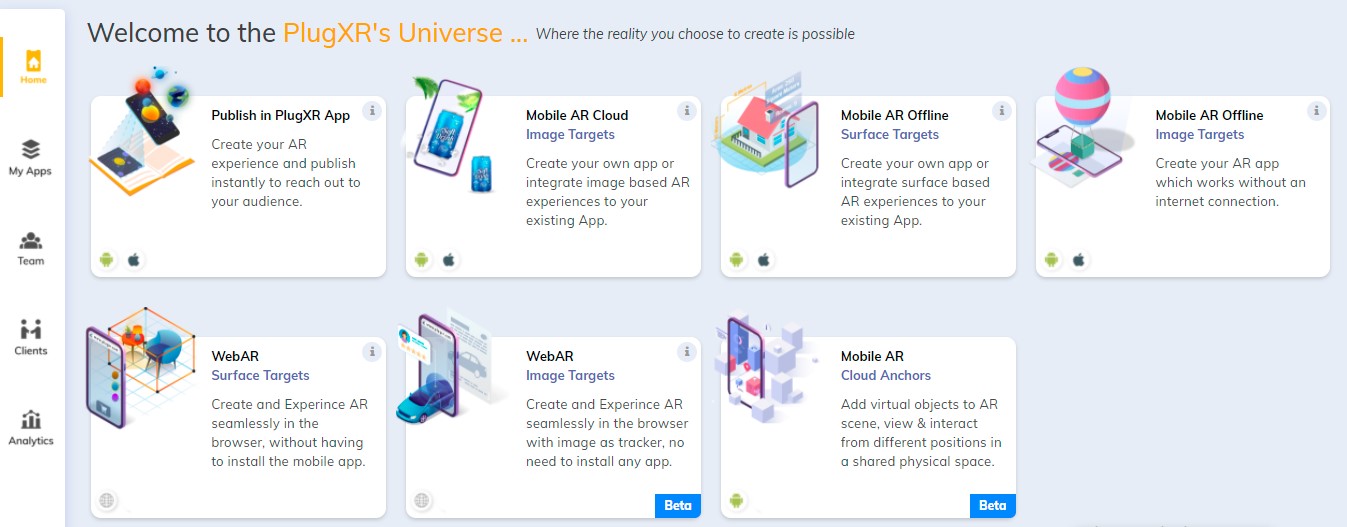
Publish in PlugXR App
Hover onto the “Publish in PlugXR App” section in the “Home” screen and click onto the ‘+’ button. You will now be directed to the “PlugXR App” under the ‘My Apps’ section.
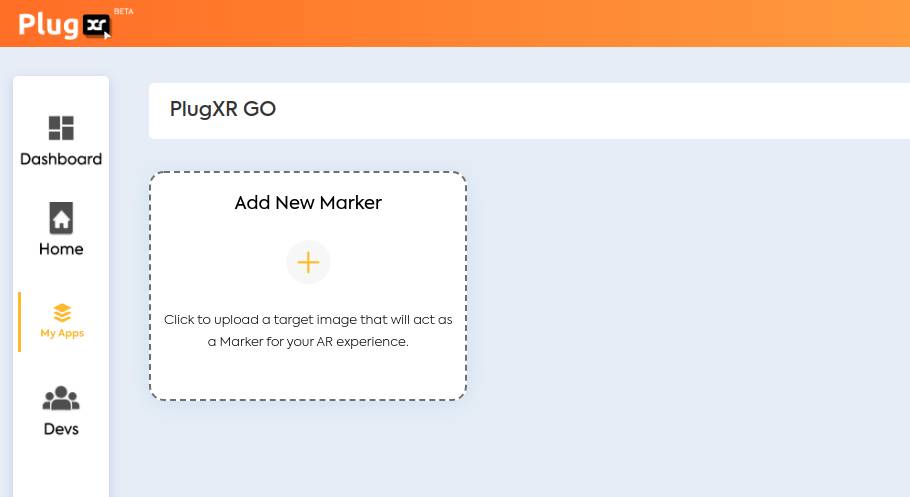
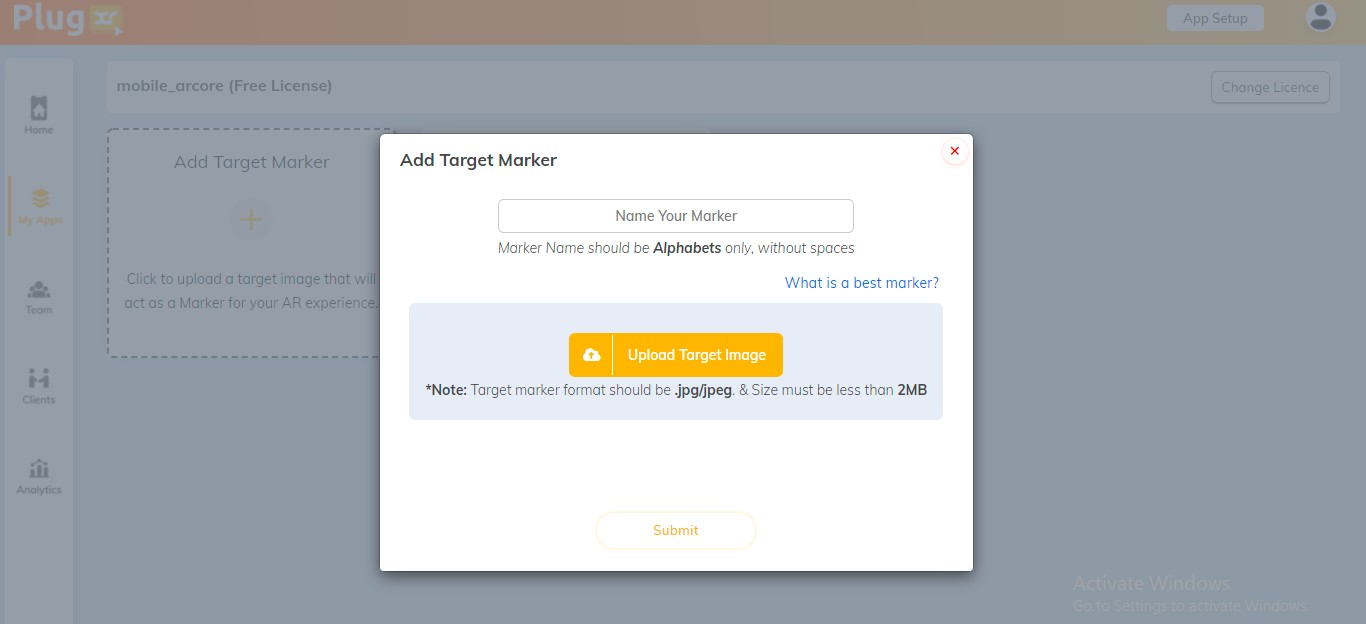
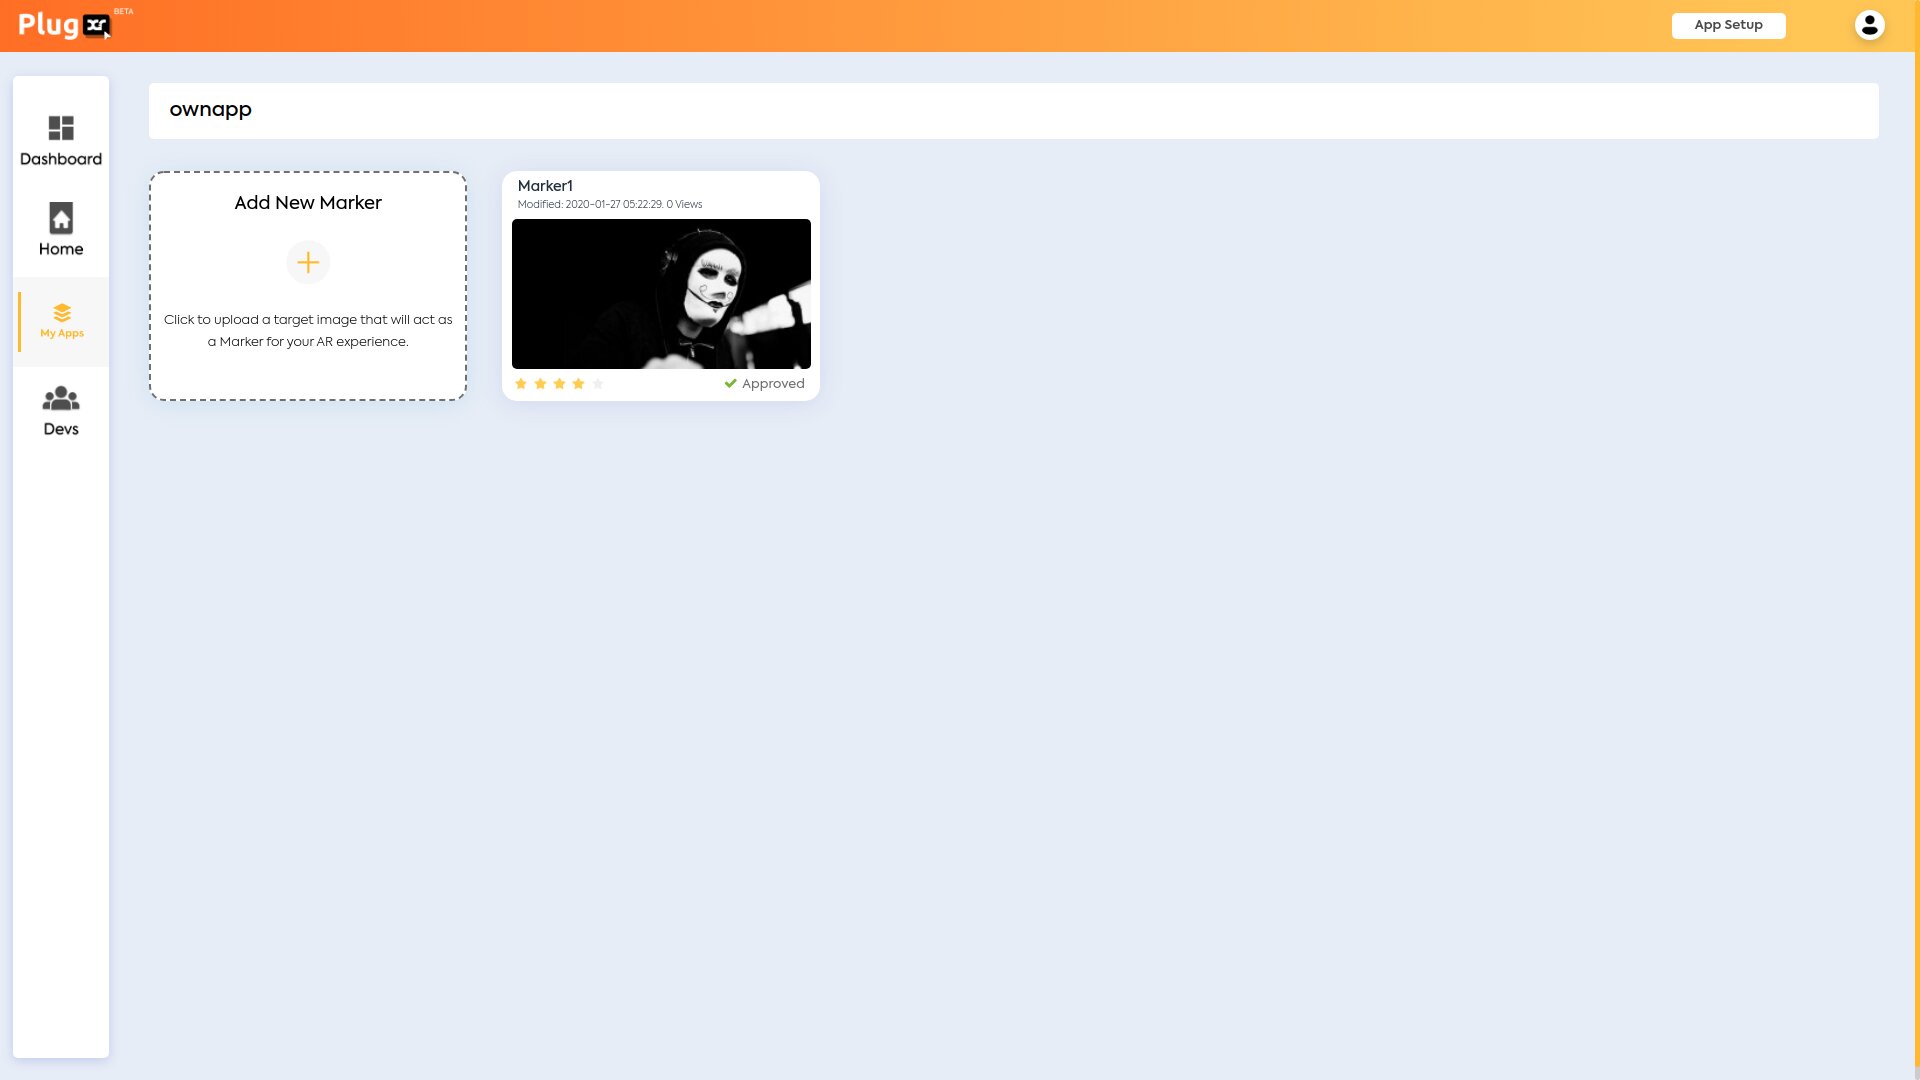
Add Marker
- Click on the box that reads “Add New Marker” (A Marker is a target image which upon scanning shows the AR experience).
- Upon clicking this, a pop-up appears where you have to do the following:
- Name your Marker
- Upload the target image which is less than 2MB
- Upload target image in the .jpg or jpeg format.
- Complex images with a lot of contrast tend to work very well by making it easier for the Mobile Camera to recognize the marker. Avoid flat and monochromatic images as much as possible.
Features of Good Markers
- A Good Marker has a good contrast that has good brightness.
- There are no repetitive patterns and are rich in detail.
- A Good marker makes use of good camera focus mode that will ensure the best camera focus conditions.
- The lighting conditions are stable and easy to control.
- The recommended size of Good Markers varies based on target rating and the distance to the physical image target.
- The printed targets need to be flat that will enhance the quality of tracking.
For more details check here Vuforia, ARCore, ARKit
Marker Settings
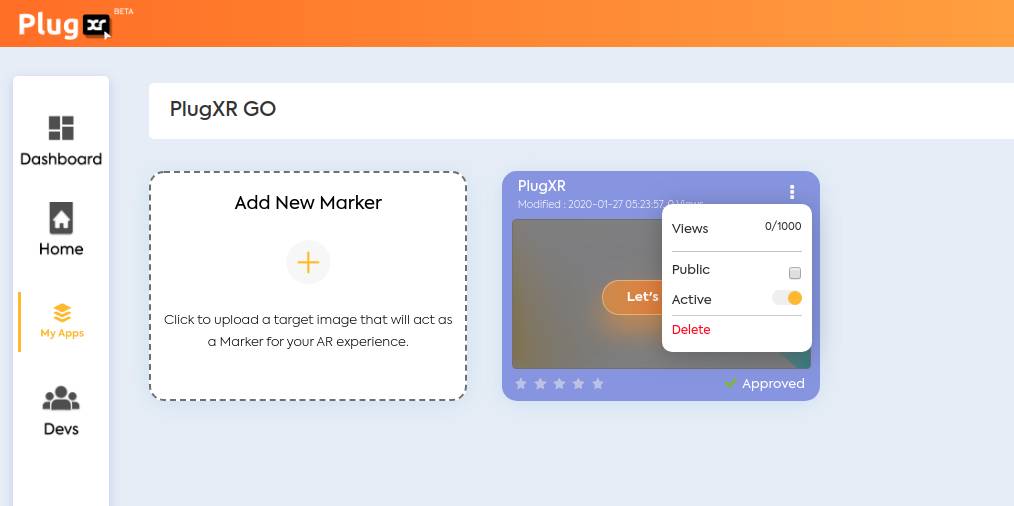
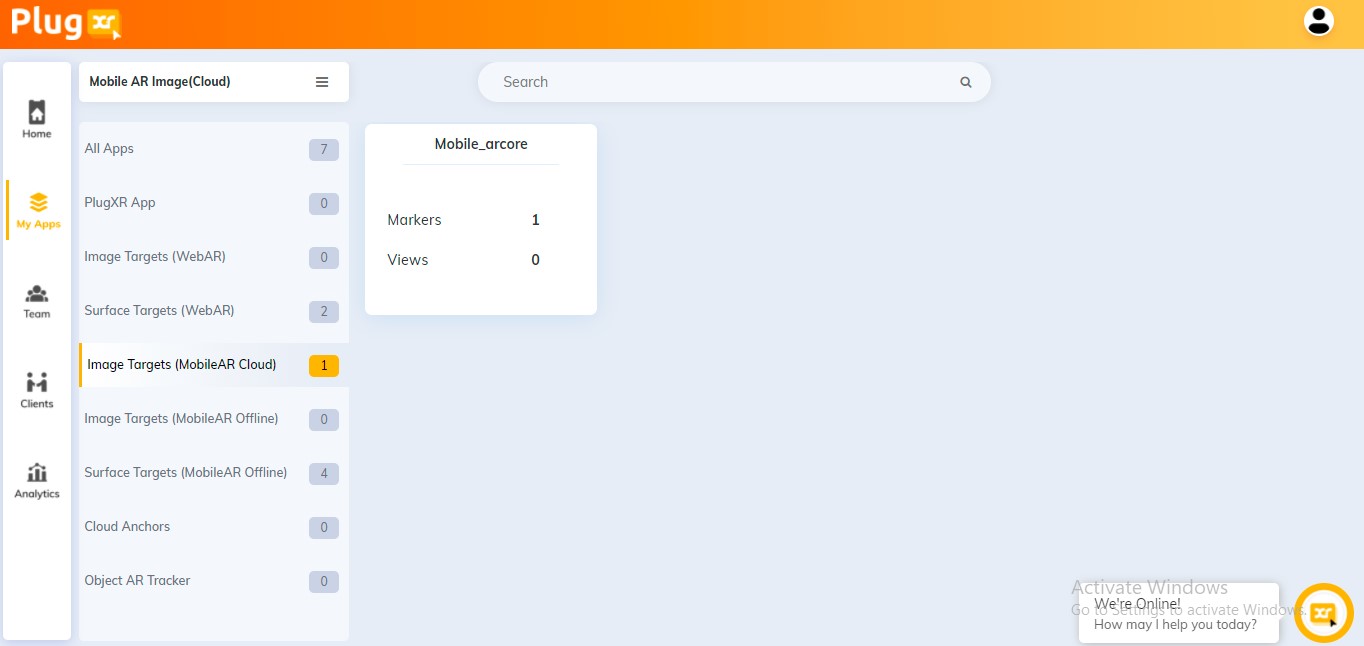
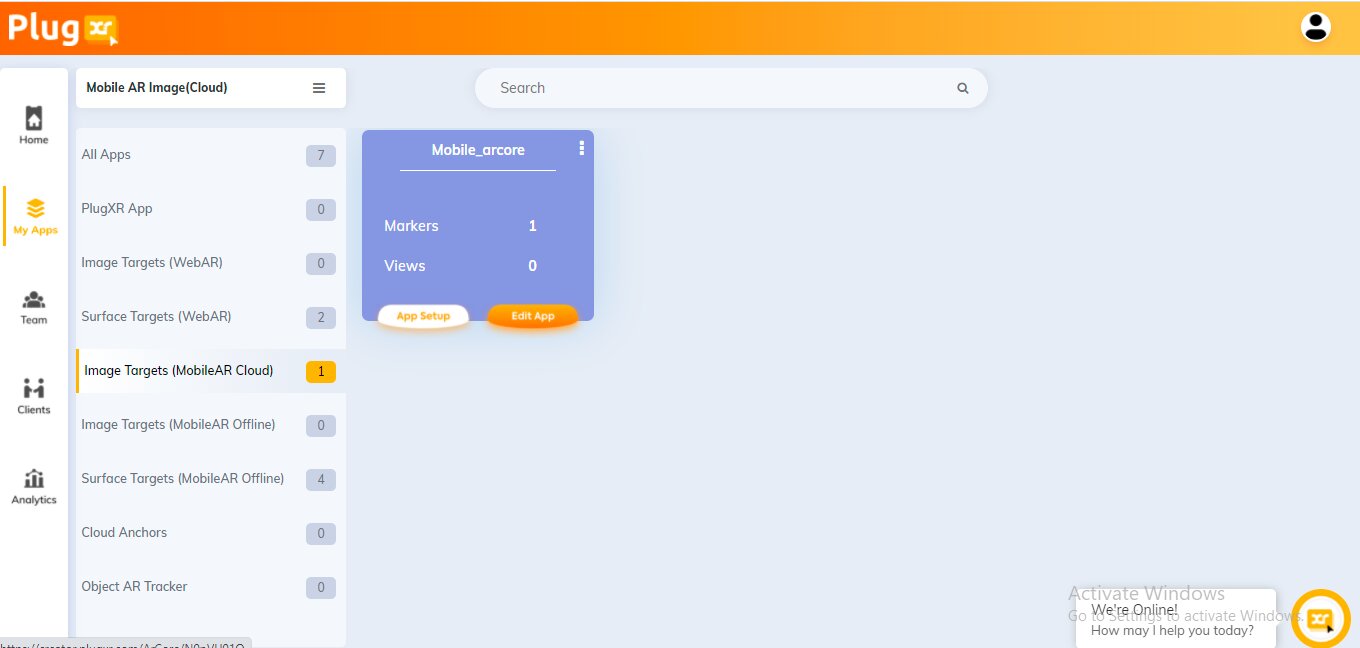
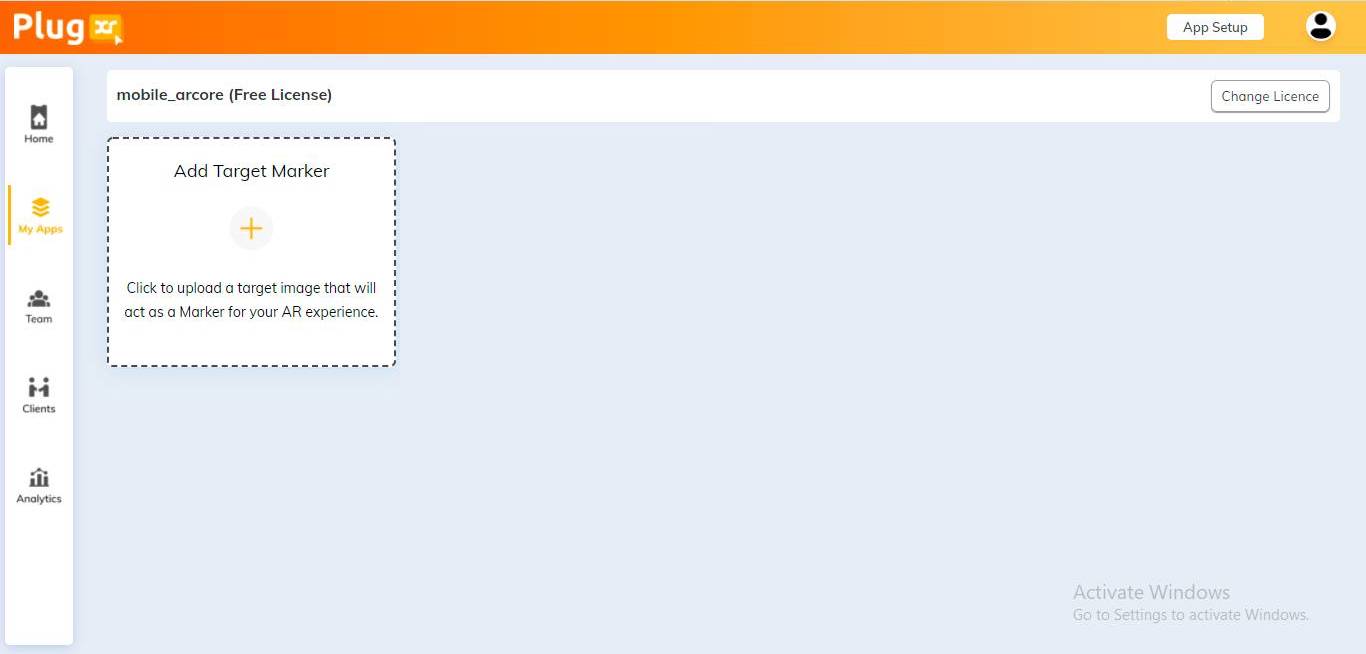
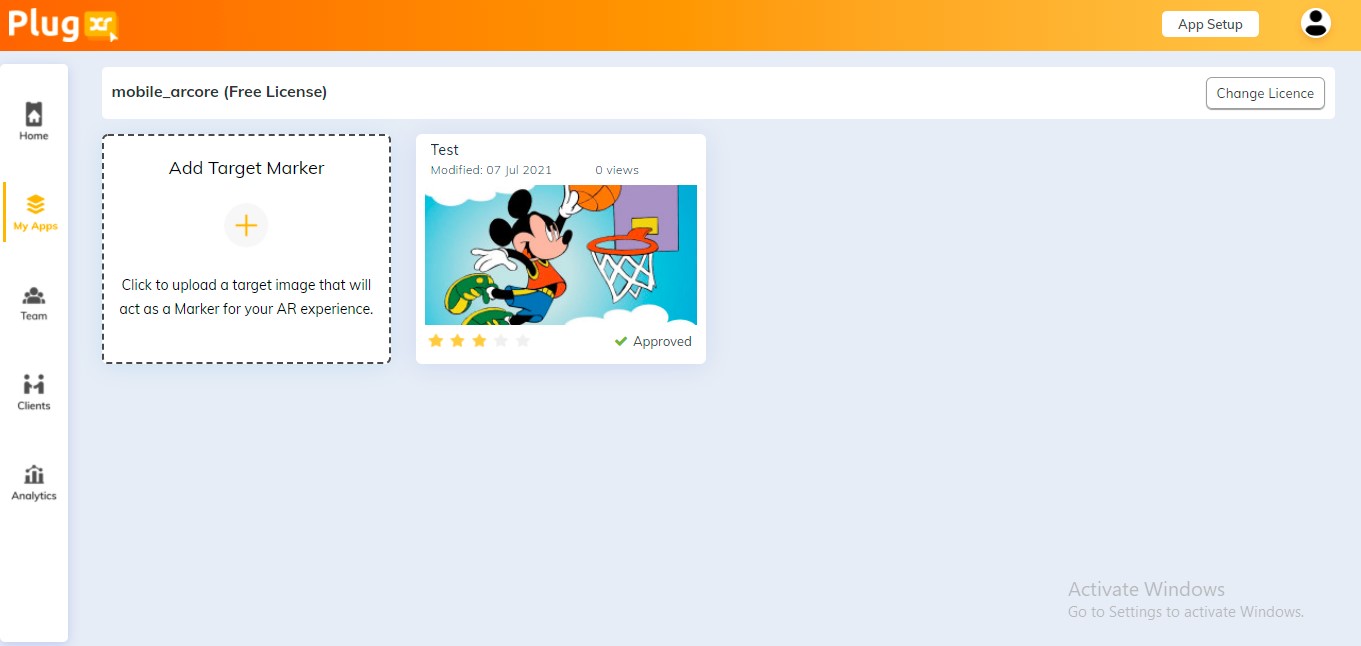
Once you have uploaded the Marker, go to “My Apps” to find your Marker under the PlugXR App section.
The stars on the marker icon suggest how easy it is for the camera to identify your Marker. Markers with 5 ratings work the best. Complex images with a lot of contrast tend to work very well as compared to flat and monochromatic images.
Marker ViewsThe views on your marker can be found on the right top corner of the Marker Icon. You could also find them in the 3 dots on the top right corner of the Marker Icon. Marker views are the number of times your marker has been clicked upon to view the AR Experience.
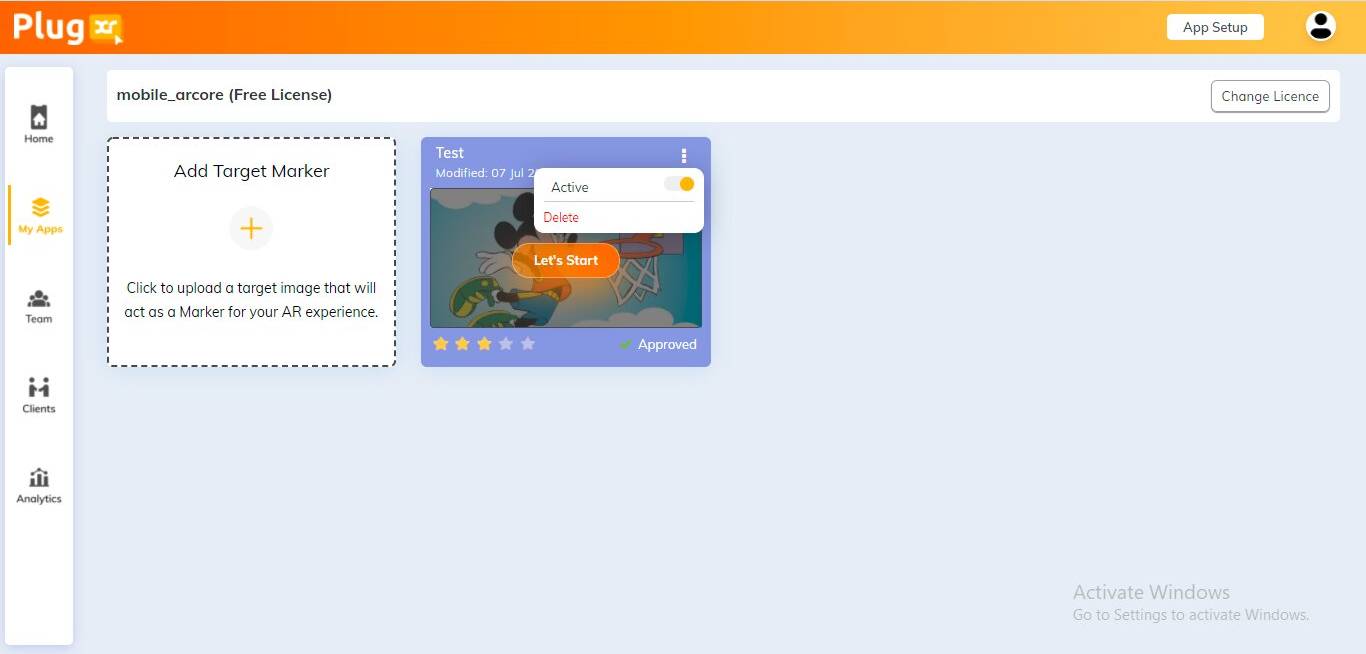
Privacy SettingControl the access of your Marker by clicking on the 3 dots on the top right corner of the Marker Icon. Your Marker is Private until you don’t tick on the box provided to make it Public.
Active/InactiveActivate or Deactivate your project by clicking on the 3 dots on the top right corner of the Marker Icon and clicking the slide bar beside the ‘Active’ option.
DeleteClick on the 3 dots on the top right corner of the Marker Icon and click on ‘Delete’ and ‘Confirm’ to delete the entire Project along with content.
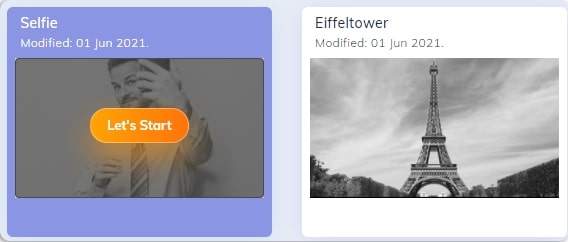
Let’s startBy clicking on the “Let’s Start” icon on the marker, you will be redirected to the grid where you can start creating your Augmented Reality experiences upon the Marker.
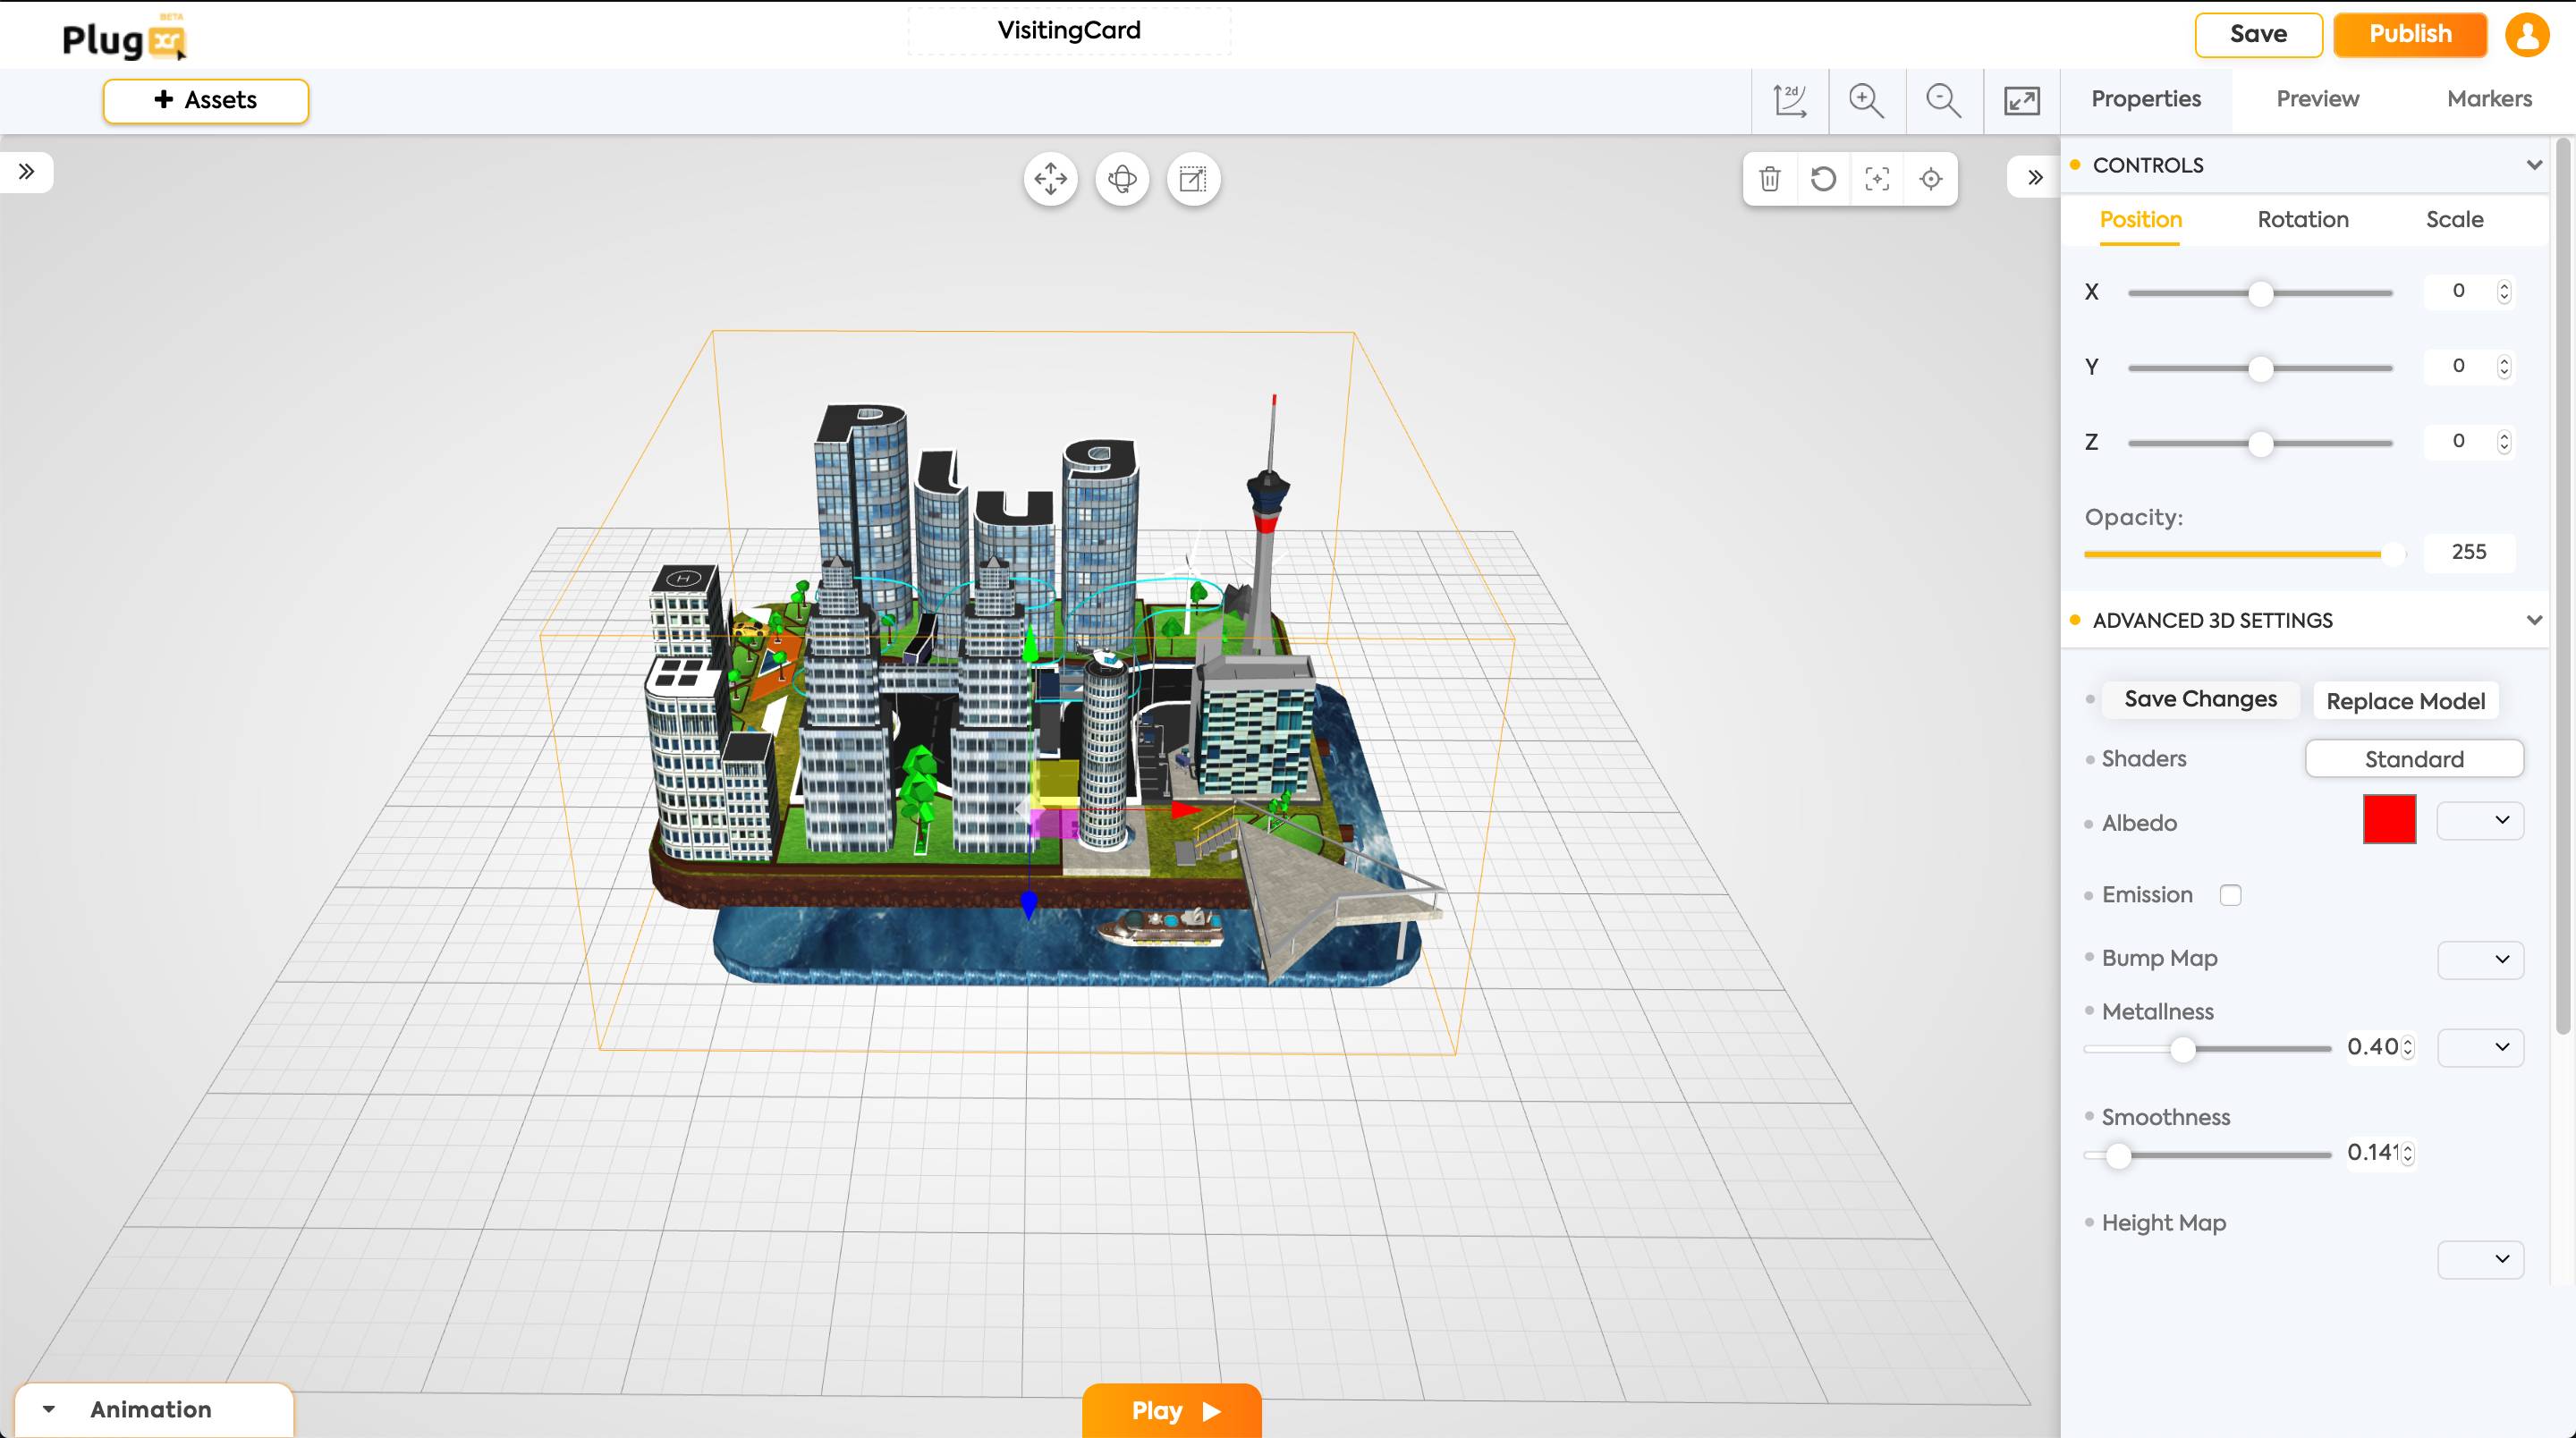
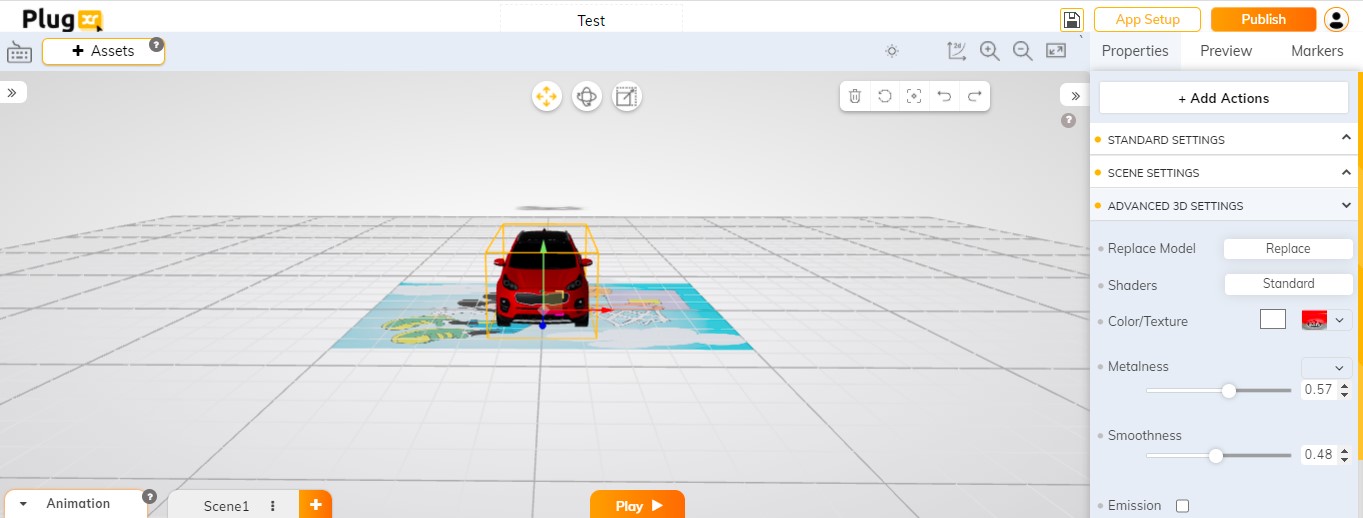
Grid View (add content)
Once the marker is successfully uploaded, you can be redirected to the grid. The grid is where you can build your AR Experience that will be shown when you scan the above-uploaded Marker. Once you have created an AR Experience in the grid, click on “Save” on the right-top corner of the grid to save your AR Experience. Now click on “Publish” to publish your AR Experience in the PlugXR GO App.
You would have successfully uploaded your AR Experience in the PlugXR App. To view the experience, download PlugXR GO App from Play Store or App Store and log in with your credentials. Click on the “Developer” option which is on the right side of the camera to find your AR App. For others to view your Marker, kindly set your Marker to Public in the Marker Settings.
Existing App Integration
The process to integrate the AR Experience created on the PlugXR platform into an existing application is mentioned below. Note that the below-mentioned process can be carried out by a developer or with a developer’s support.
- Android (Check the Instructions at Github))
-
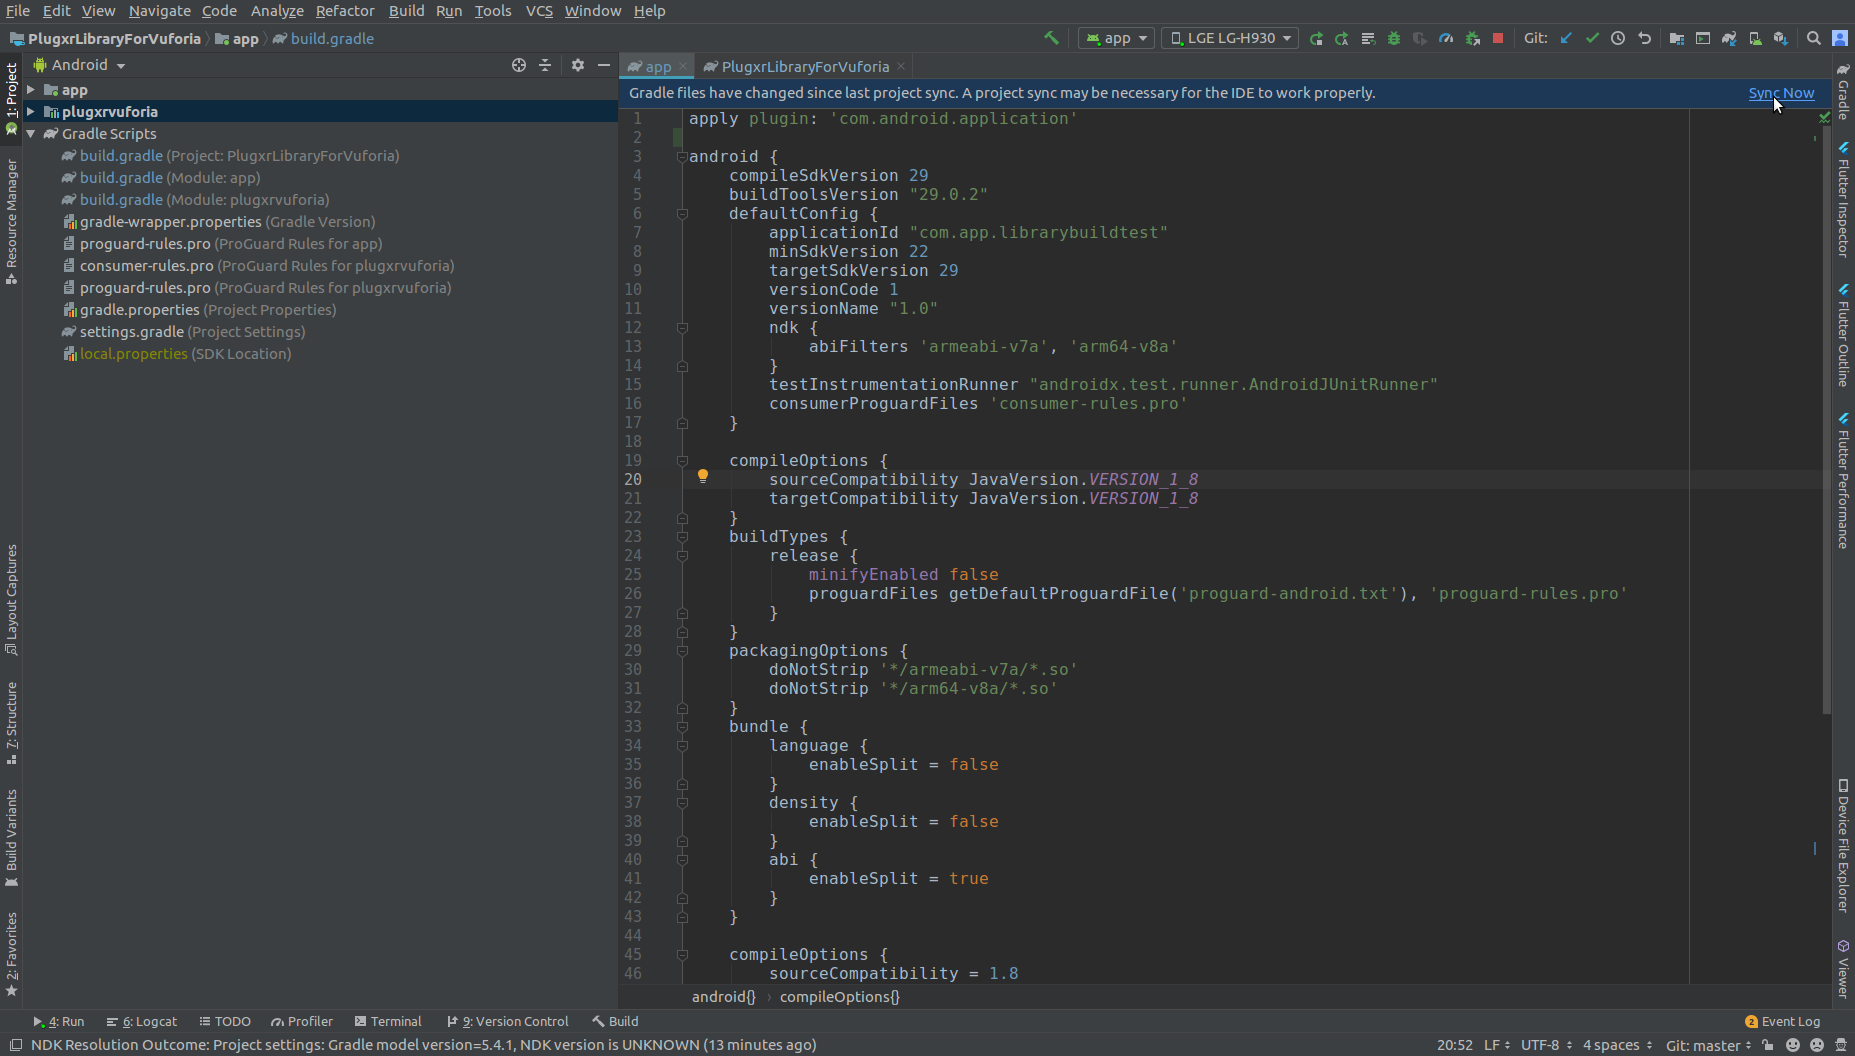
Create project or Open existing android project in android studio
Make sure your project has following versions
minSdkVersion: 22
targetSdkVersion: >=28
gradle version: 3.4.2
-
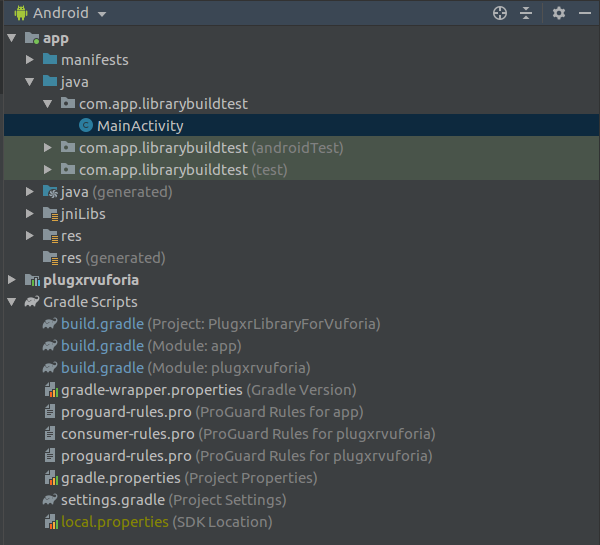
Clone plugxr-vuforia-library-android library
git clone https://github.com/plugxr/plugxr-vuforia-library-android.git -
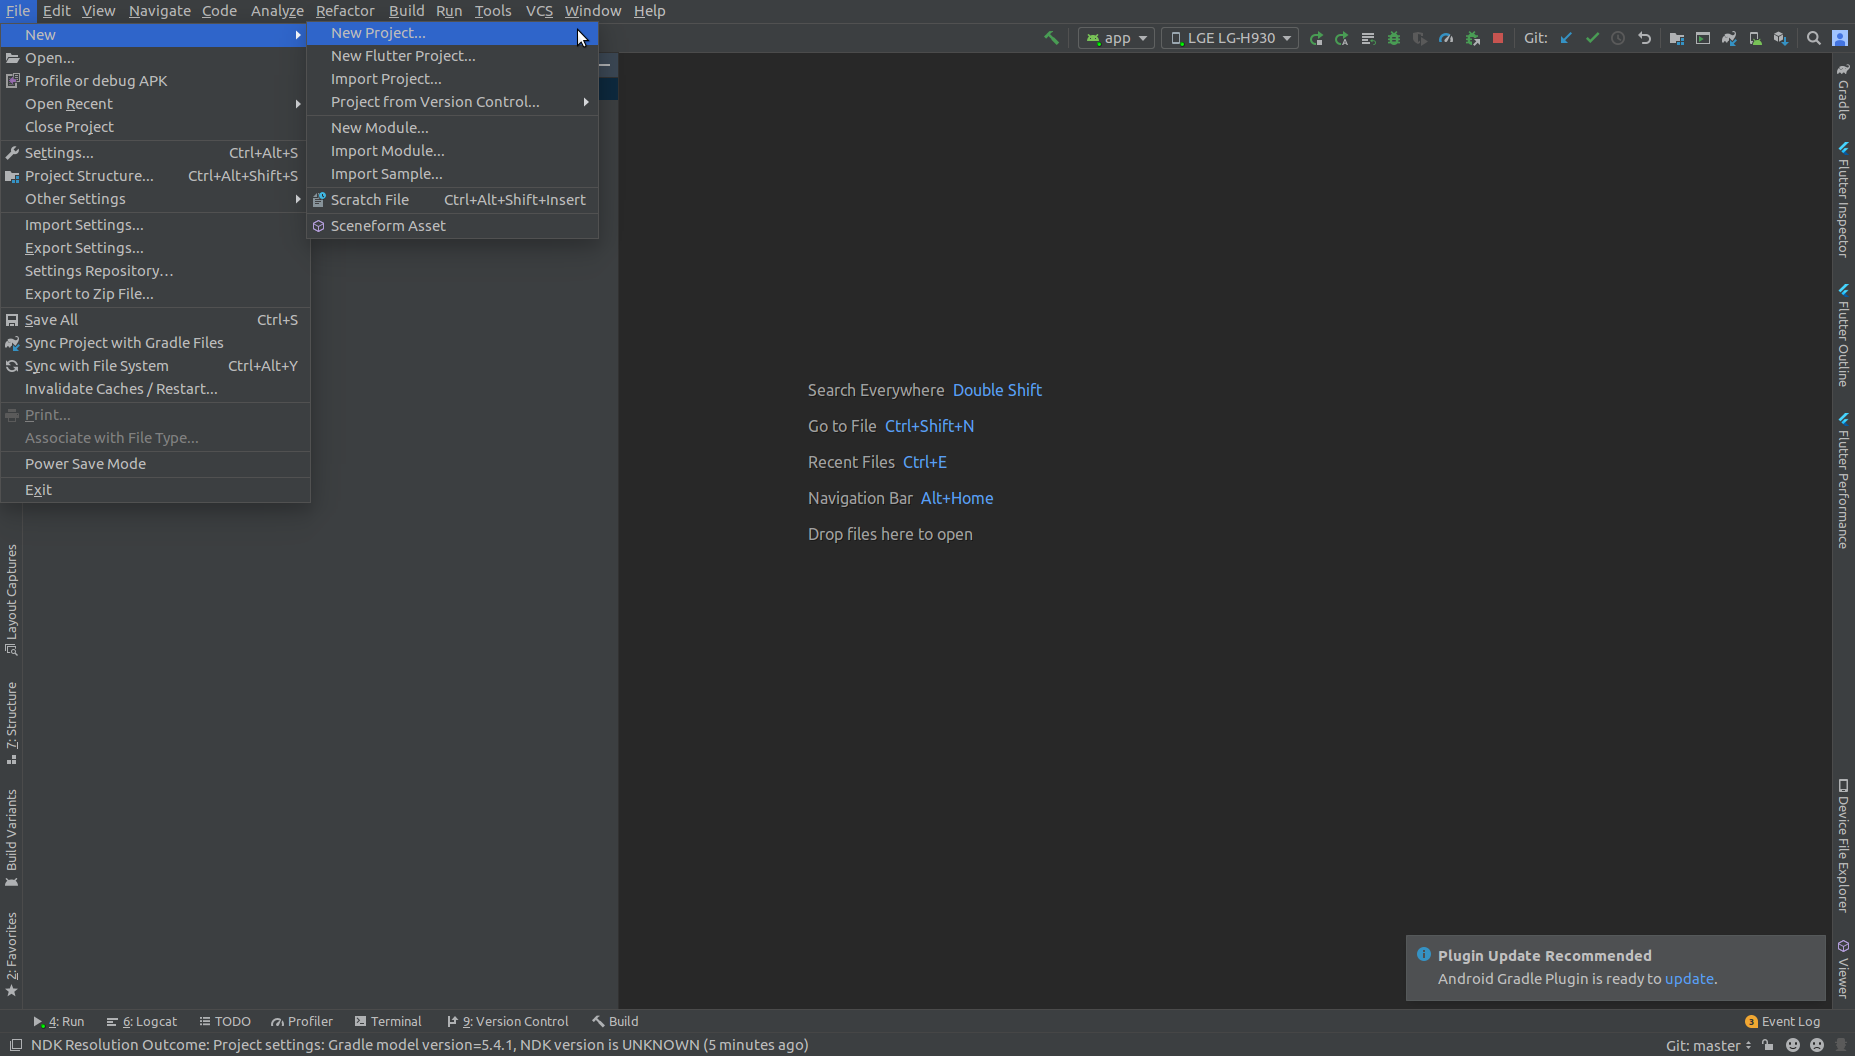
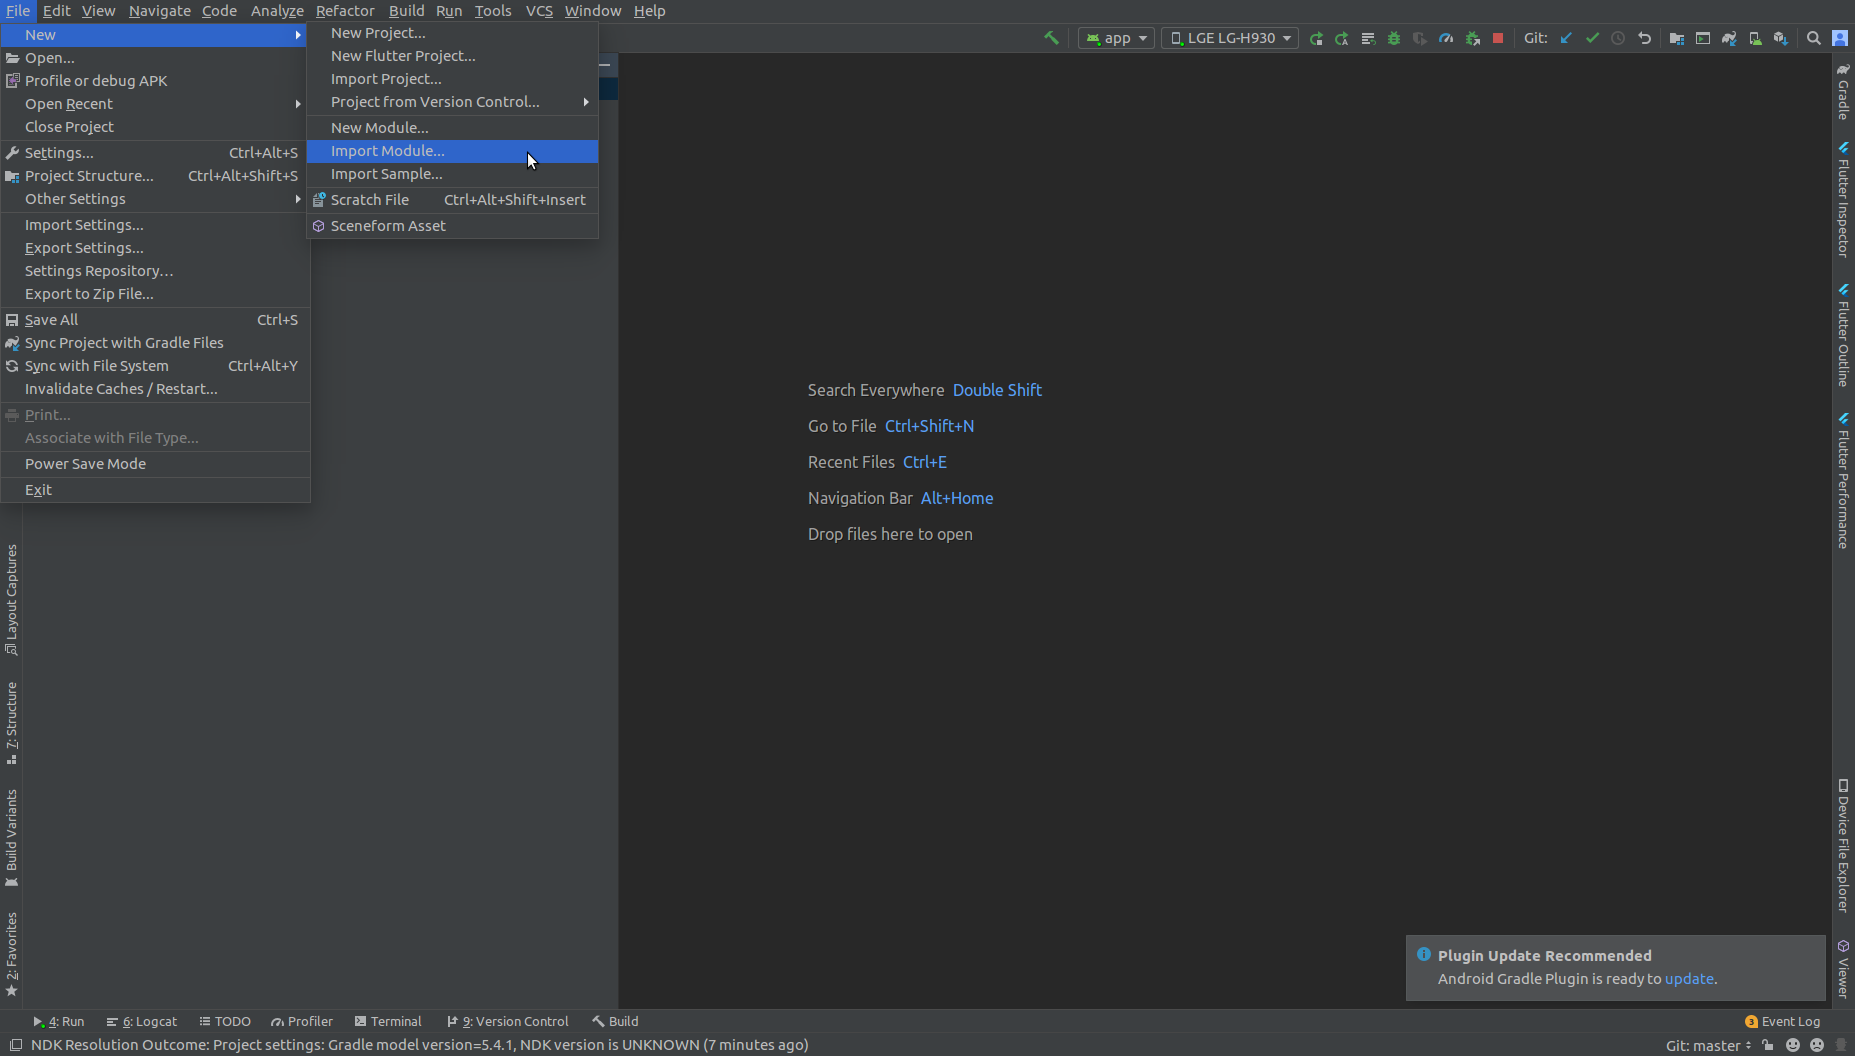
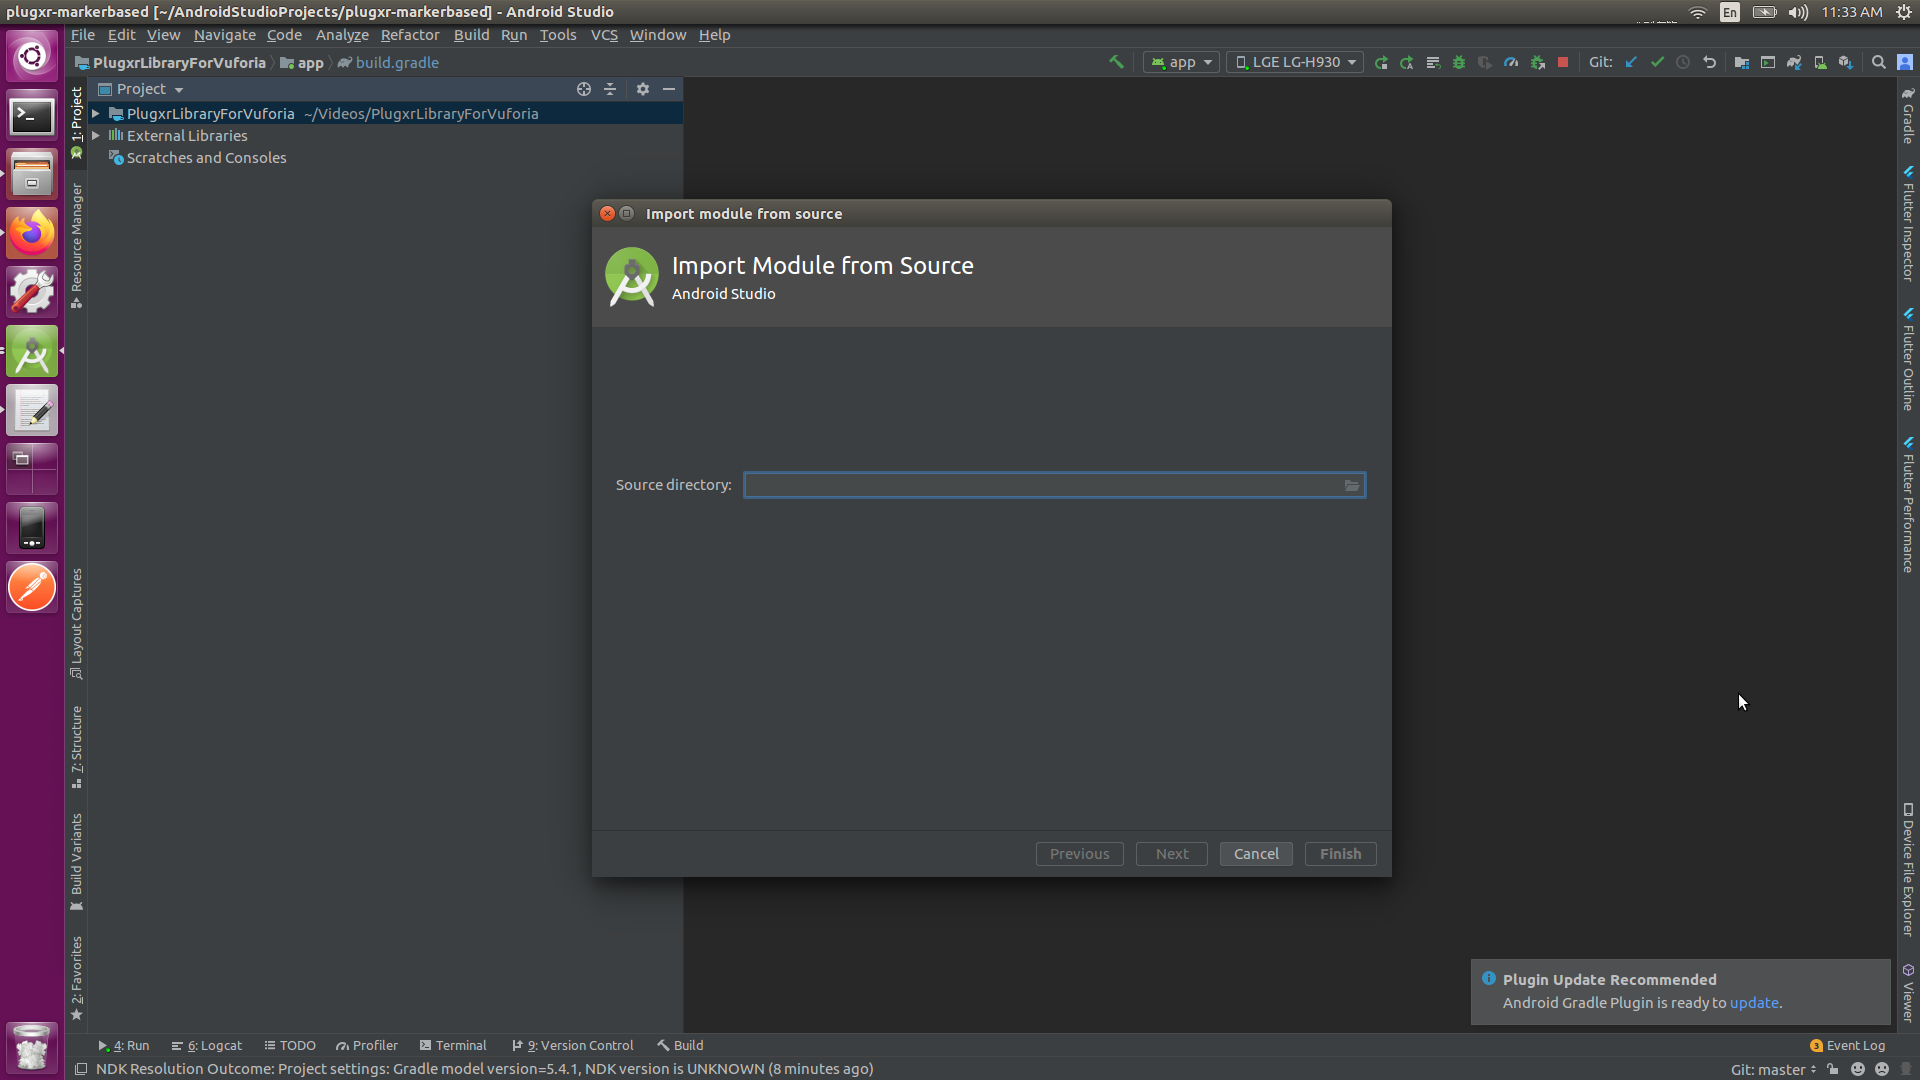
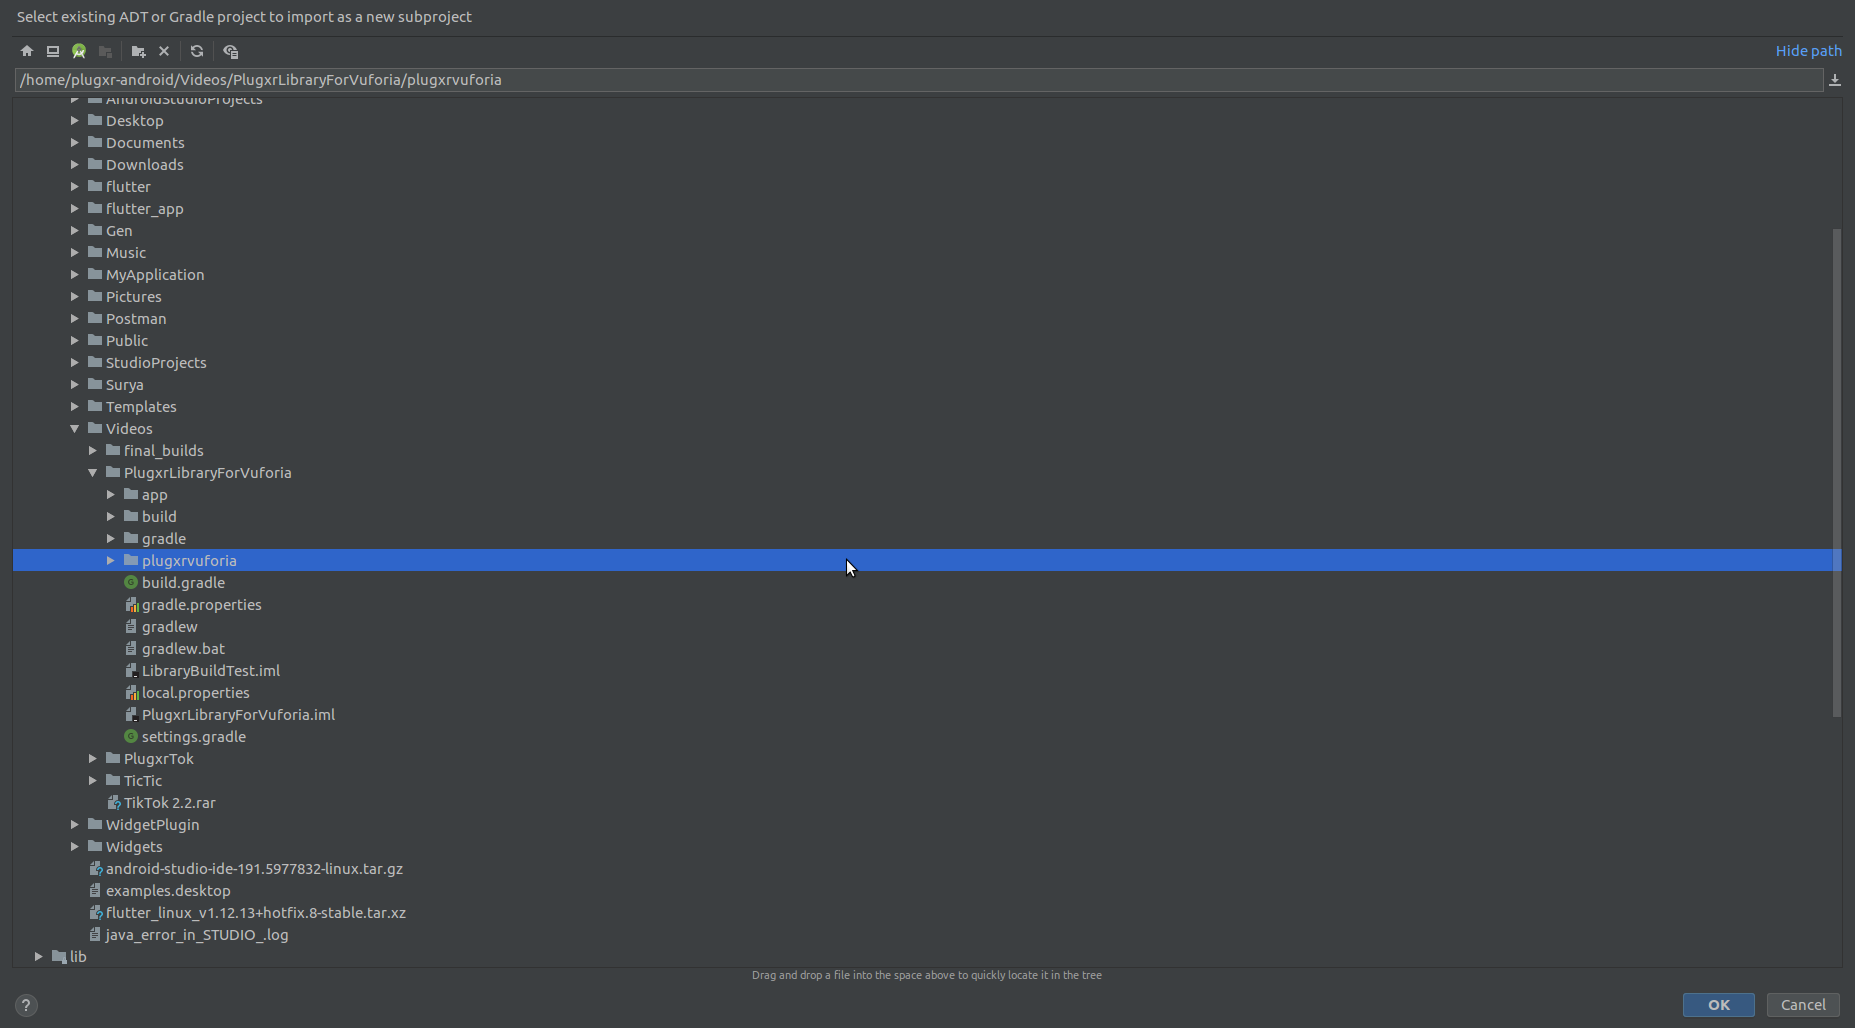
Click on File -> New -> Import Module. Then select plugxr-vuforia-library-android as module which is cloned in step 2.
-
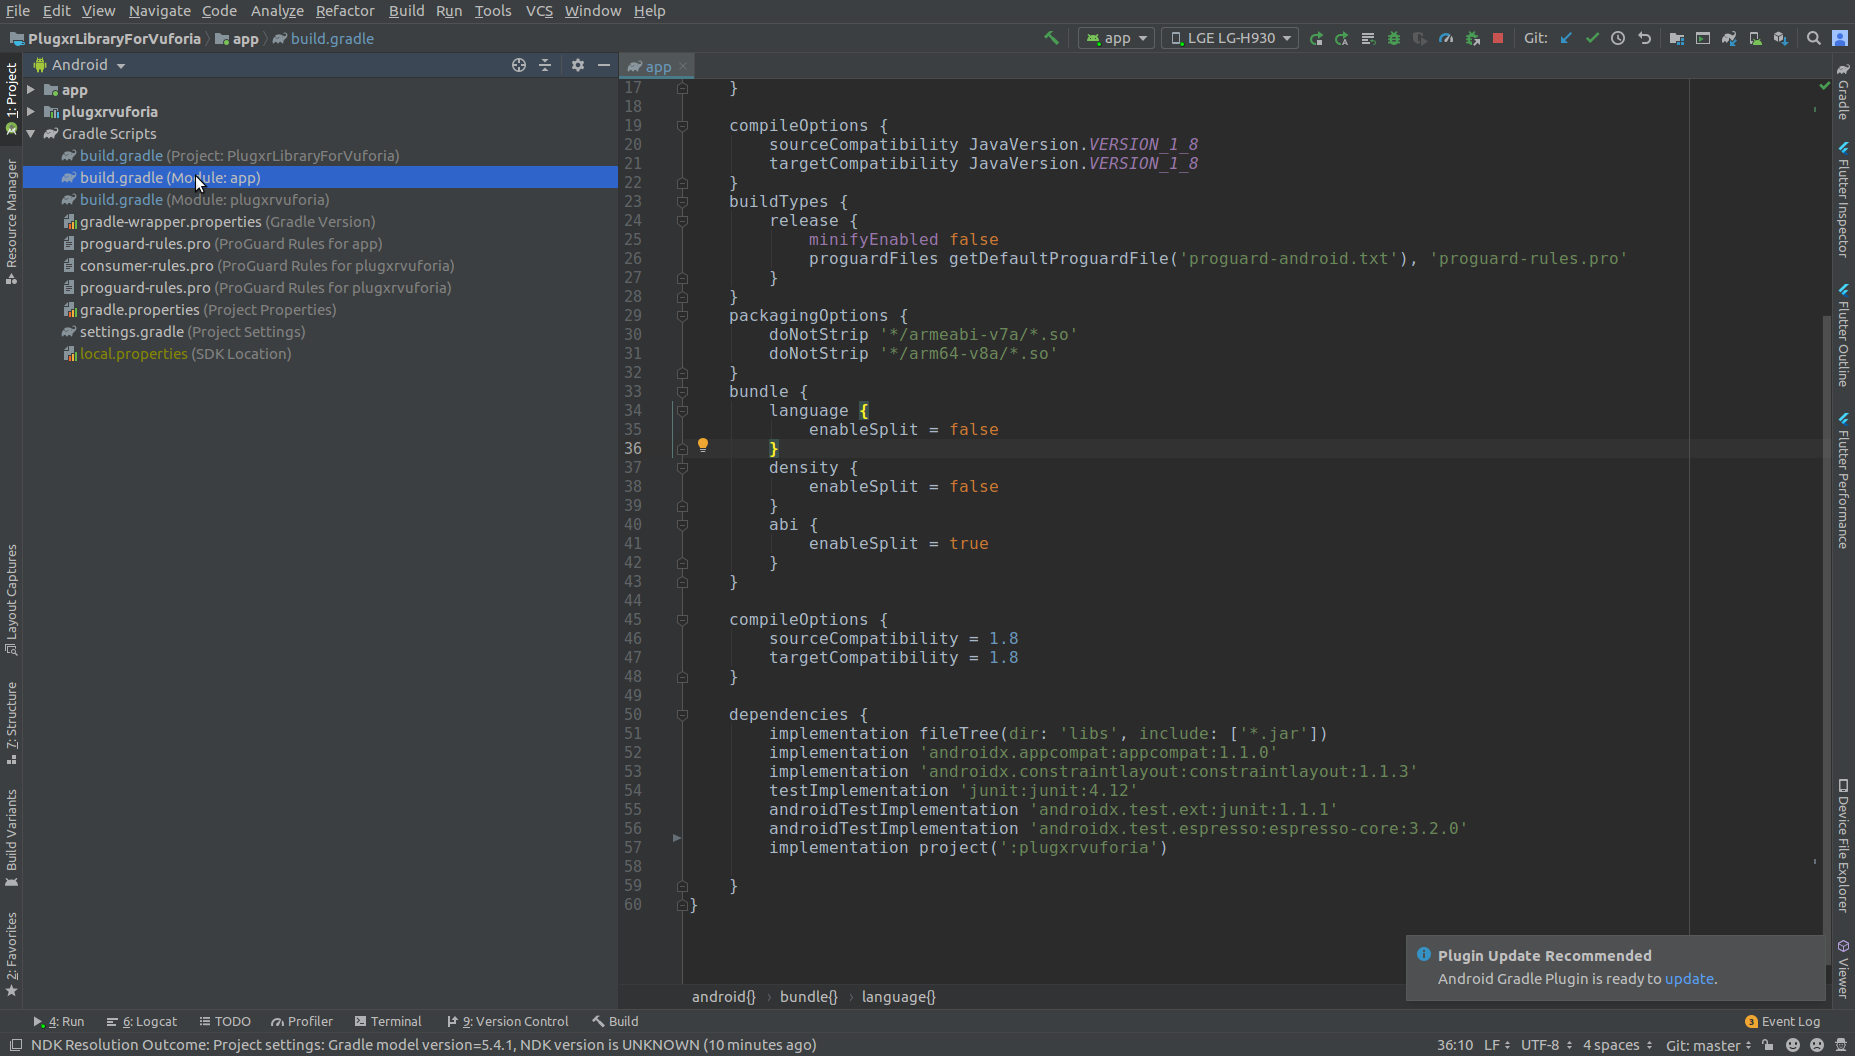
Open your app build.gradle and place below code in dependencies section.
implementation project(':plugxr-vuforia-library-android')
-
Add below lines in project build.gradle module under allprojects module
                            flatDir {
                              dirs project(':plugxr-vuforia-library-android').file('libs')
                            }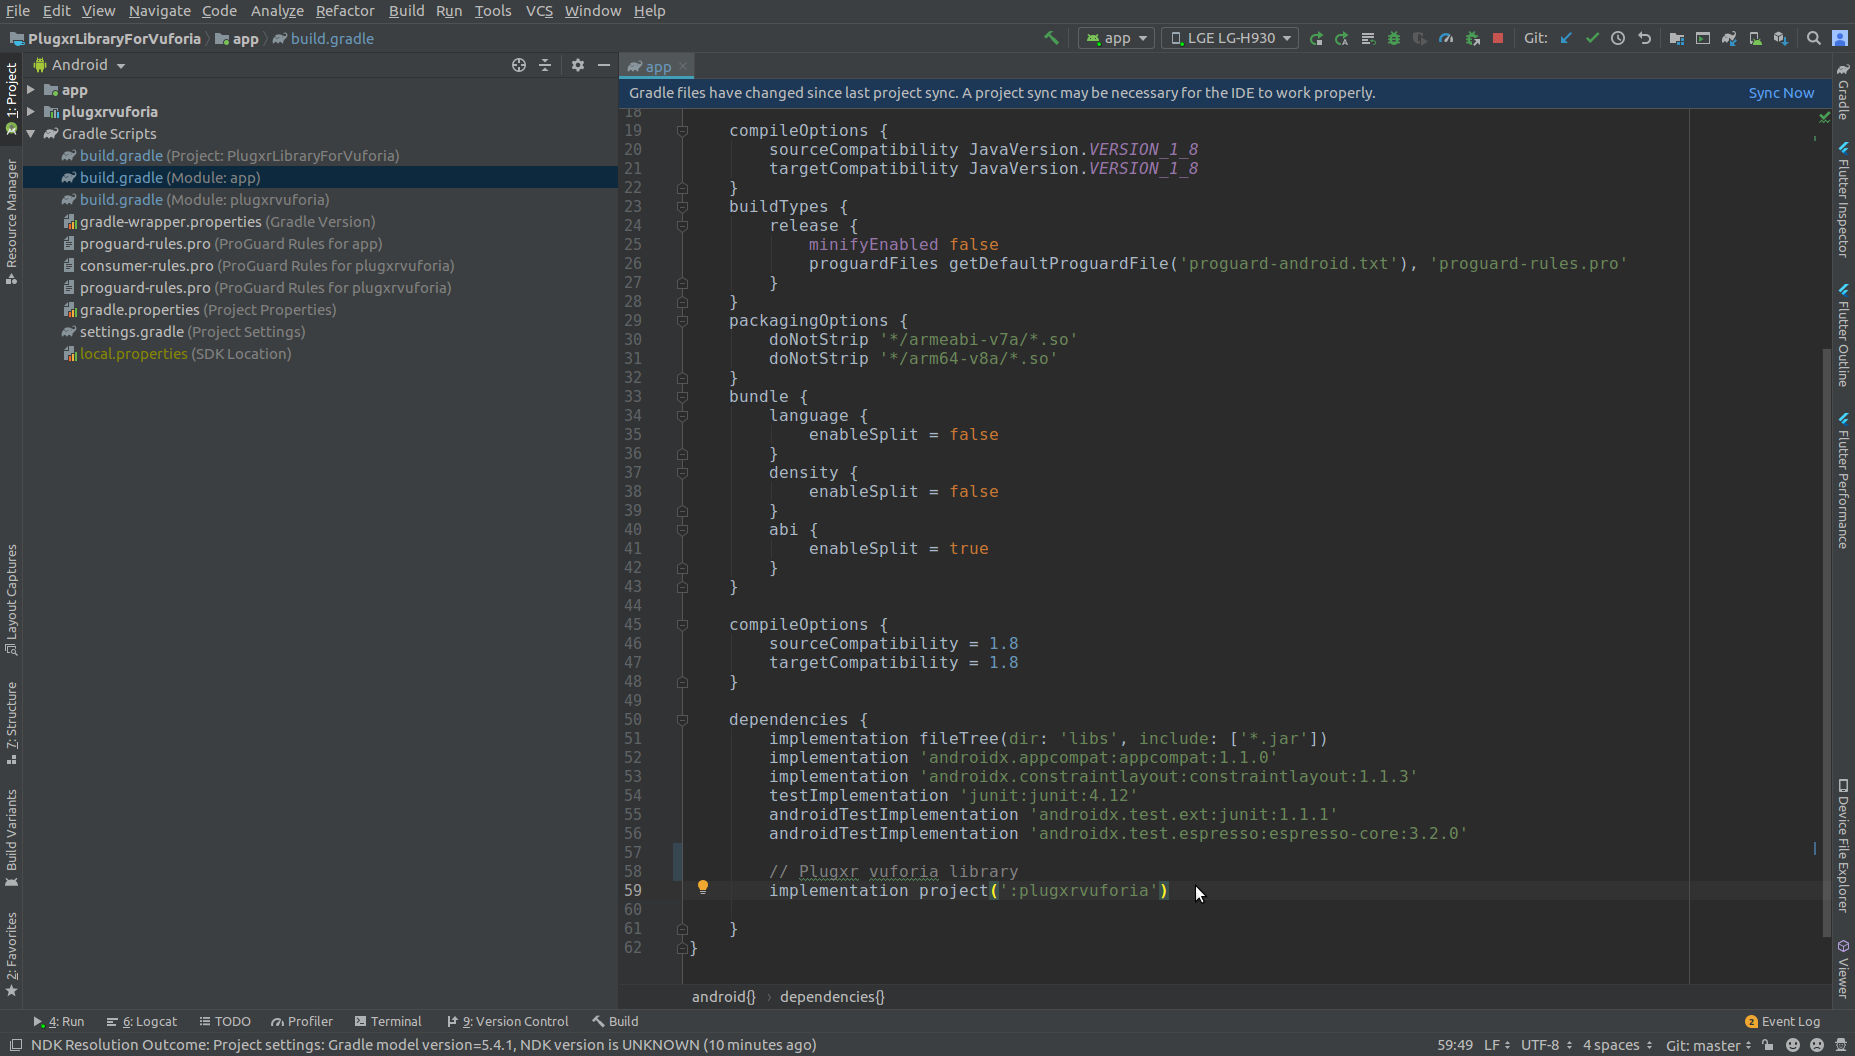
-
Now Sync your project with gradle files
-
Add Permissions to your app AndroidManifest.xml file.
<uses-permission android:name="android.permission.INTERNET"/>
<uses-permission android:name="android.permission.ACCESS_NETWORK_STATE"/>
<uses-permission android:name="android.permission.ACCESS_FINE_LOCATION"/>
<uses-permission android:name="android.permission.CAMERA"/>
<uses-permission android:name="android.permission.MODIFY_AUDIO_SETTINGS"/>
<uses-permission android:name="android.permission.WRITE_EXTERNAL_STORAGE"/>
<uses-permission android:name="android.permission.READ_PHONE_STATE"/>
<uses-permission android:name="android.permission.READ_EXTERNAL_STORAGE"/>

-
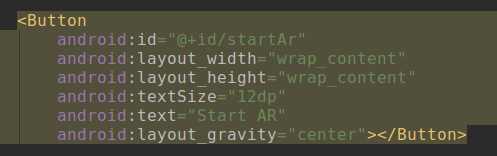
Now open your activity_main.xml file and create button
<Button
android:id="@+id/arscene"
android:layout_width="wrap_content"
android:layout_height="wrap_content"
android:text="AR SCENE"
android:layout_gravity="center"/>
-
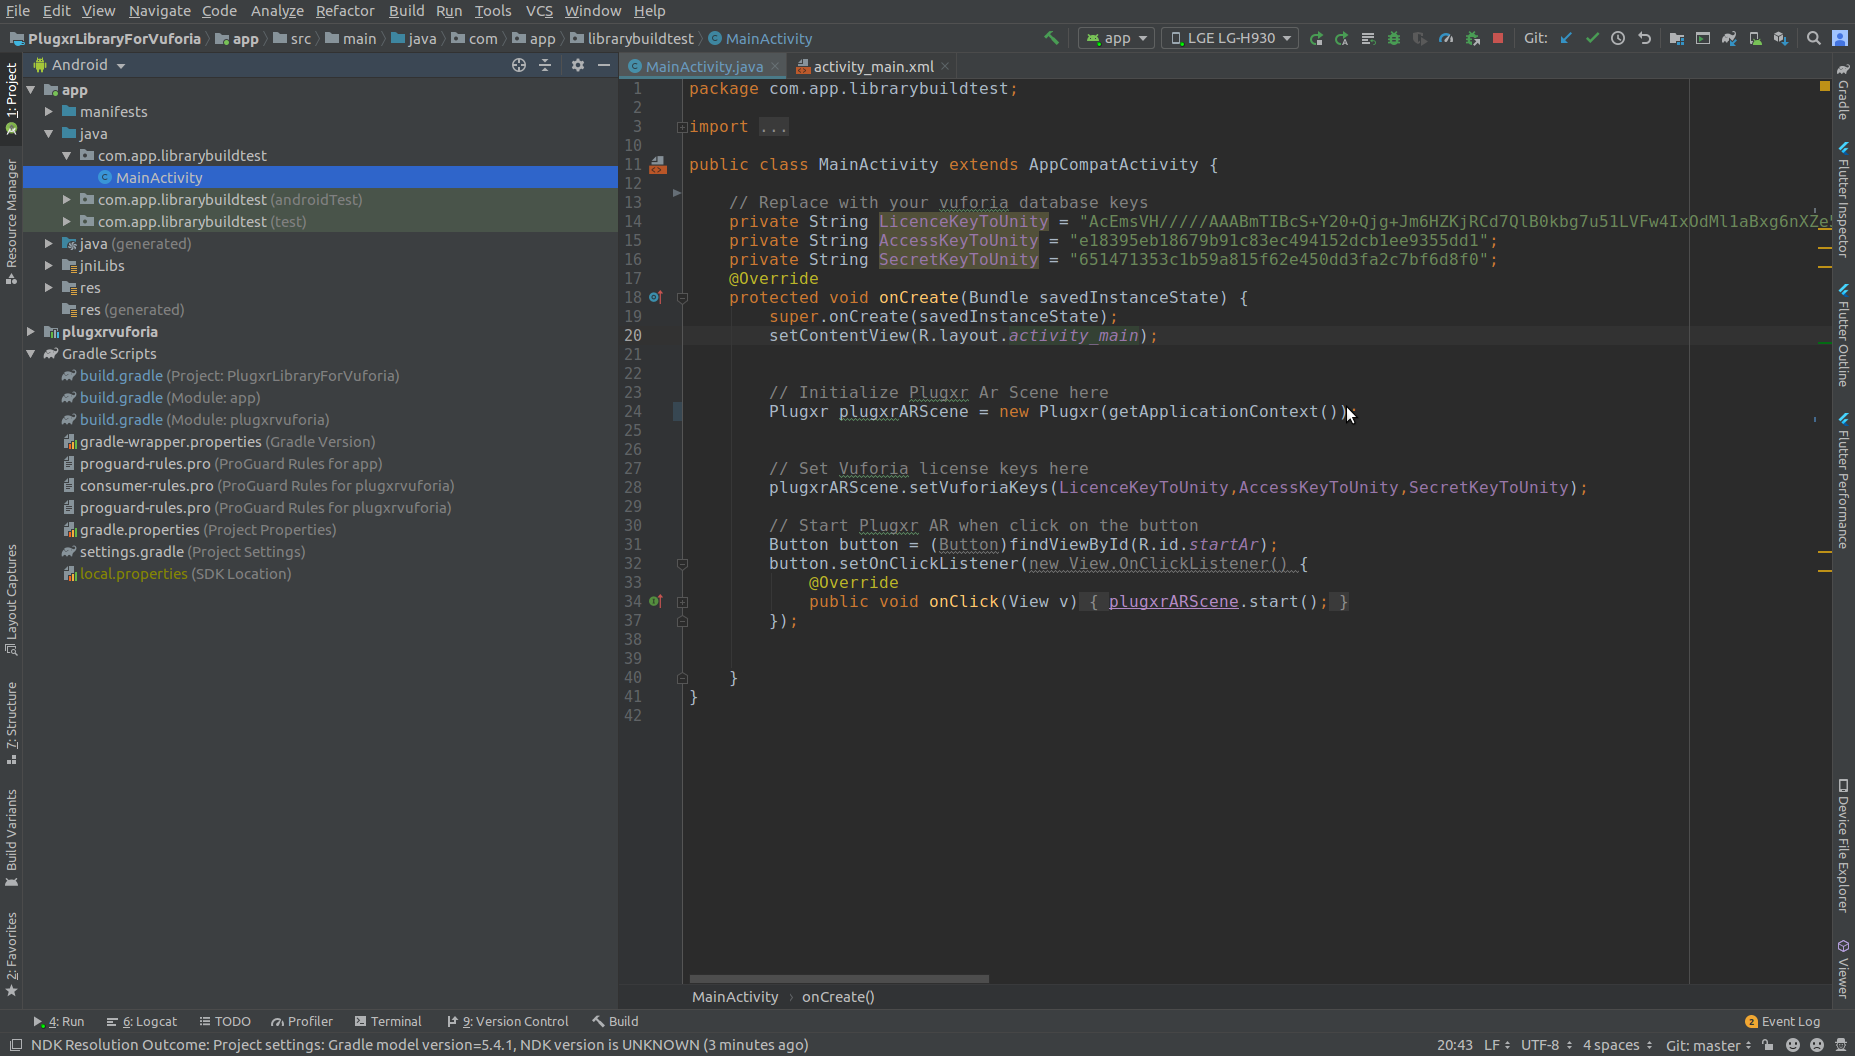
Initialize button in your MainActivity.java file and give click event to button And call PlugXR AR Scene
                            // Initialize Plugxr Ar Scene here
                            Plugxr plugxrARScene = new Plugxr(getApplicationContext());
                            // Set Vuforia license keys here
                            plugxrARScene.setVuforiaKeys(licenceKeyToUnity,accessKeyToUnity,secretKeyToUnity);
                            // Start Plugxr AR when click on the button
                            Button button = (Button)findViewById(R.id.startAr);
                            button.setOnClickListener(new View.OnClickListener() {
                              @Override
                              public void onClick(View v) {
                                plugxrARScene.start();
                              }
                            });


-
Run Application
NOTE: If you are facing any issues, Please raise a issue here. We will issues as soon as possible
-
- iOS (Check the Instructions at Github)
Setup Project in Swift
- Open your Xcode project (New/Existed)
- Add the framework folder to your Xcode project folder.
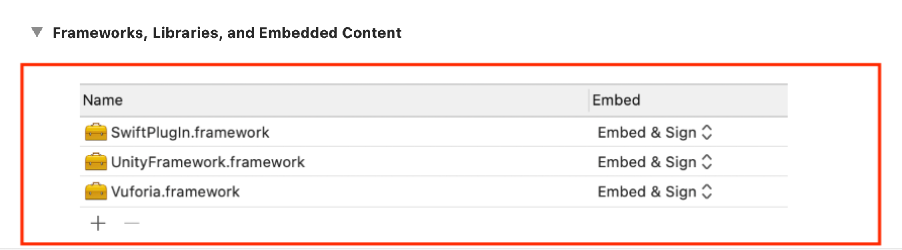
- Open your project in Xcode , under Project -> General -> Frameworks and Libraries. Click on + button to add Vuforia Framework , UnityFramework and SwiftPlugIn And set all frameworks to Embed & Sign.
- Open your File from where you want to open Unity window (Viewcontroller.Swift).
- Add import SwiftPlugIn in your view controller class.
import SwiftPlugIn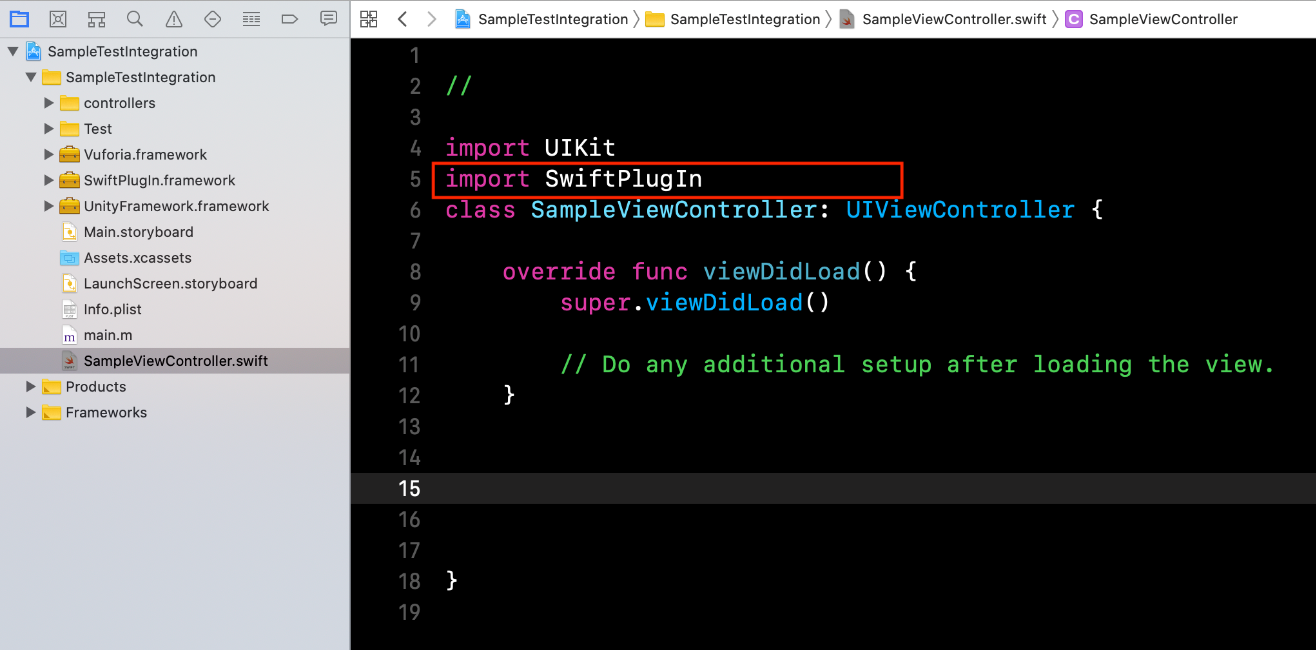
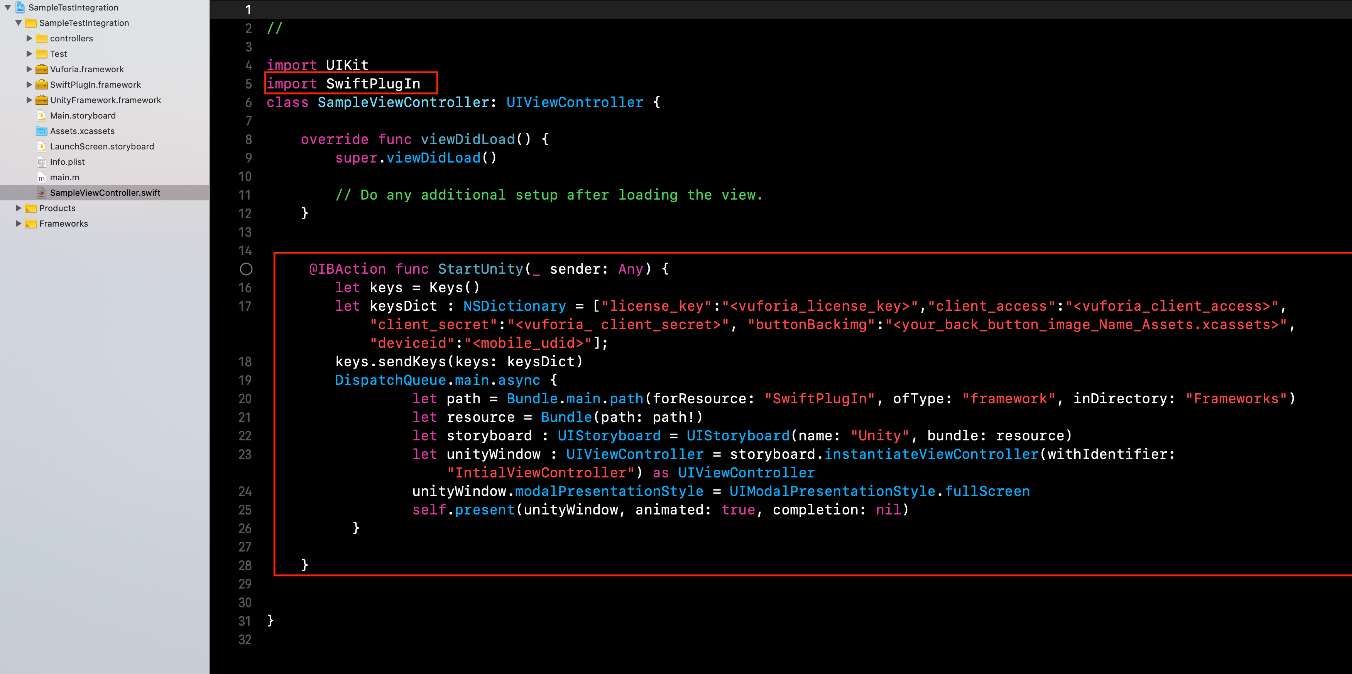
- Initialise Keys class in ViewController. Place your Vuforia keys, back button image name from your Assets.xcassets and unique device ID in keysDict.
Note : All Keys and values are Required and should be proper
let keys = Keys()
let keysDict : NSDictionary = ["license_key":"","client_access":" ", "client_secret":" ", "buttonBackimg":" ", "deviceid":" "]; keys.sendKeys(keys: keysDict) - Place below code in your button action to navigate to unity window.
                            DispatchQueue.main.async {

                            let path = Bundle.main.path(forResource: "SwiftPlugIn", ofType: "framework", inDirectory: "Frameworks")

                            let resource = Bundle(path: path!)

                            let storyboard : UIStoryboard = UIStoryboard(name: "Unity", bundle: resource)

                            let unityWindow : UIViewController = storyboard.instantiateViewController(withIdentifier: "IntialViewController") as UIViewController
                            unityWindow.modalPresentationStyle = UIModalPresentationStyle.fullScreen
                            self.present(unityWindow, animated: true, completion: nil)

                            }
Mobile AR Cloud (Image Targets)
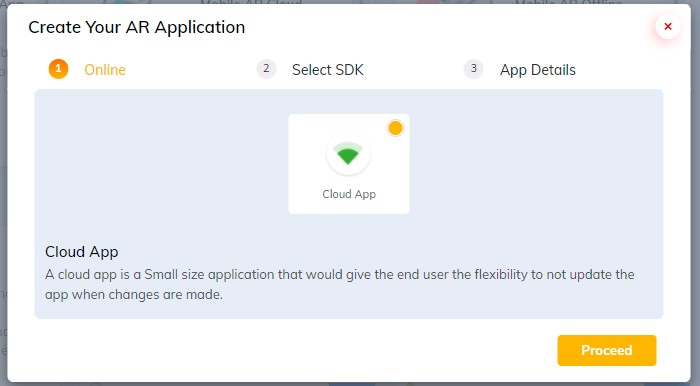
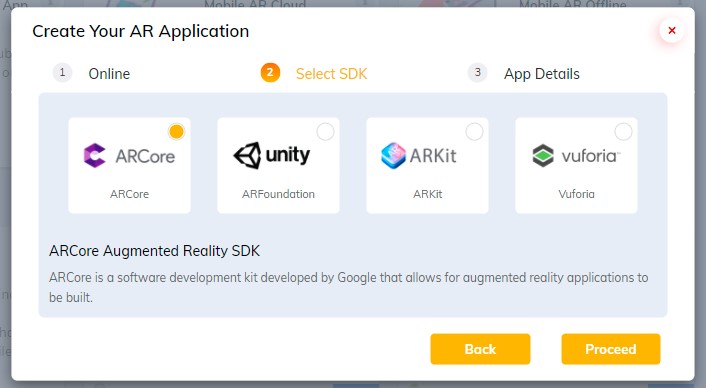
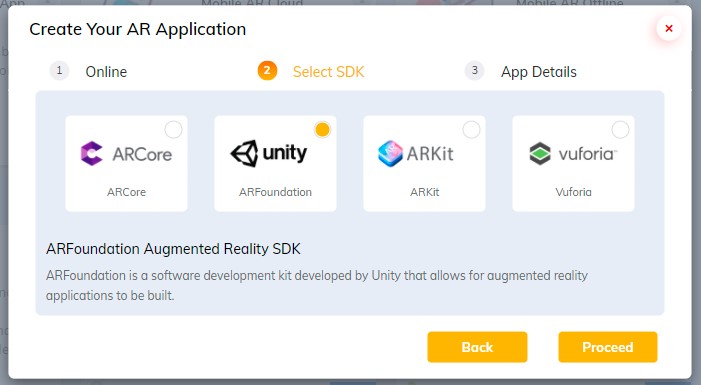
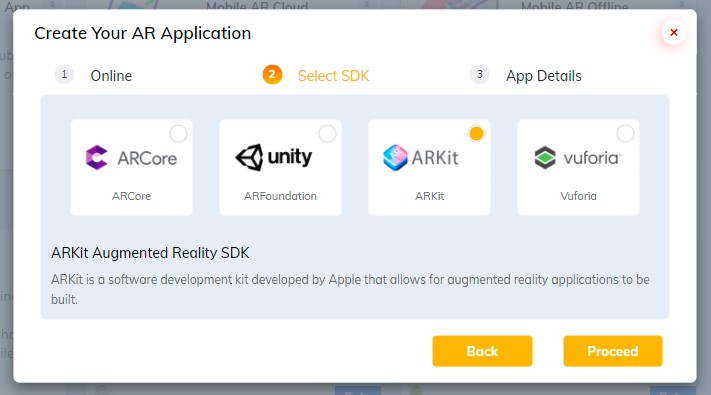
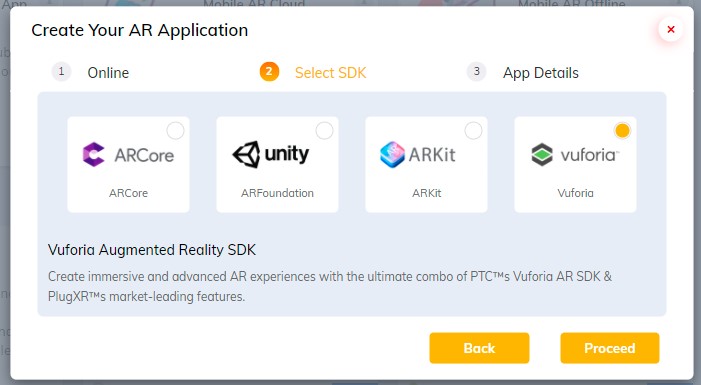
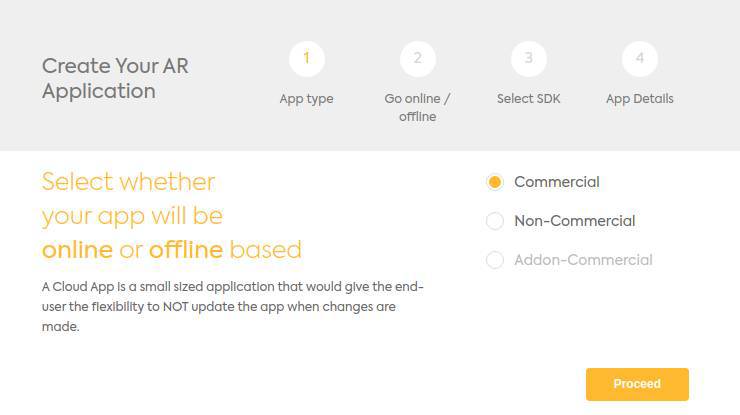
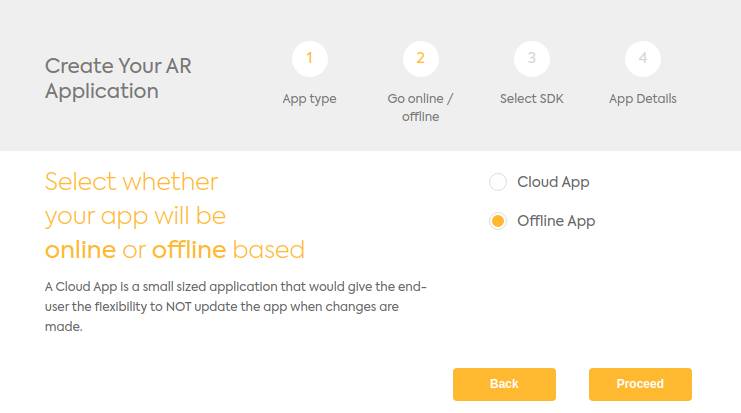
Below mentioned is the process of creating AR Experiences and publishing it into its own white-labeled application on Android/iOS. Click on to “Own AR App” in the “Home” screen on the platform. A pop-up emerges where you can select the requirements of your application.
Create App
- Online
- A cloud app is a Small size application that would give the end-user the flexibility to not update the app when changes are made. In offline application, any changes made in the application the users need to download the whole application again. The prime advantage of this app is the end-users don’t need the internet once they download the application.
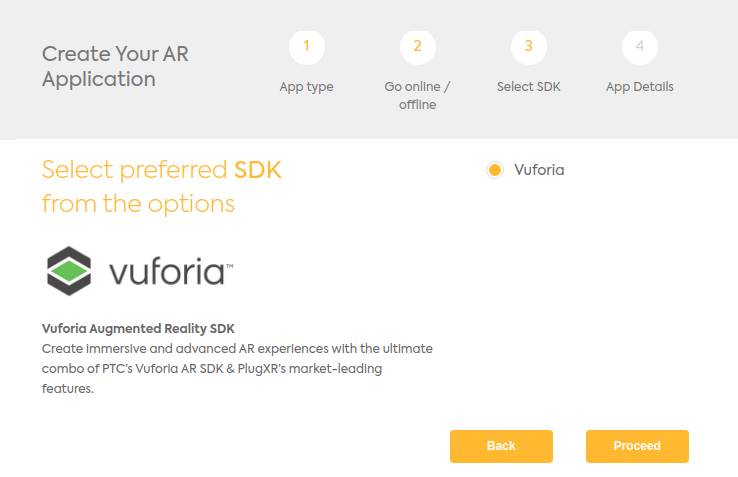
- SDK Details
- Enter the SDK license keys in the respective blanks to proceed with the creation of AR Experience. Guidelines to obtain license keys for SDK are given in a link on the bottom of the pop-up.
- Online (/Cloud) ARCore Steps:

- Online (/Cloud) ARFoundation Steps:

- Online (/Cloud) ARkit Steps:

- Online (/Cloud) VUFORIA Steps:
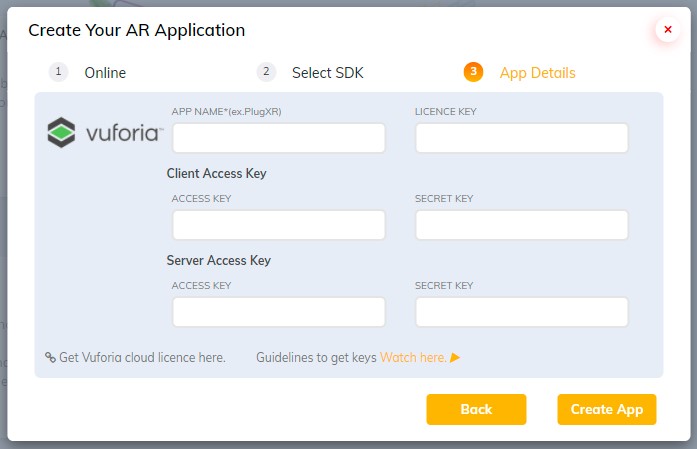 Add Access Keys (Vuforia )
- Vuforia Free Licence
- To obtain Vuforia License Keys:
- Register with Vuforia for free and provide your details
- Click on the verification link in the mail that you will receive to get access to the Vuforia developer portal.
- Click on “Get Development Key”
- The App License Key obtained can be used during the app creation on PlugXR Creator.
- Click on “Add Database” and provide database name and select “Cloud”
- Click on “Database Access Key” to get “Client and Server Access Keys”
- To obtain Vuforia License Keys:
- Purchase Premium Licence
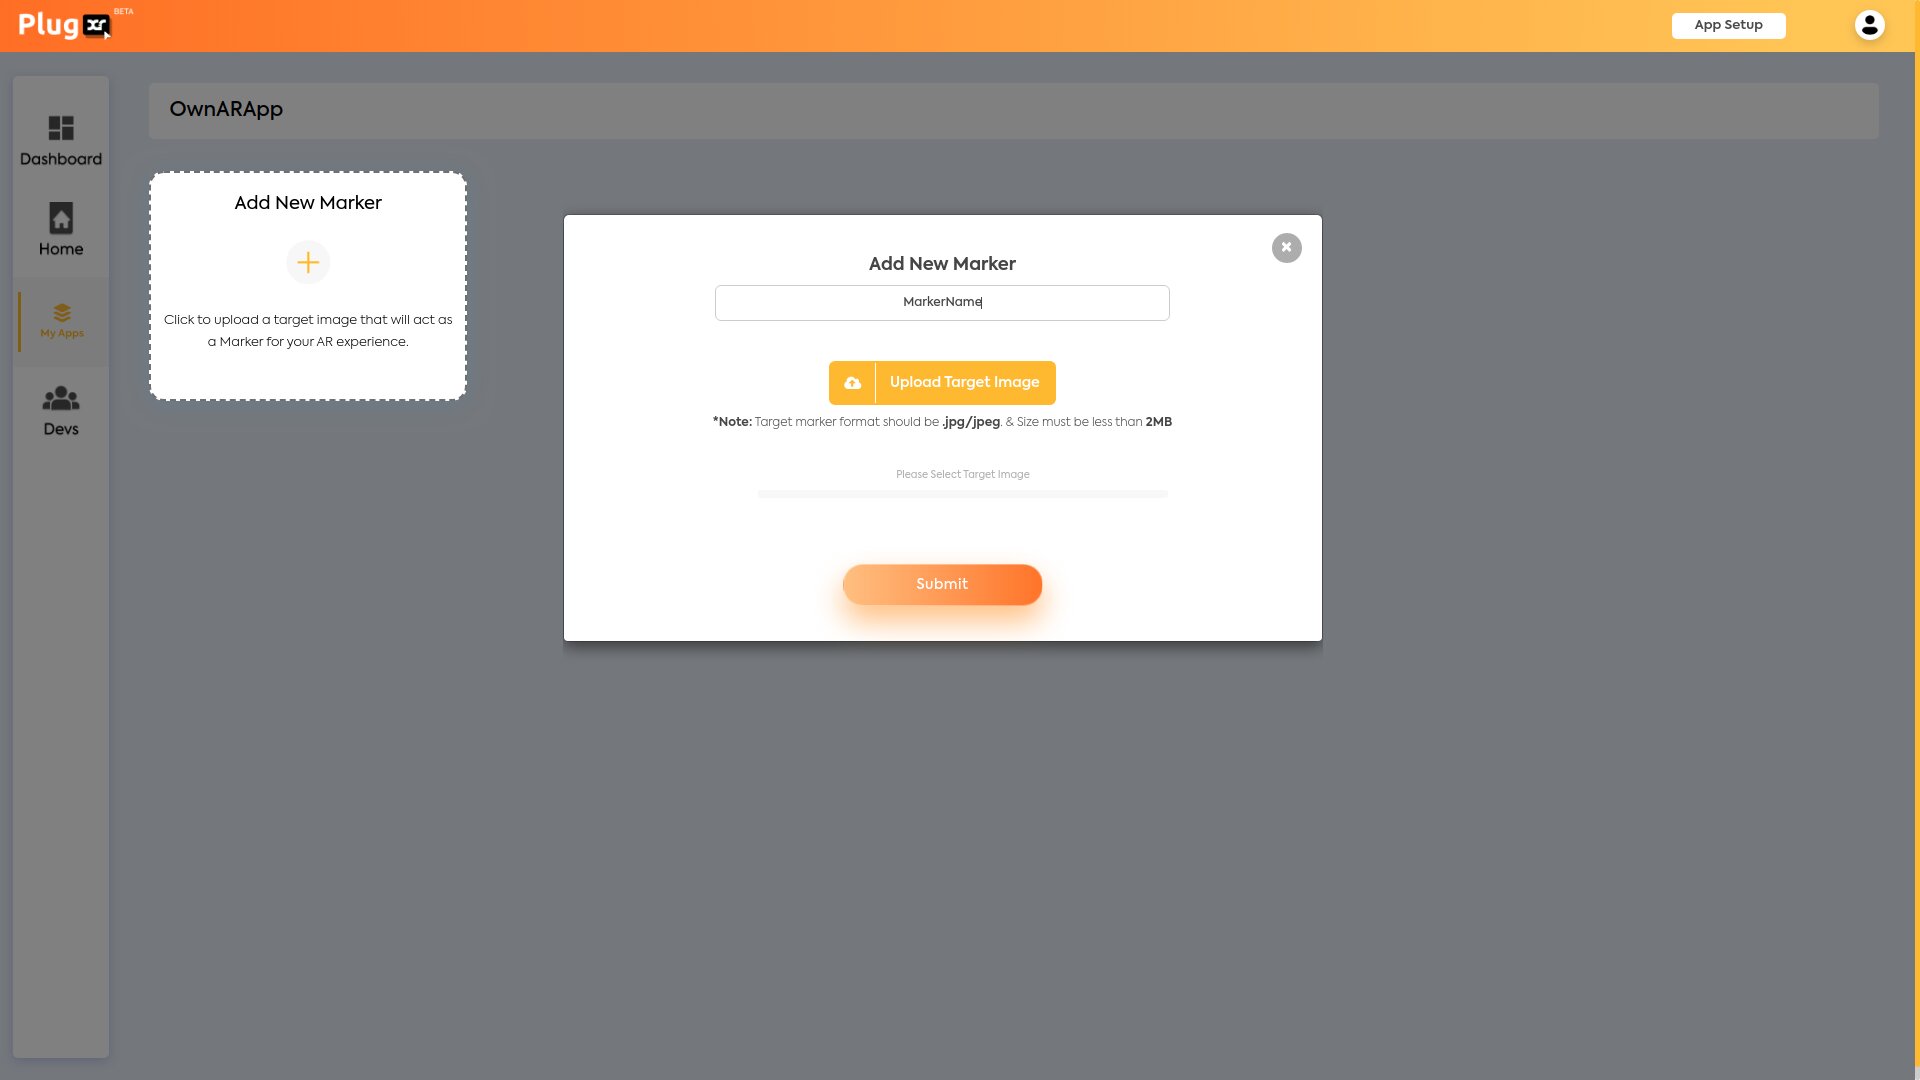
Add Marker- Click on the box that reads “Add New Marker”(A Marker is a target image which upon scanning shows the AR experience).
- Upon clicking this, a pop-up appears where you have to do the following:
- Name your Marker
- Upload the target image which is less than 2MB
- Upload target image in the .jpg or jpeg format.
- Complex images with a lot of contrast tend to work very well by making it easier for the Mobile Camera to recognize the marker. Avoid flat and monochromatic images as much as possible.
 Marker Settings
Once you have uploaded the Marker, go to “My Apps” to find your Marker under the specified section.
- Marker Rating
- The stars on the marker icon suggest how easy it is for the camera to identify your Marker. Markers with 5 ratings work the best. Complex images with a lot of contrast tend to work very well as compared to flat and monochromatic images
- Marker Views
- The views on your marker can be found on the right top corner of the Marker Icon. You could also find them in the 3 dots on the top right corner of the Marker Icon. Marker views are the number of times your marker has been clicked upon to view the AR Experience.
- Privacy Setting
- Control the access of your Marker by clicking on the 3 dots on the top right corner of the Marker Icon. Your Marker is Private until you don’t tick on the box provided to make it Public.
- Active/Inactive
- Activate or Deactivate your project by clicking on the 3 dots on the top right corner of the Marker Icon and clicking the slide bar beside the ‘Active’ option.
- Delete
- Click on the 3 dots on the top right corner of the Marker Icon and click on ‘Delete’ and ‘Confirm’ to delete the entire Project along with content.
- Let’s Start
- By clicking on the “Let’s Start” icon on the marker, you will be redirected to the grid where you can start creating your Augmented Reality experiences upon the Marker.
- Vuforia Free Licence
App Setup
Watch our tutorial on how to create an AR App here (https://youtu.be/yIanc3t3PyA)
- Android
In the top section of the App Setup page, select “Android” in the “Publish your App in” option and click on the “Development Version” option.
- Development Version
- To get Development Version in Android, enter App Name and Organisation Name in the space provided.
- Choose the Status Bar Color from the range of colors provided. Upload suitable images in the Splash Screen, App Icon, and App Logo sections provided and click “Get Android App file”. Preview the outlook of your Development version on the right side of the App Setup page.
- Visit “Download apk” after a while to find the development apk file, QR Code and Source Link.
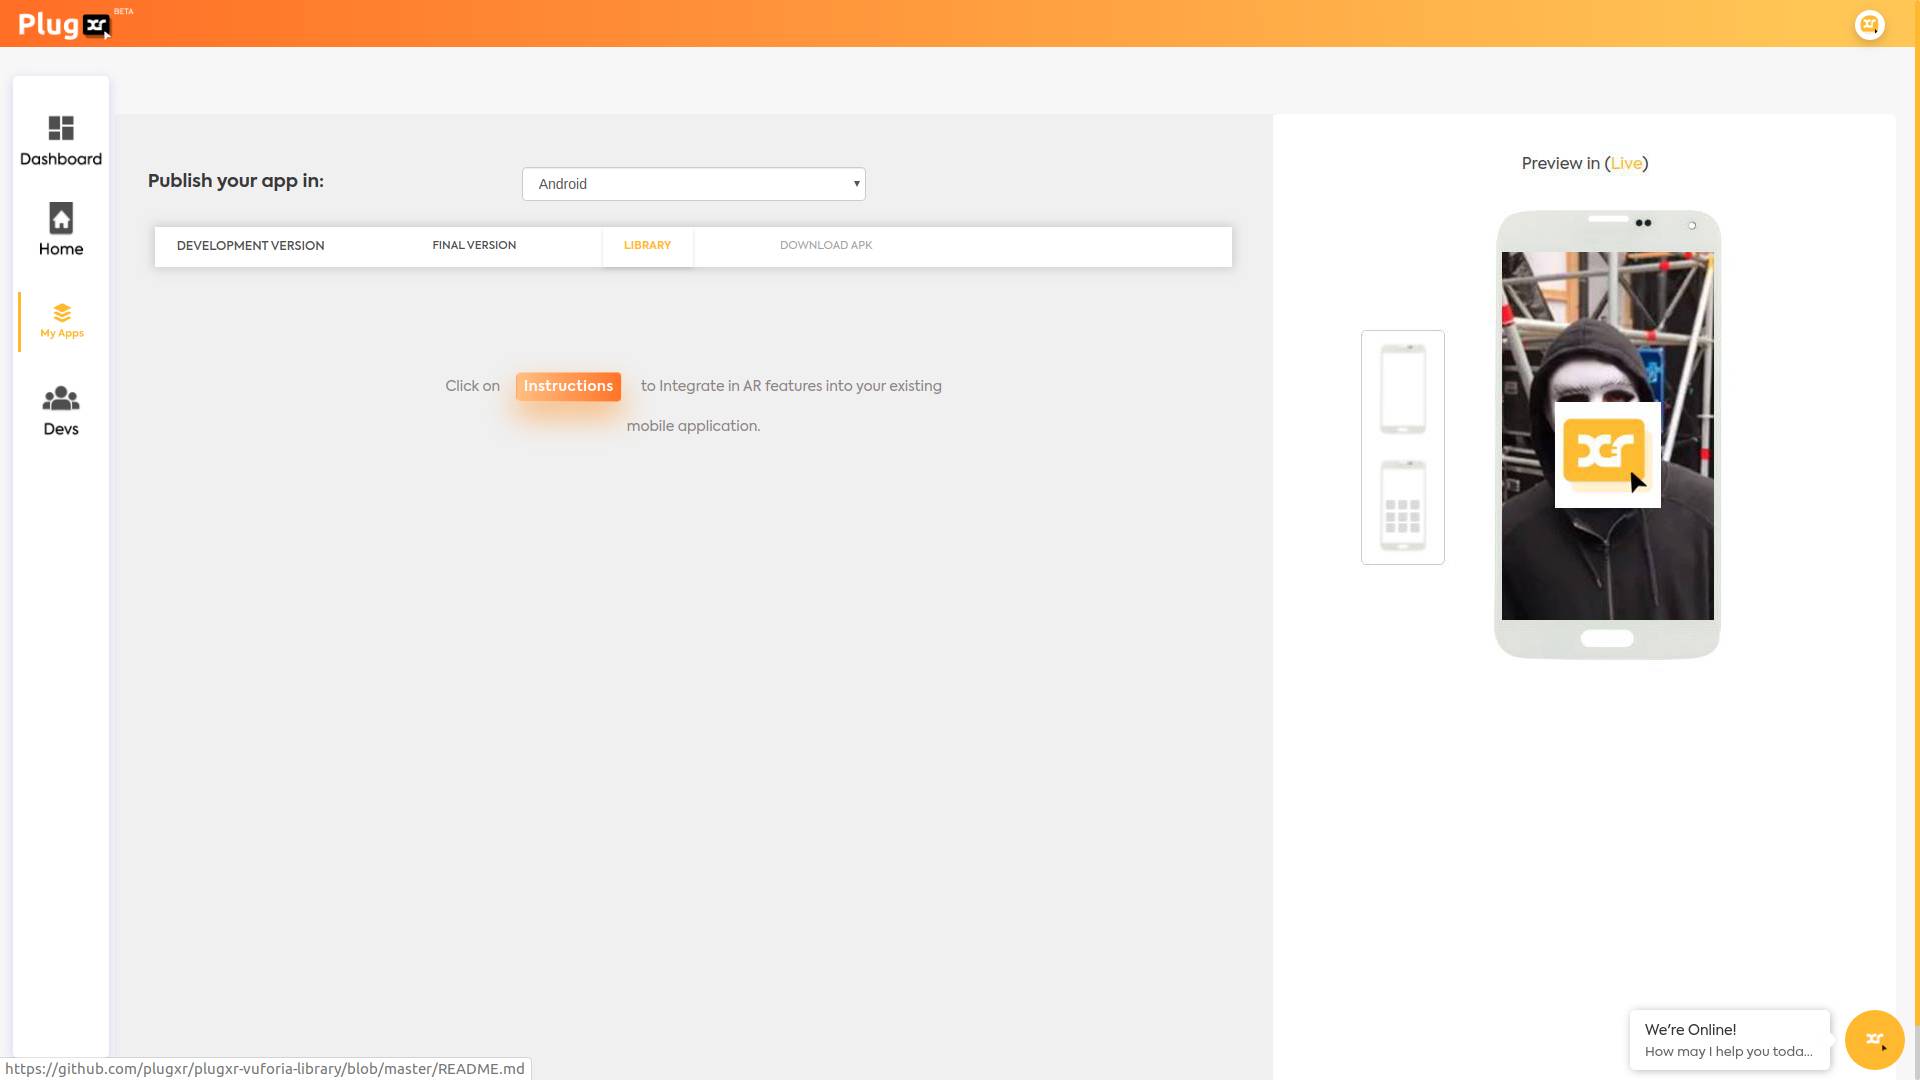
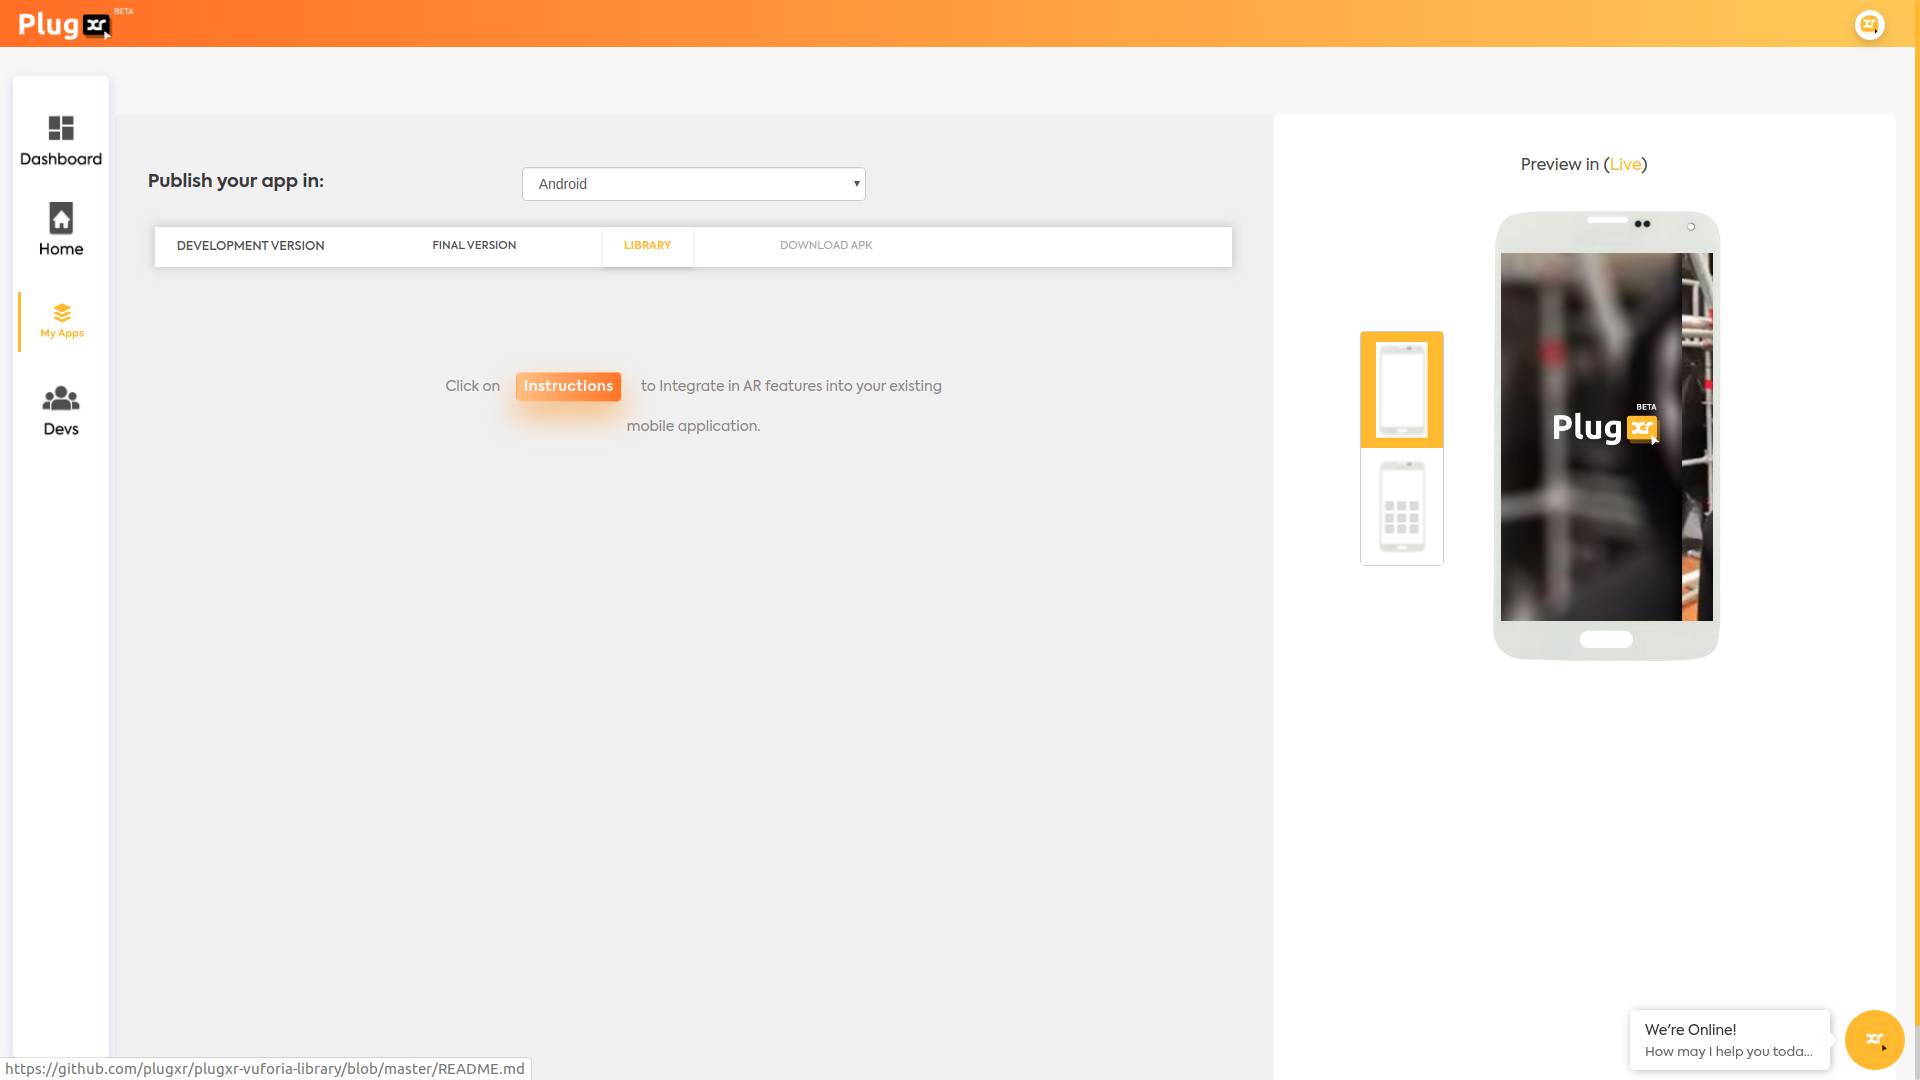
- Library
The source files available in the library will help you integrate the AR feature that you created in an existing mobile application.
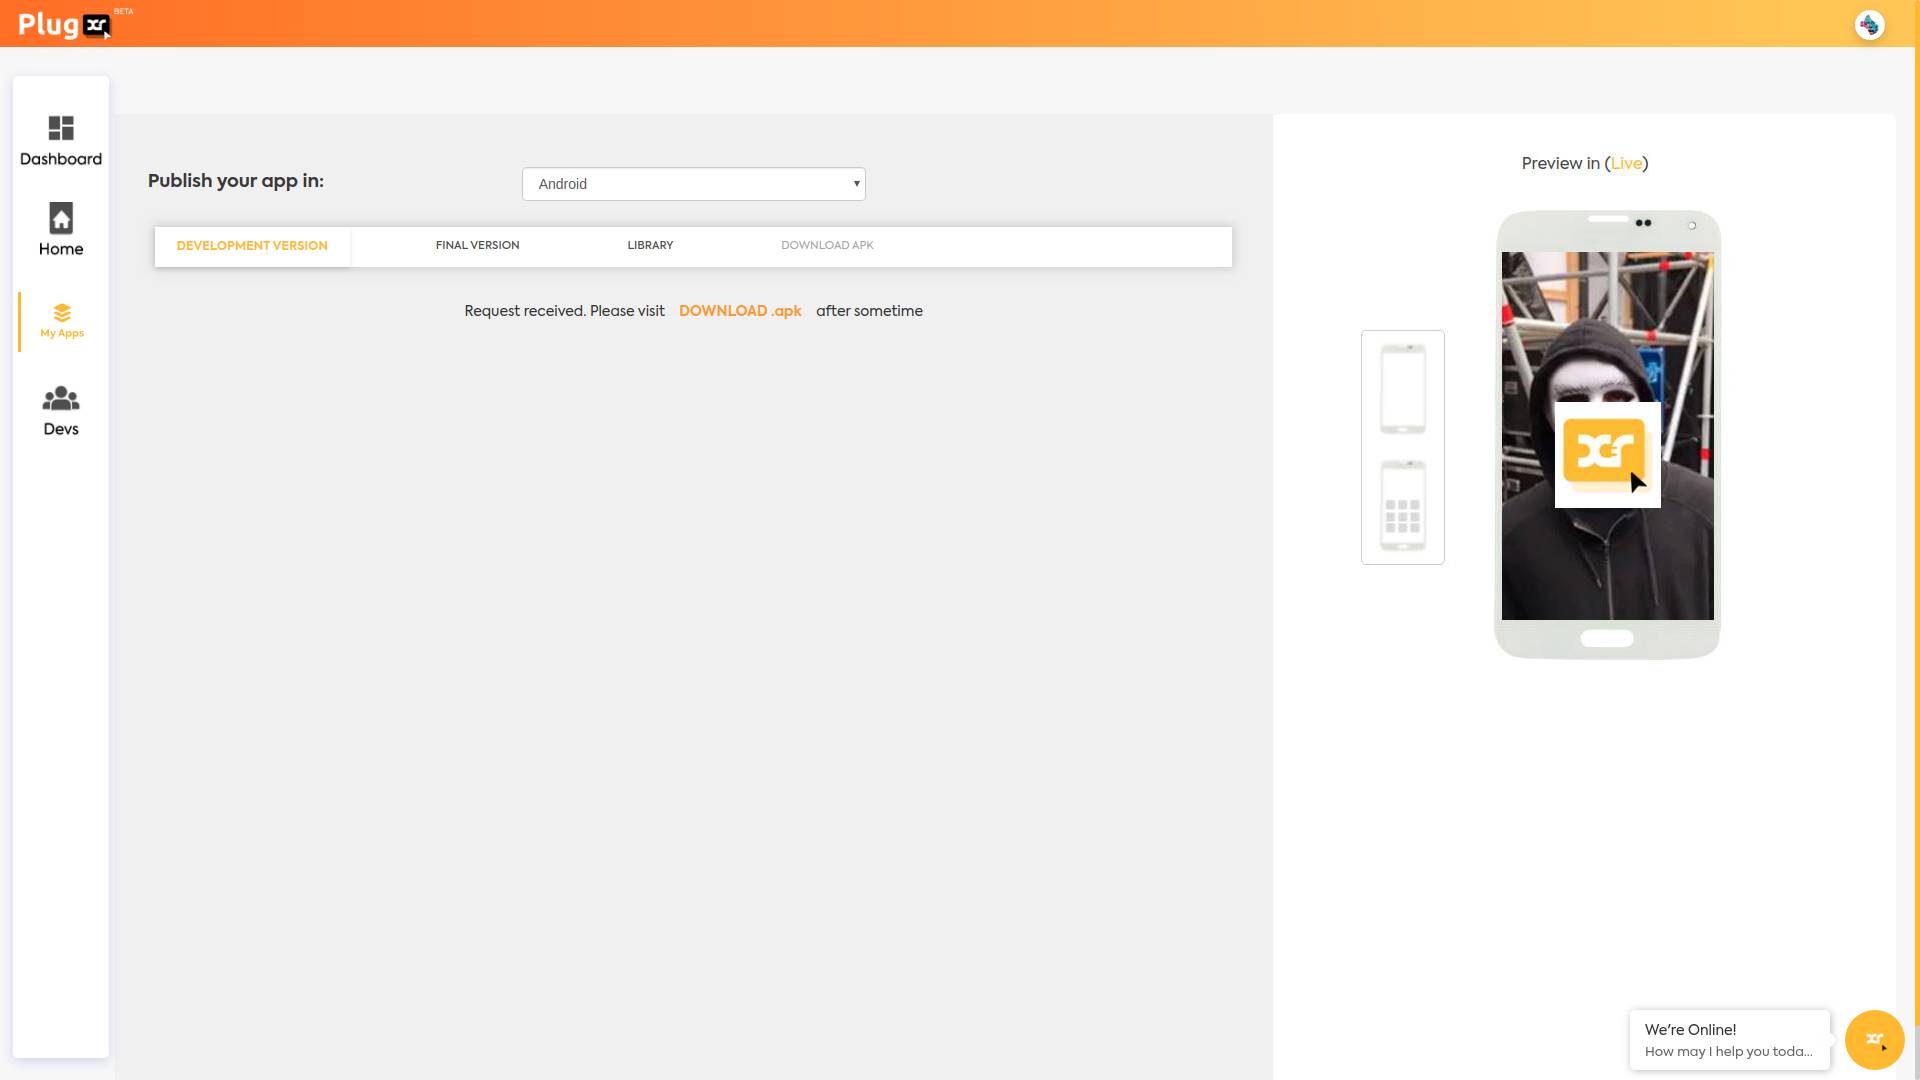
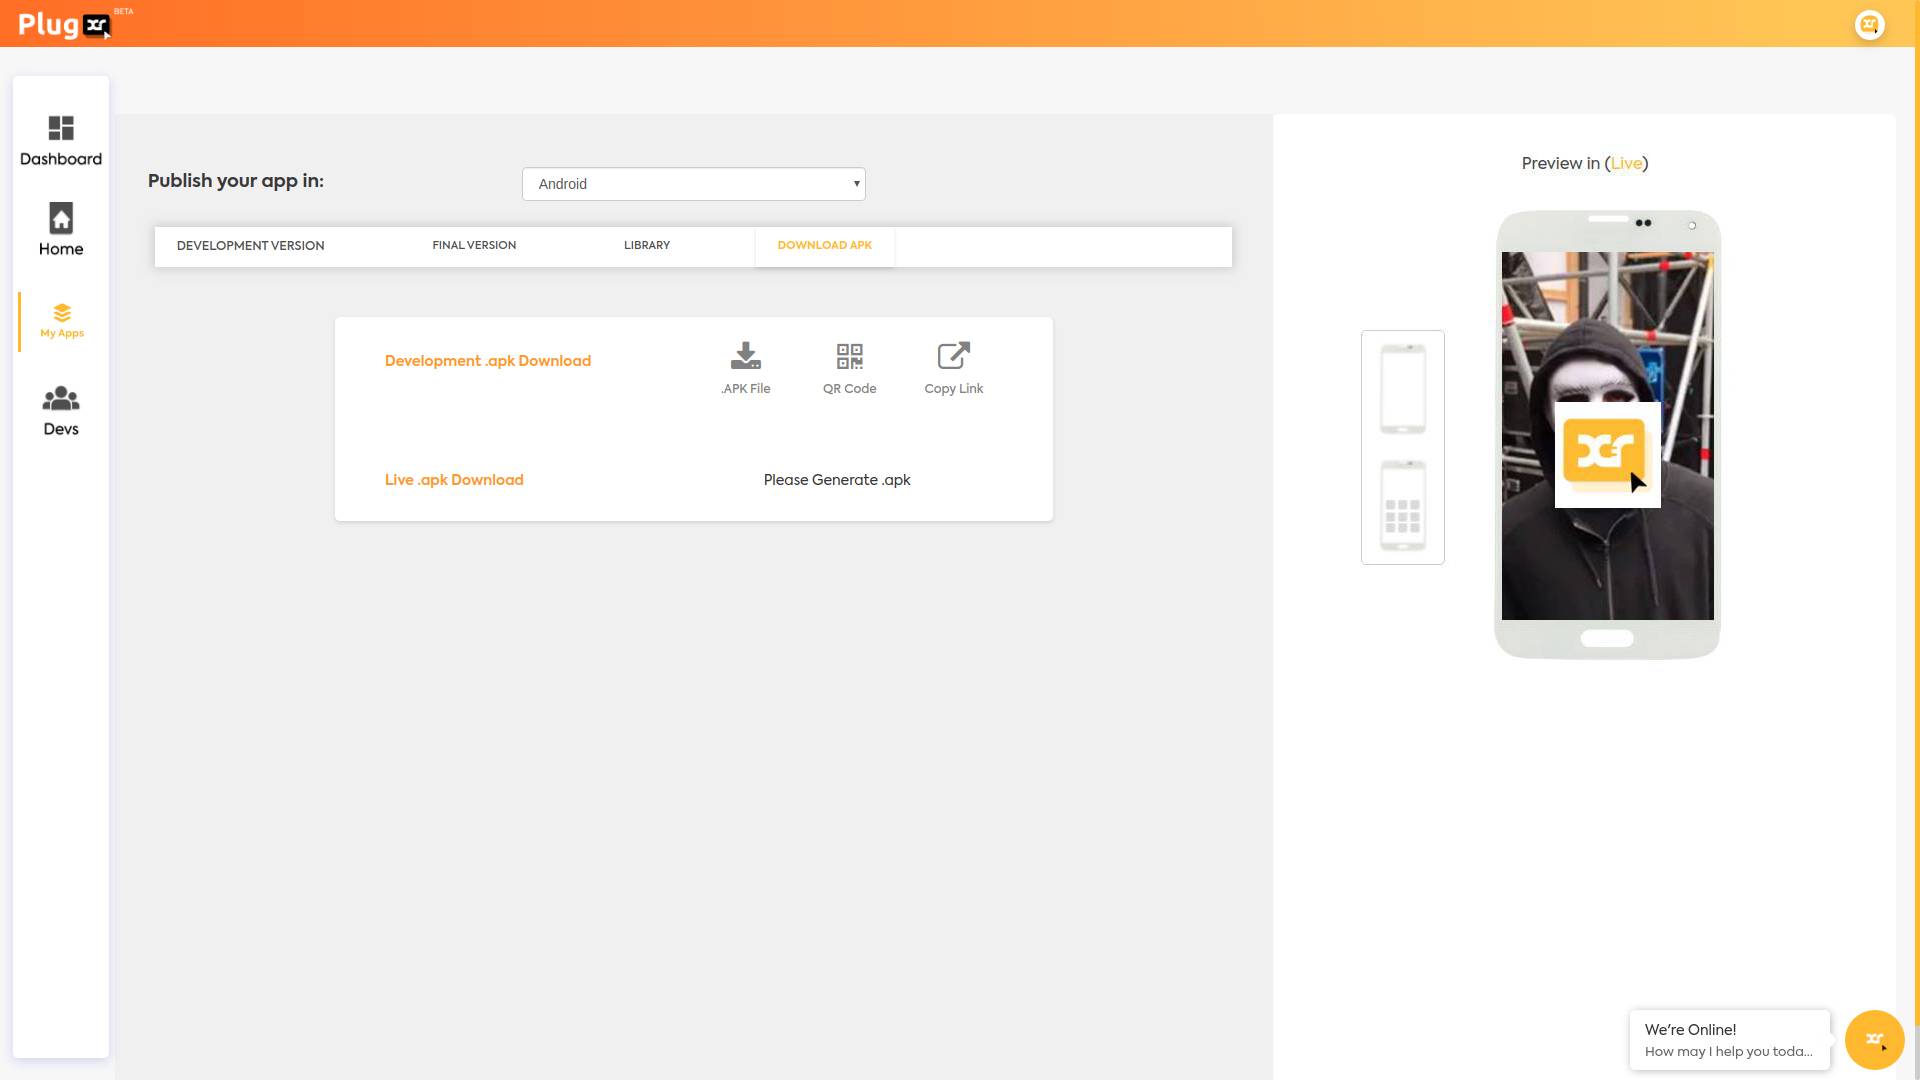
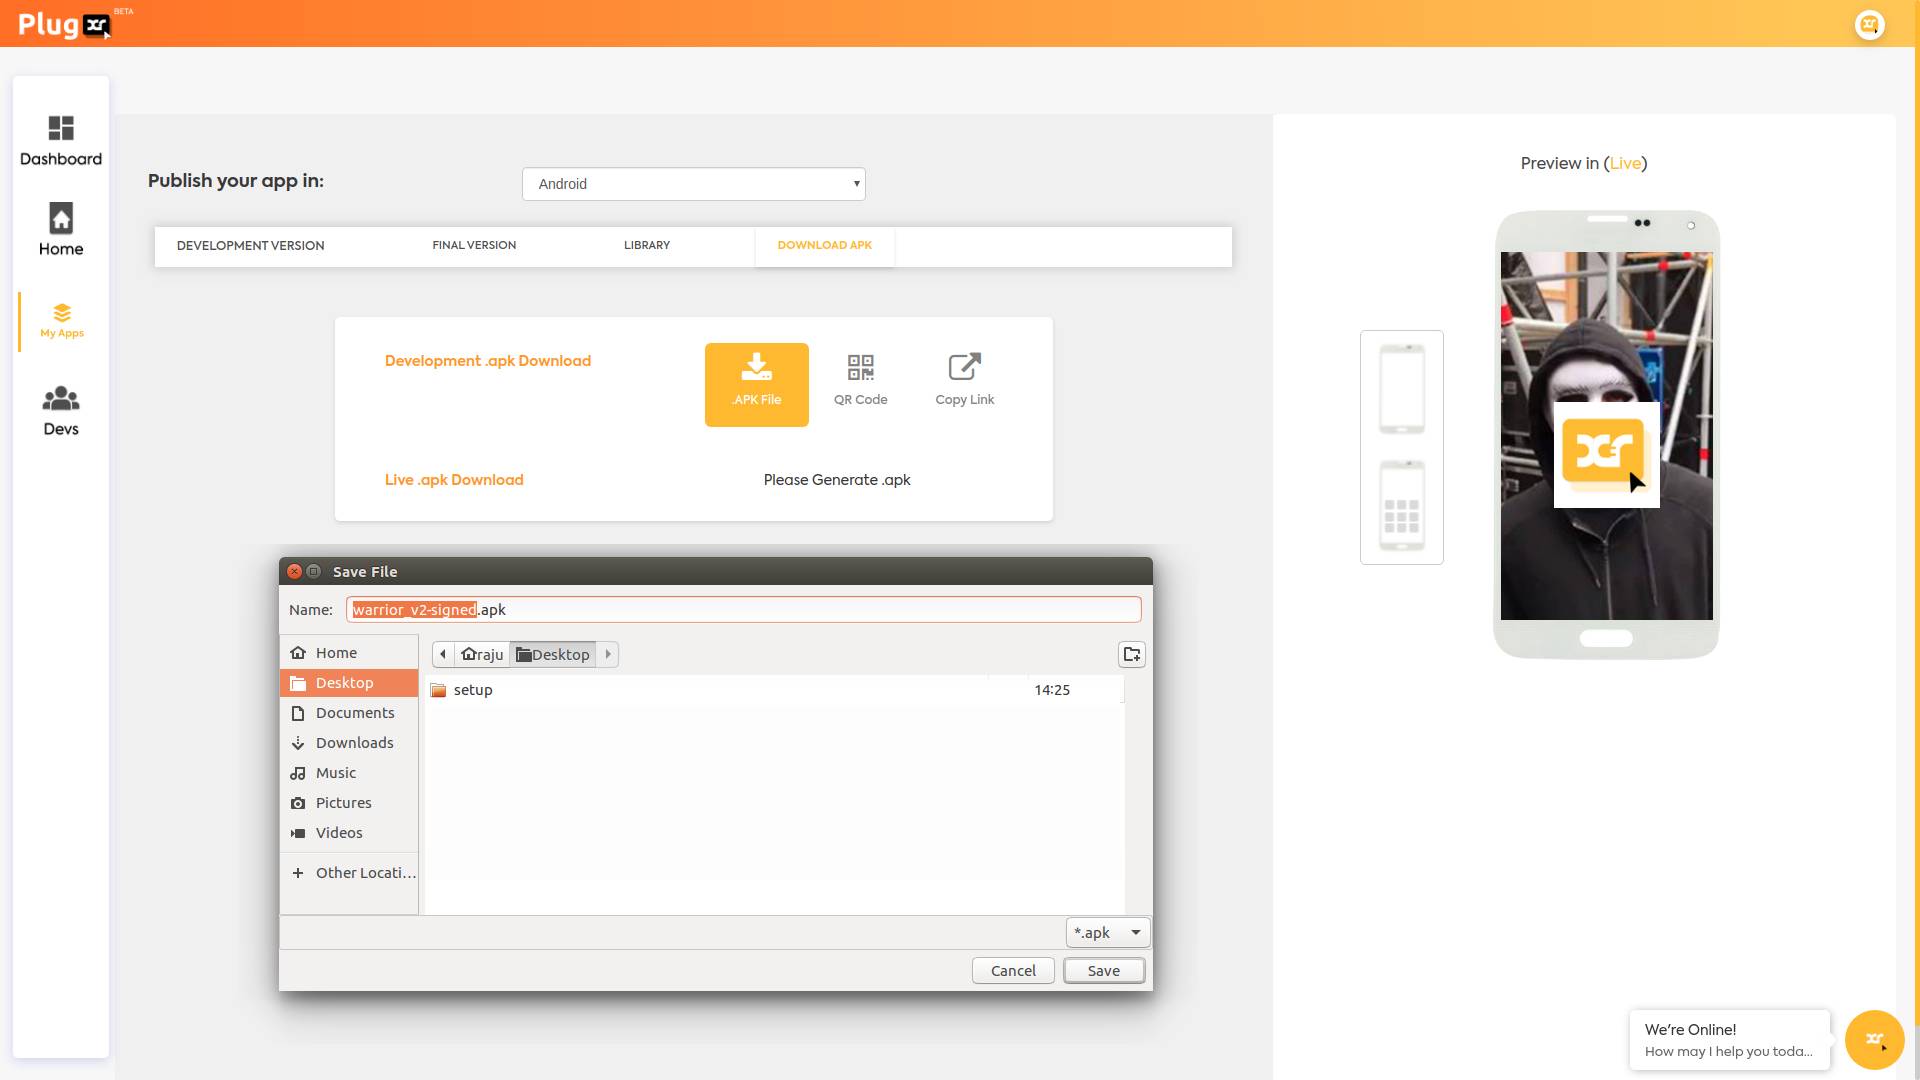
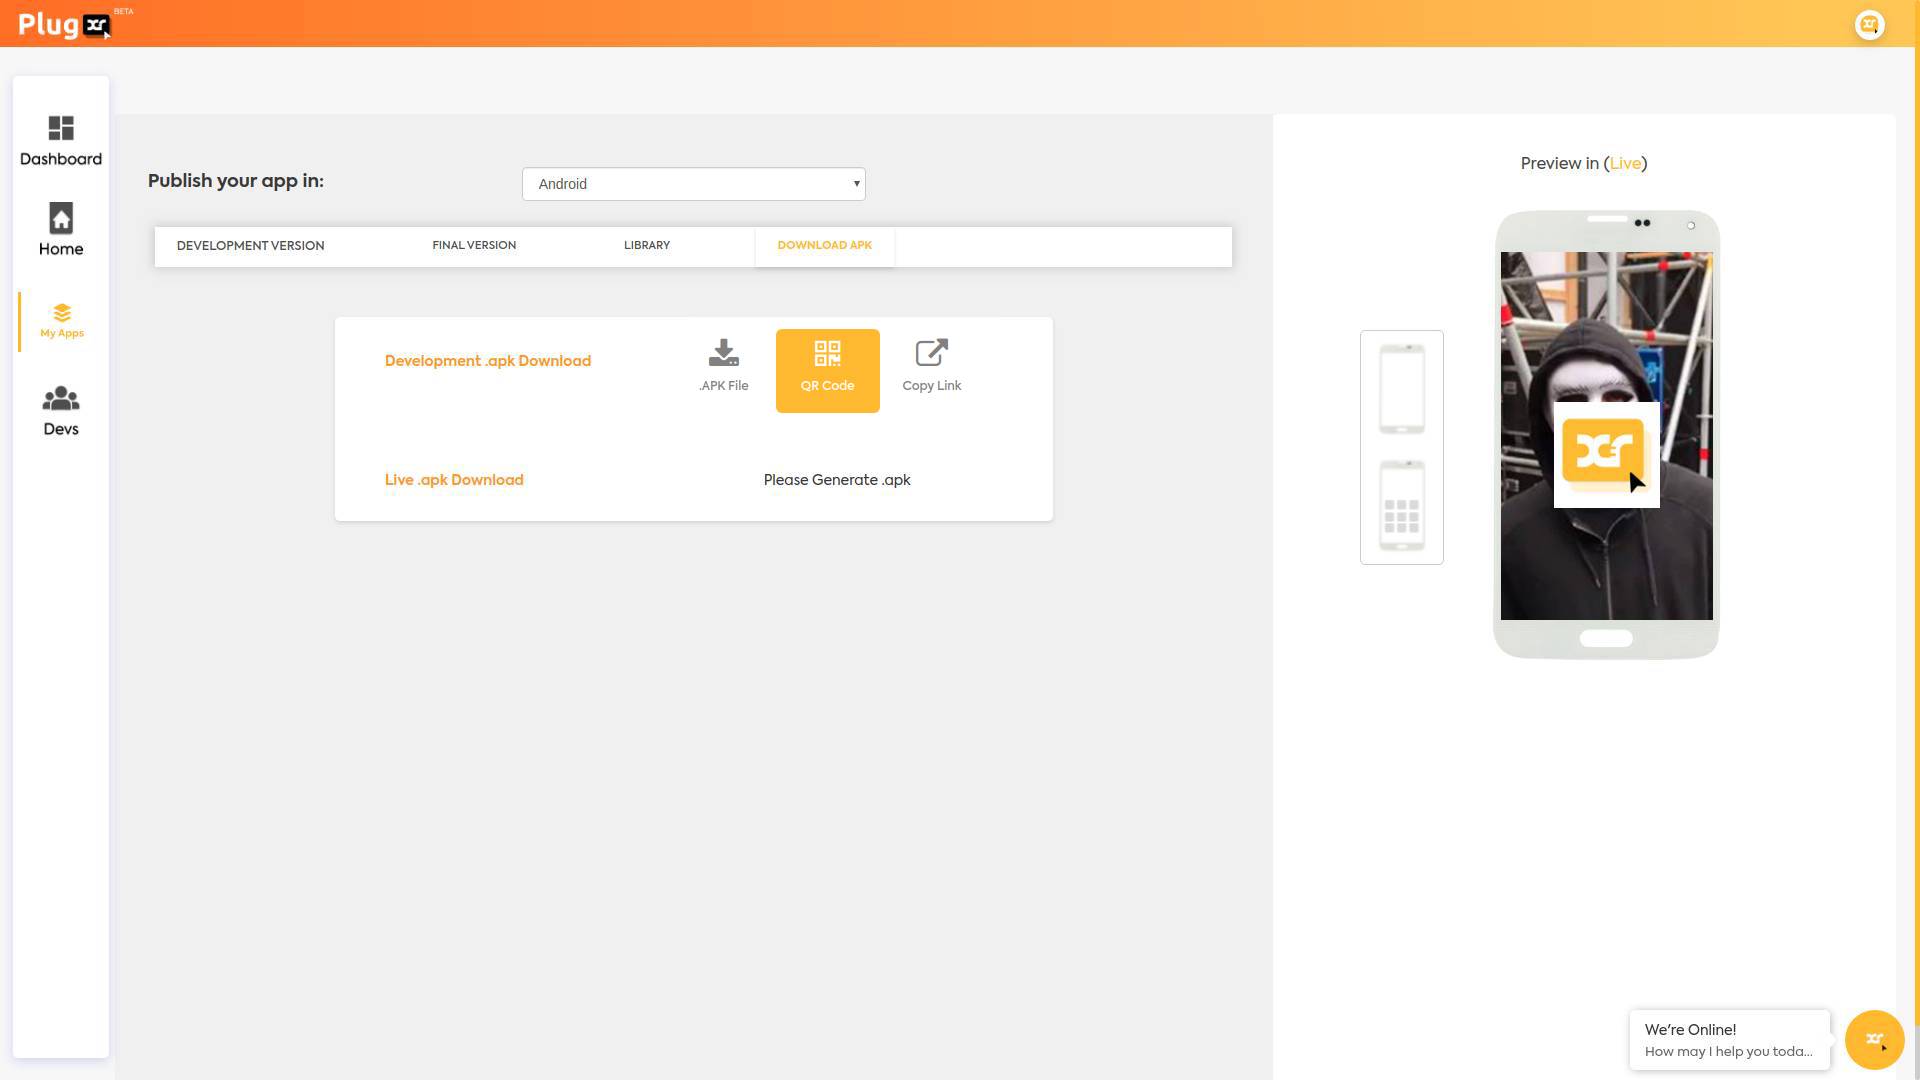
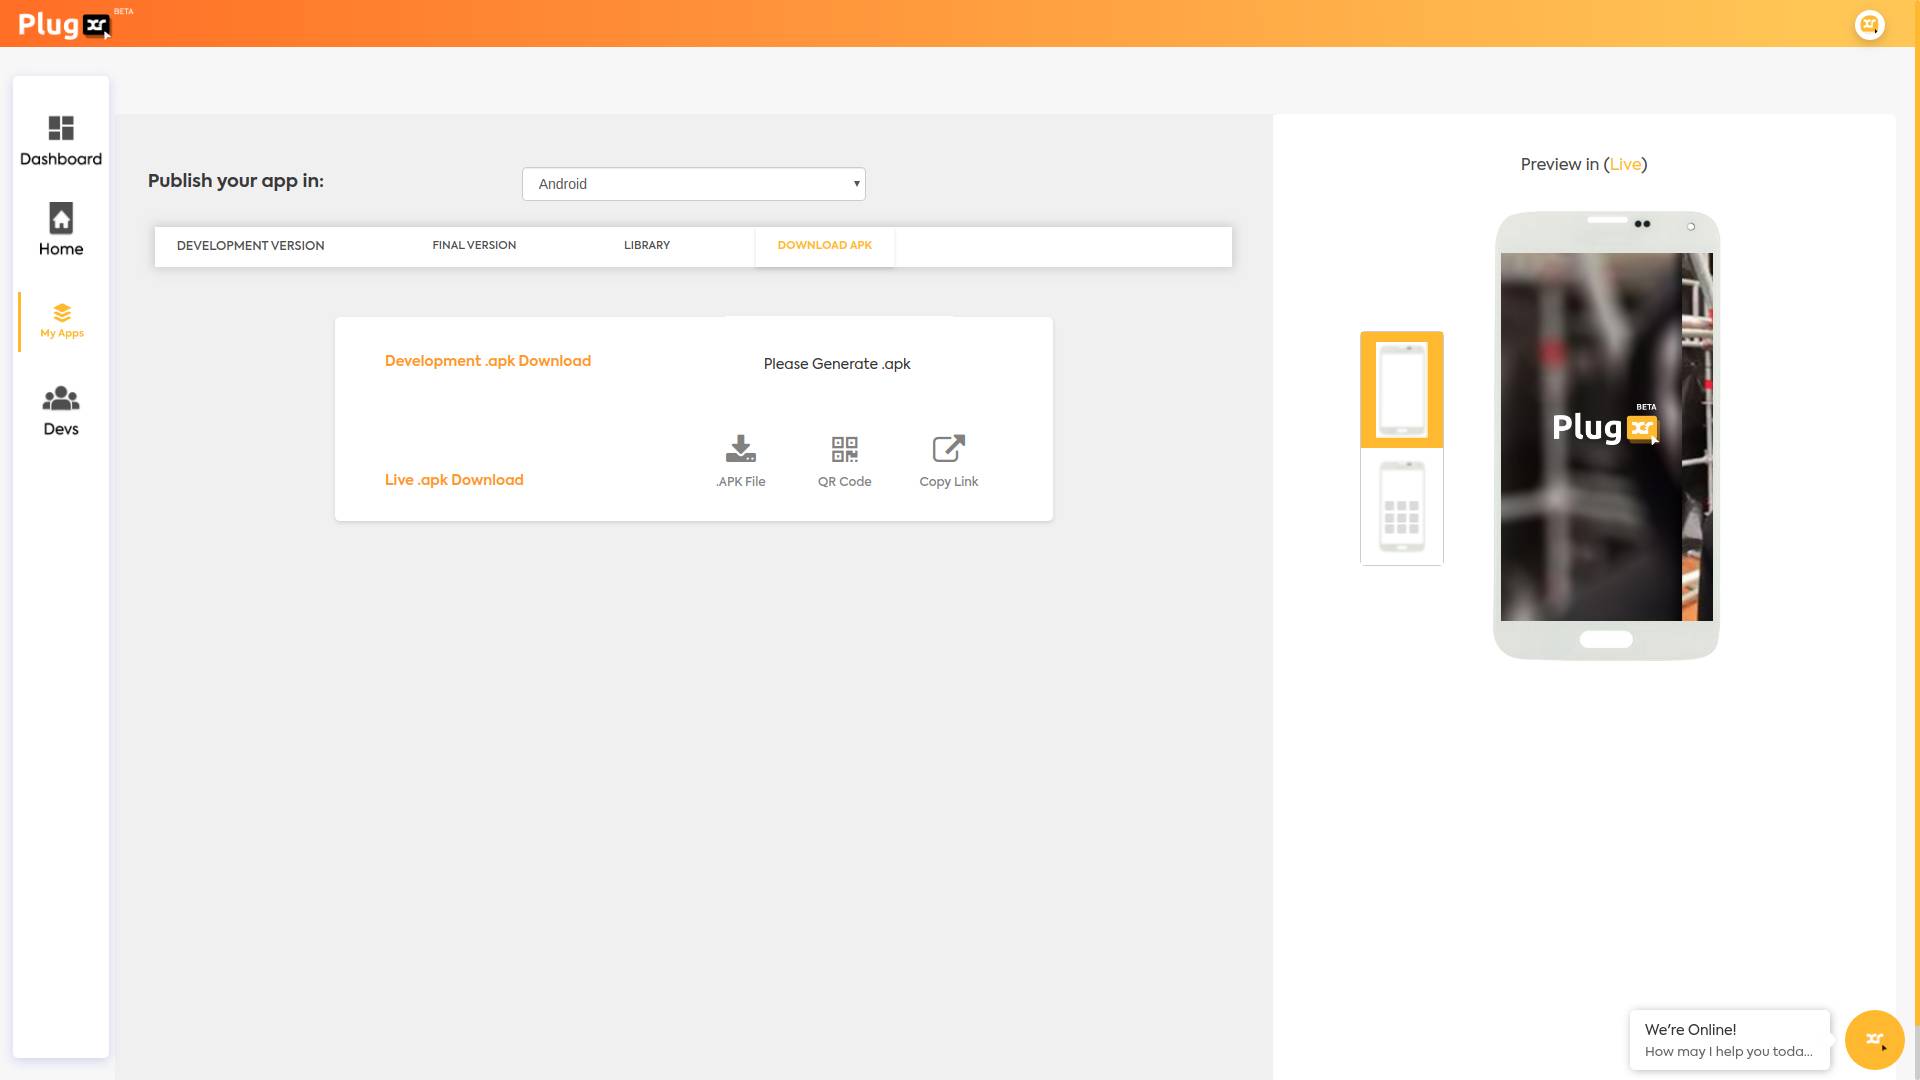
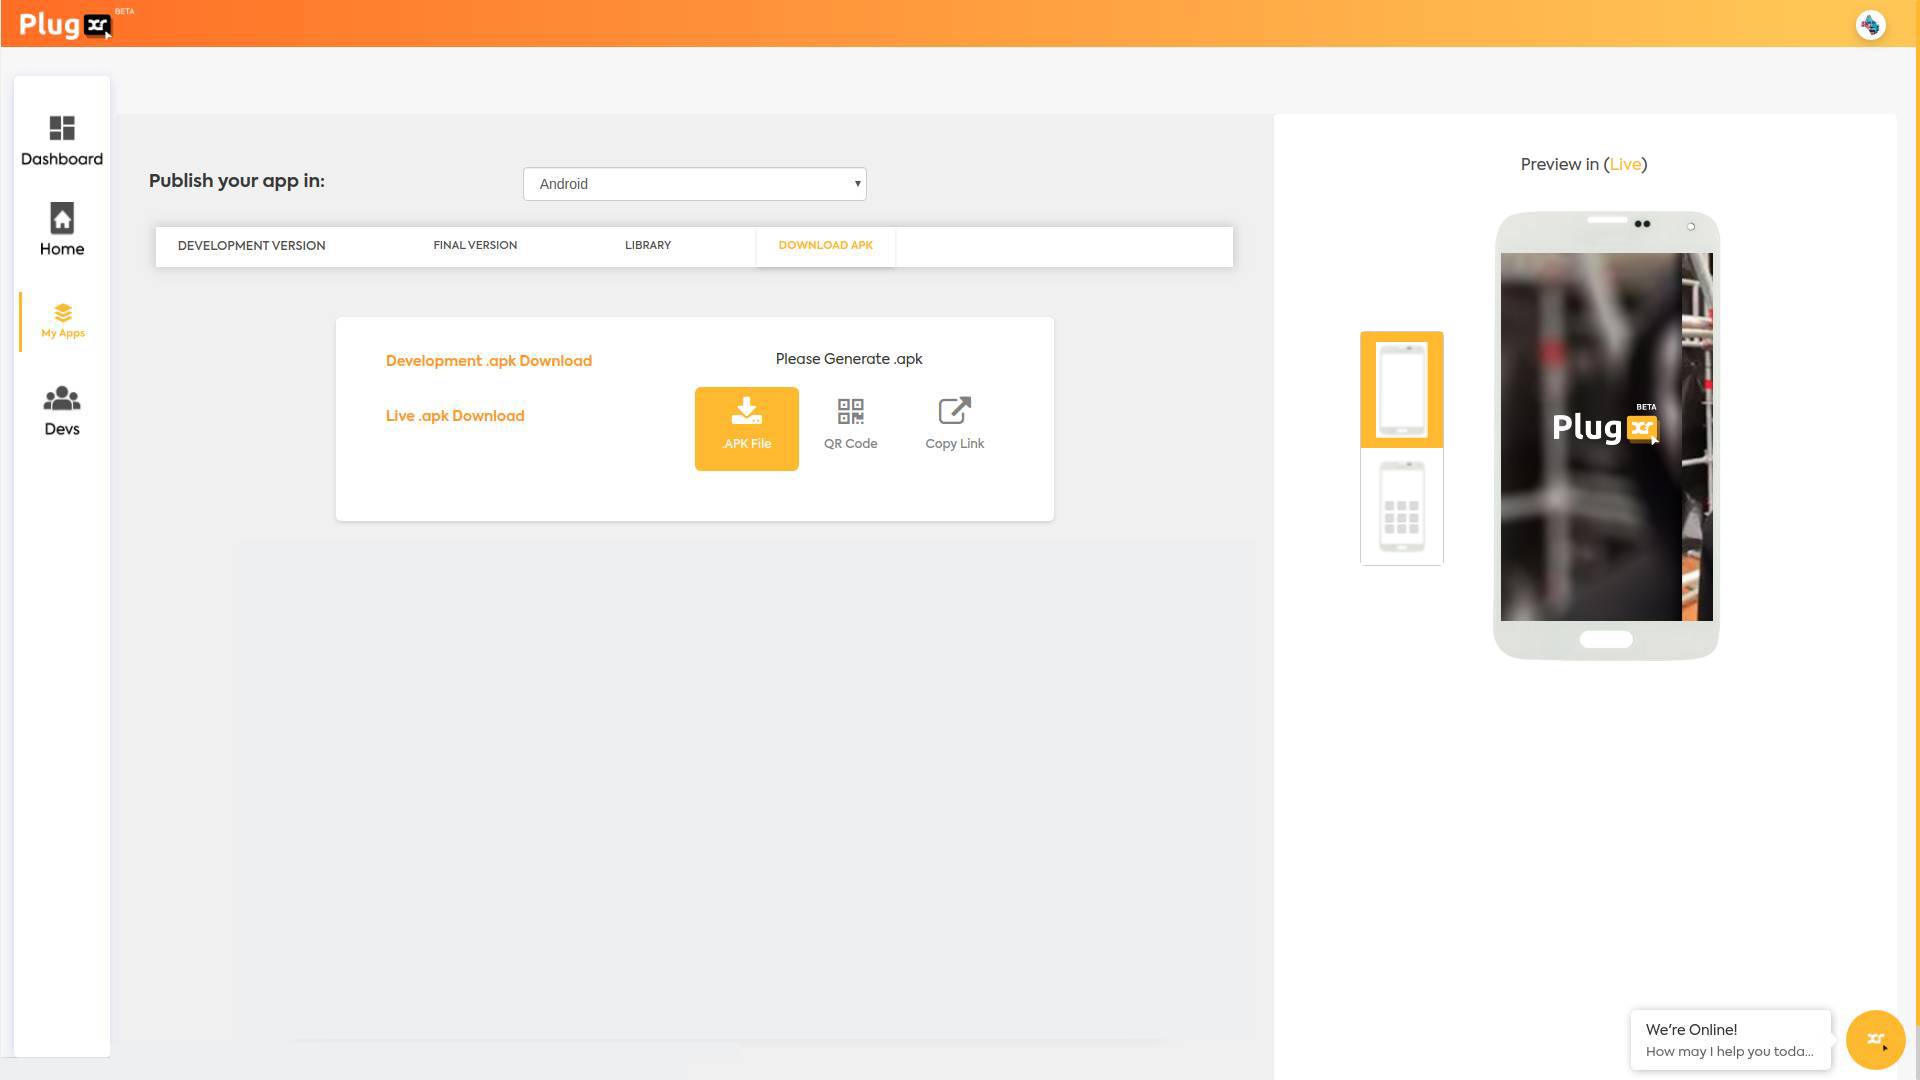
- Download APK
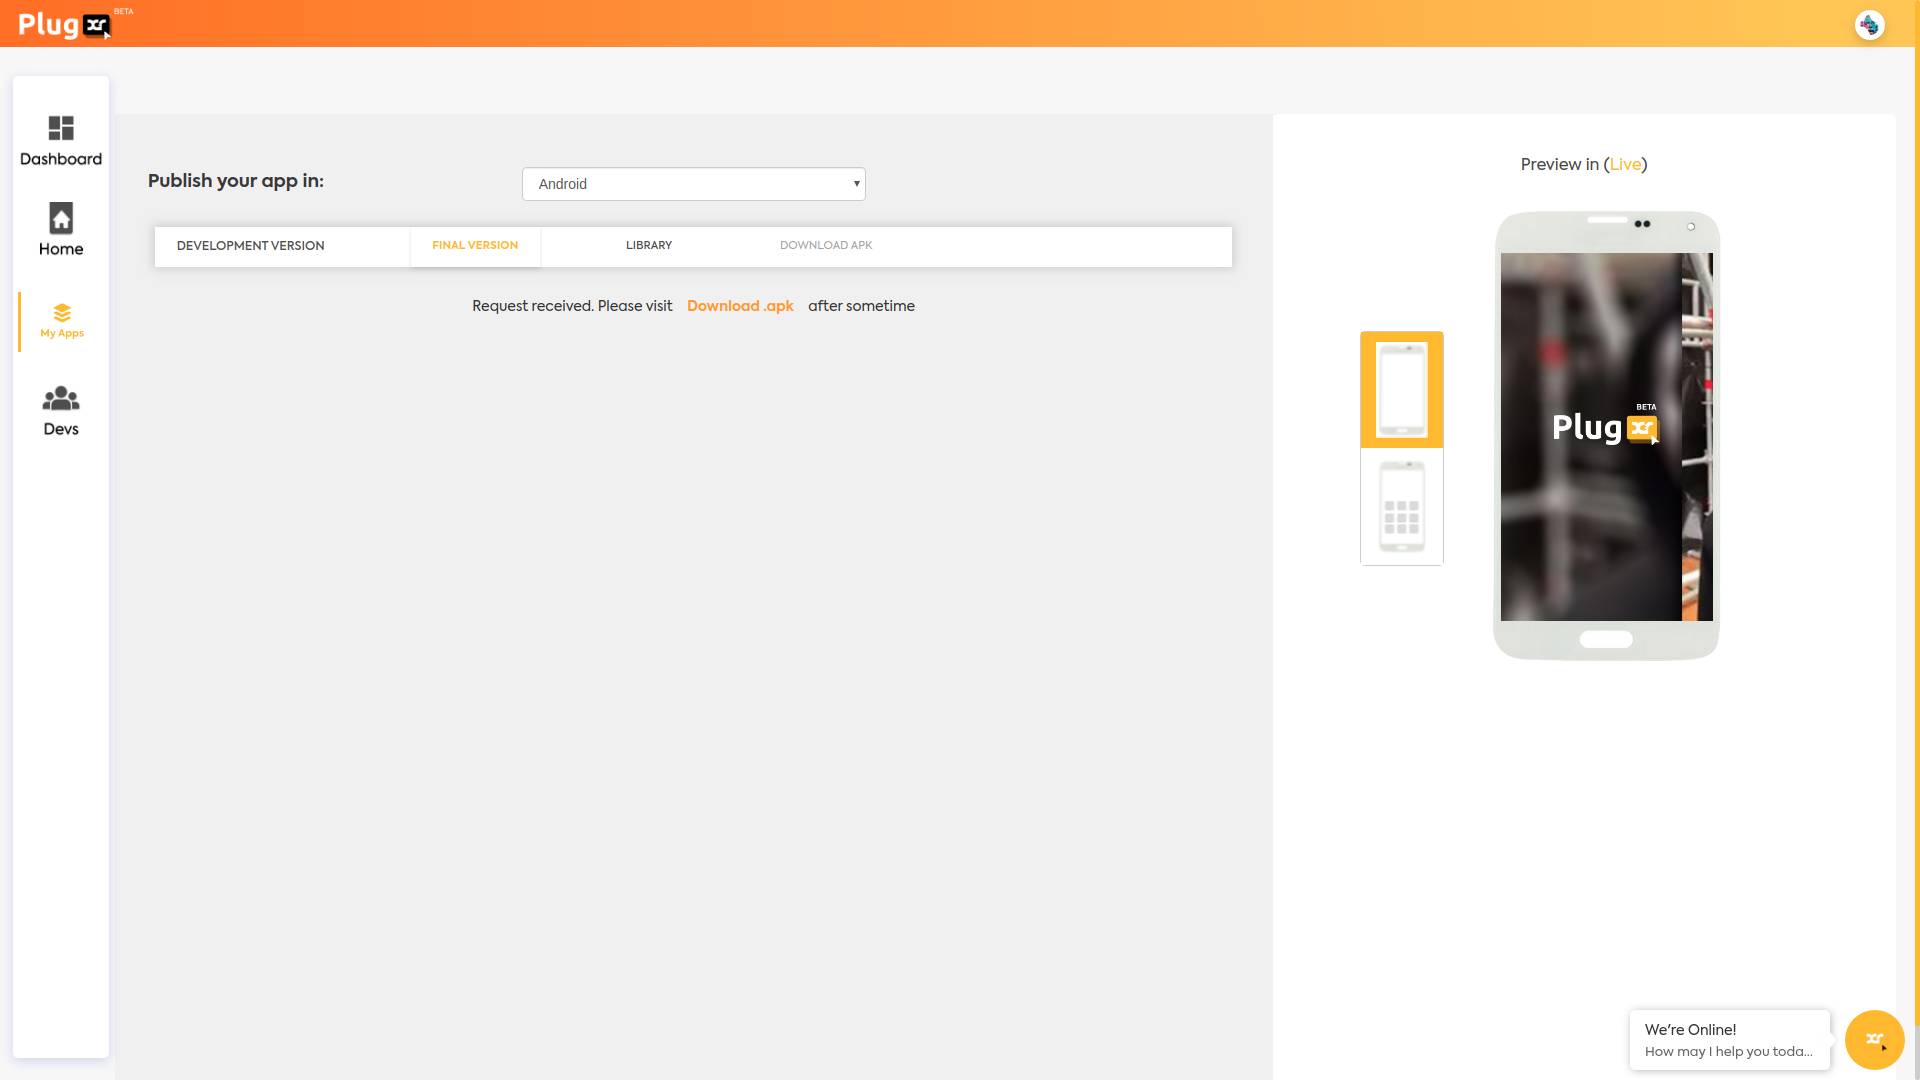
Visit this page shortly after you have requested either a developmental or final version of the apk files.
- Manual Download
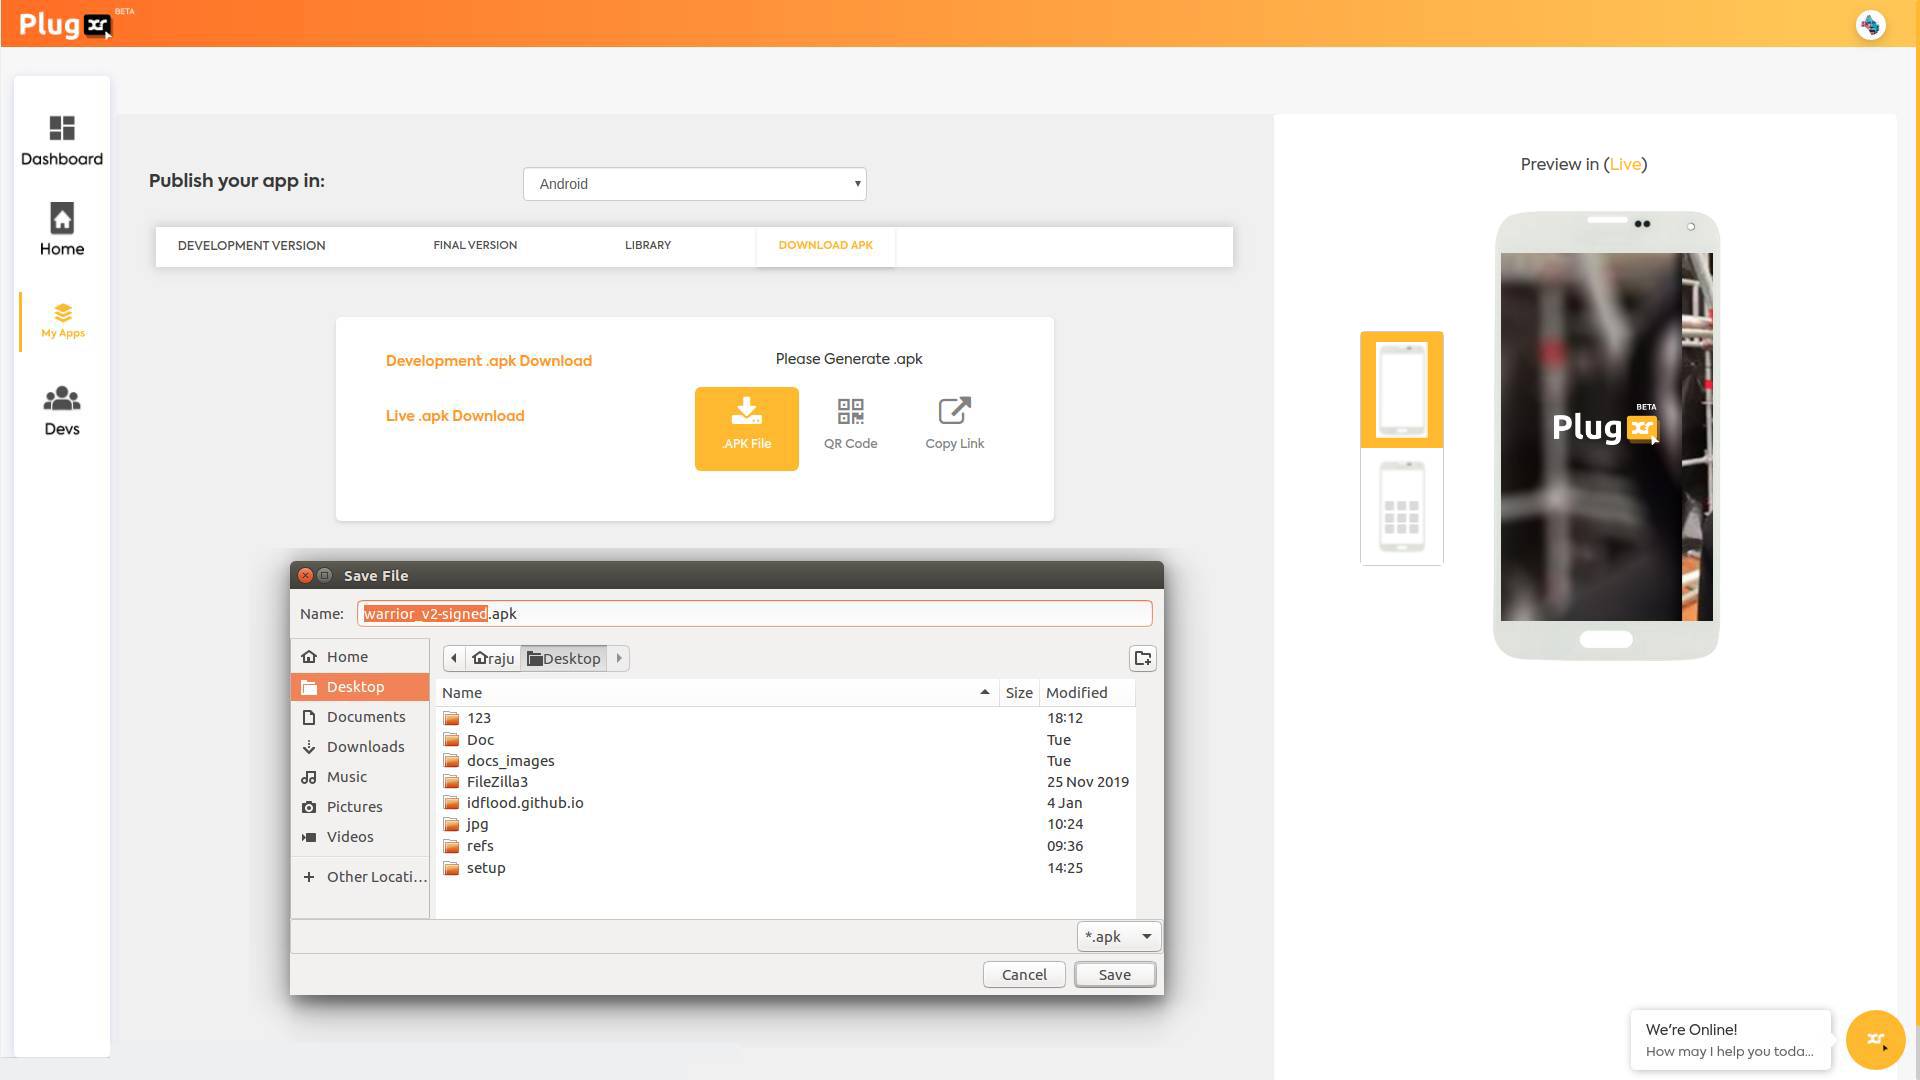
Click on the icon that reads “.APK file” to download the apk file on your system
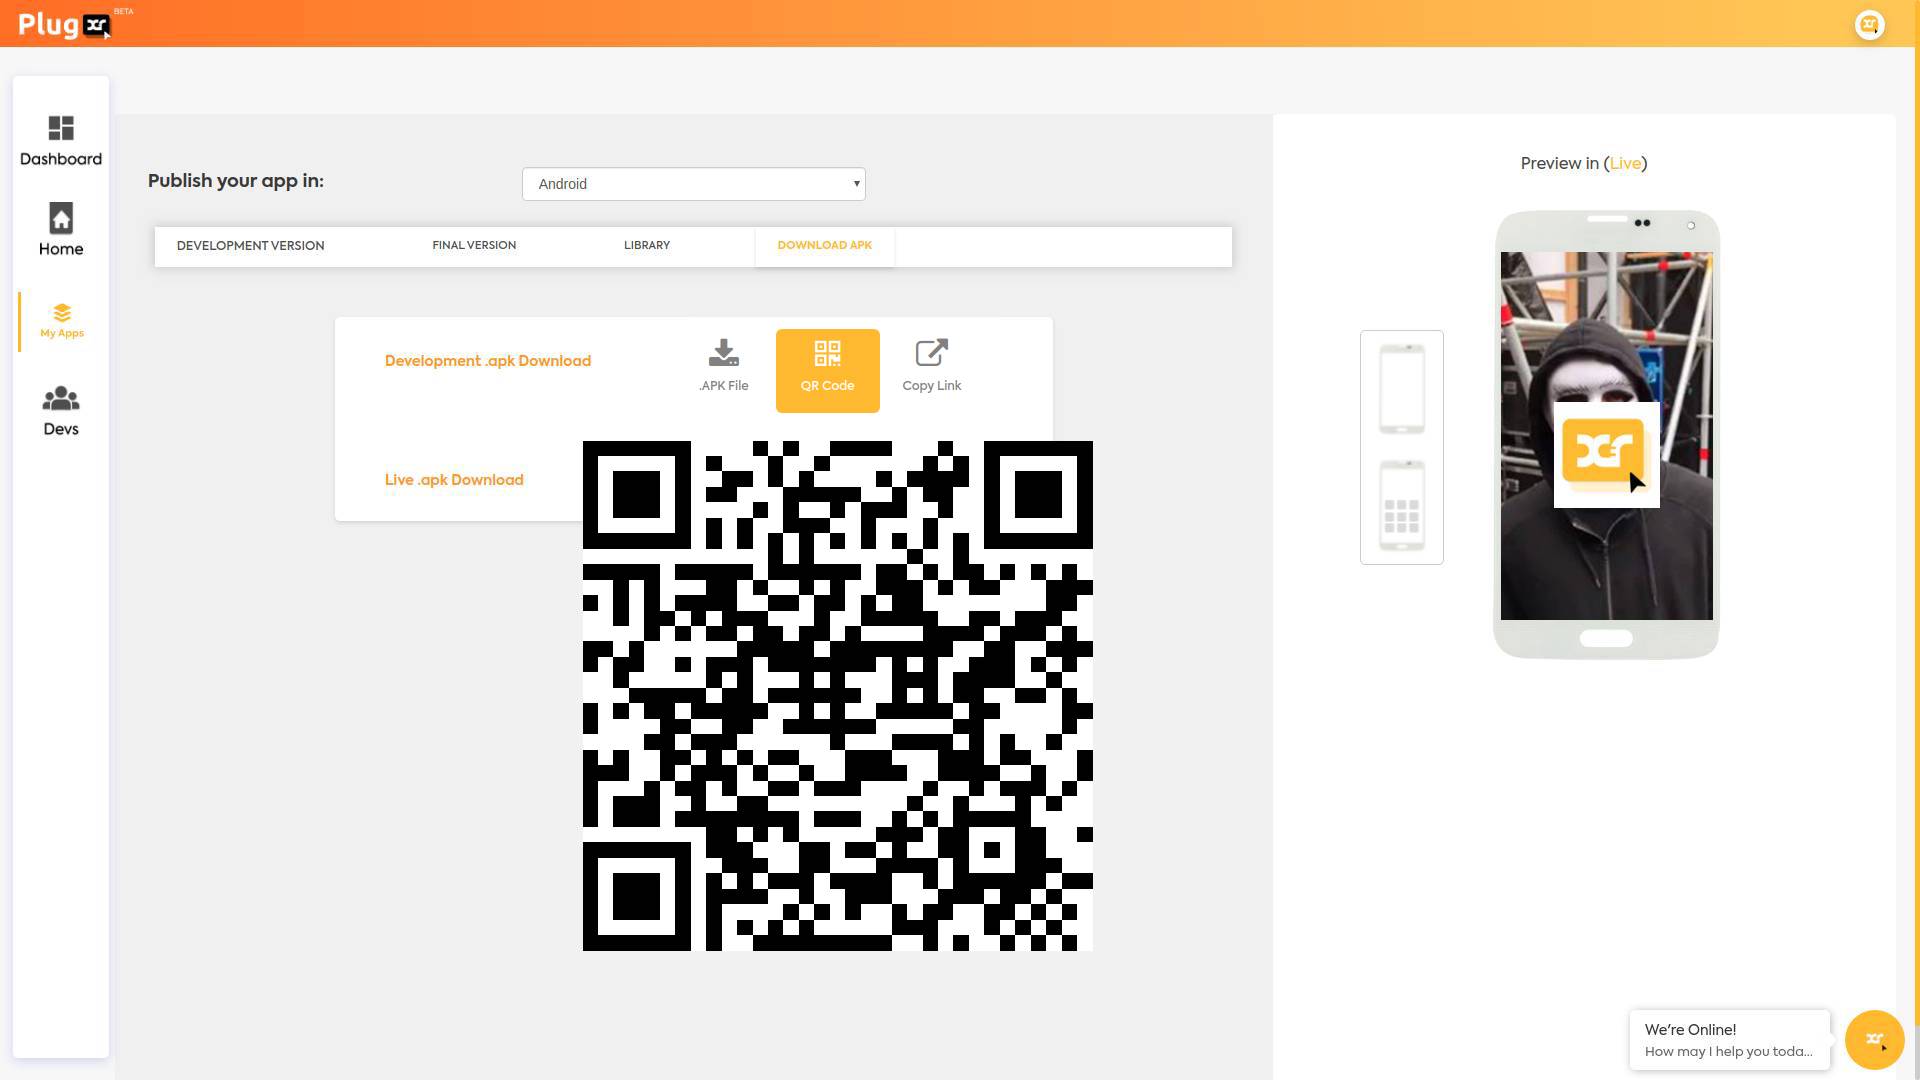
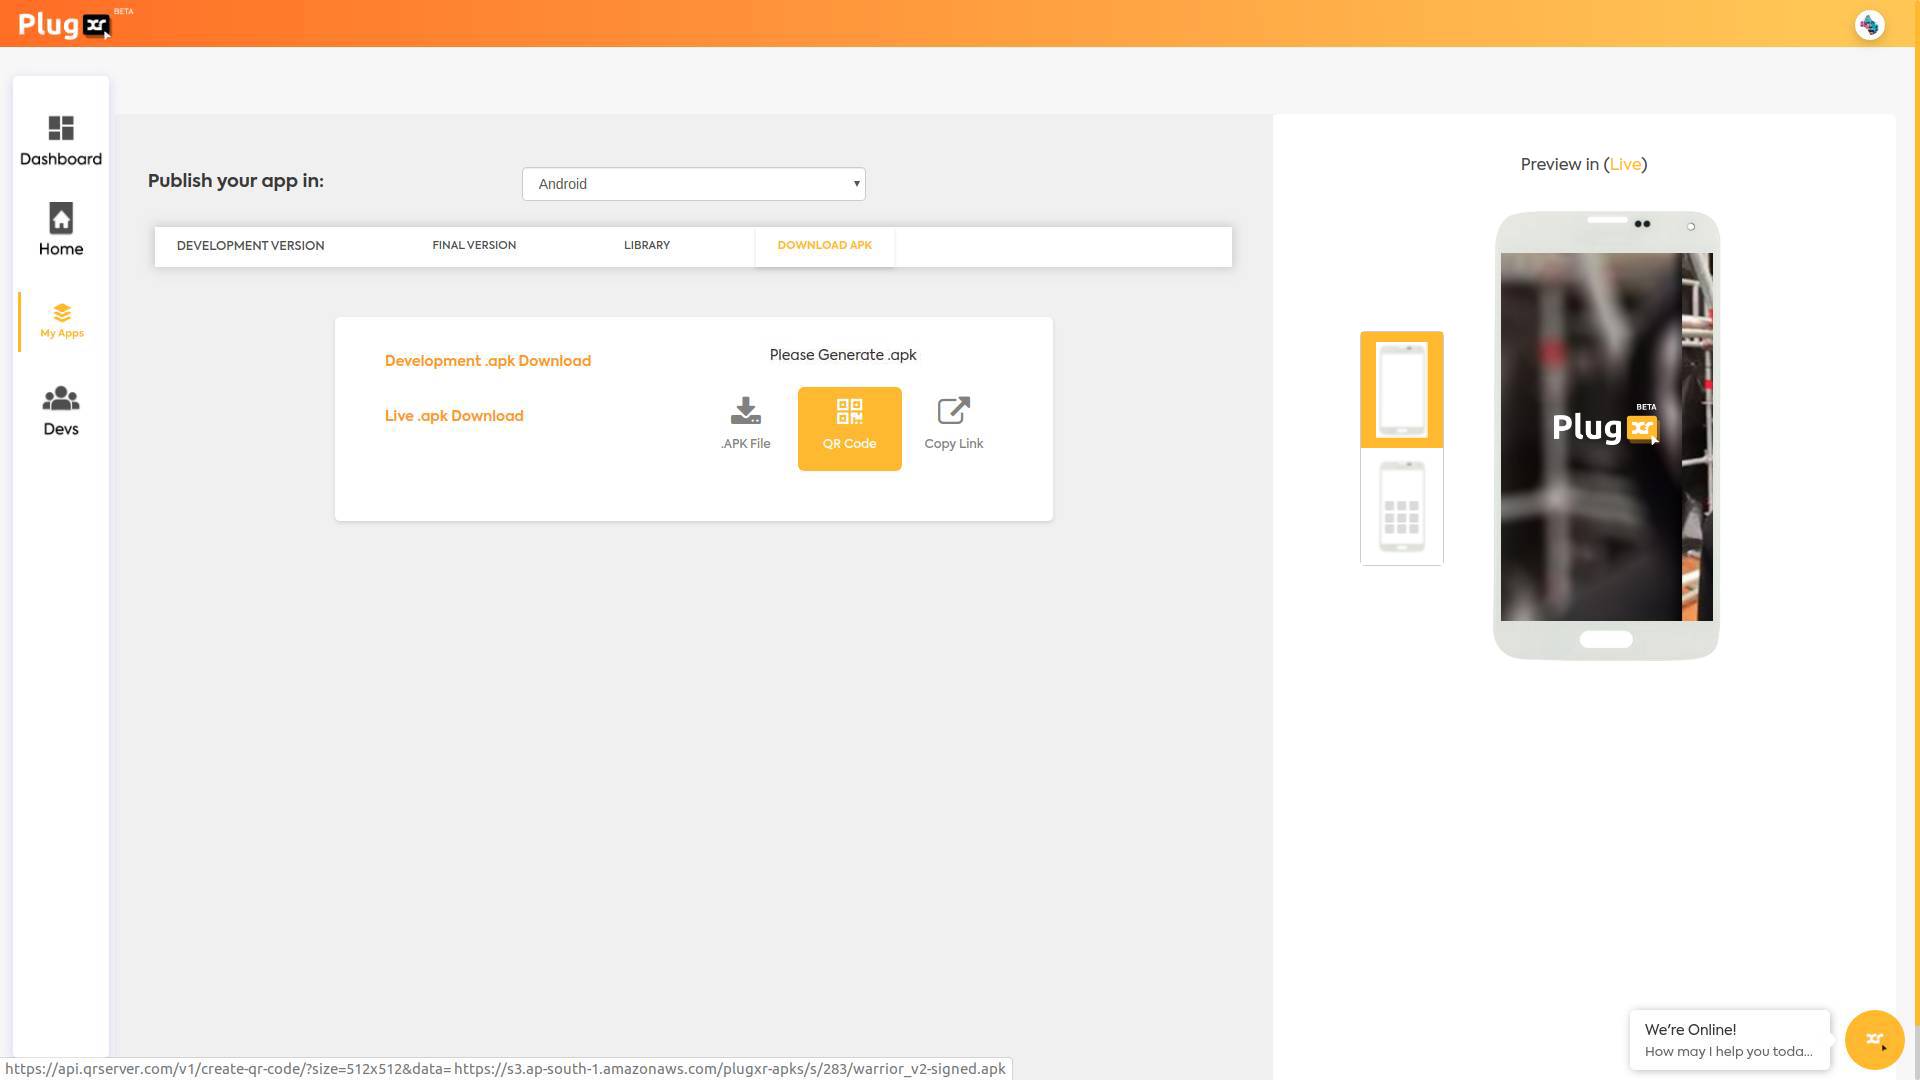
- QR Code Scanning
Scan the QR Code provided to download the .apk file on your mobile device.
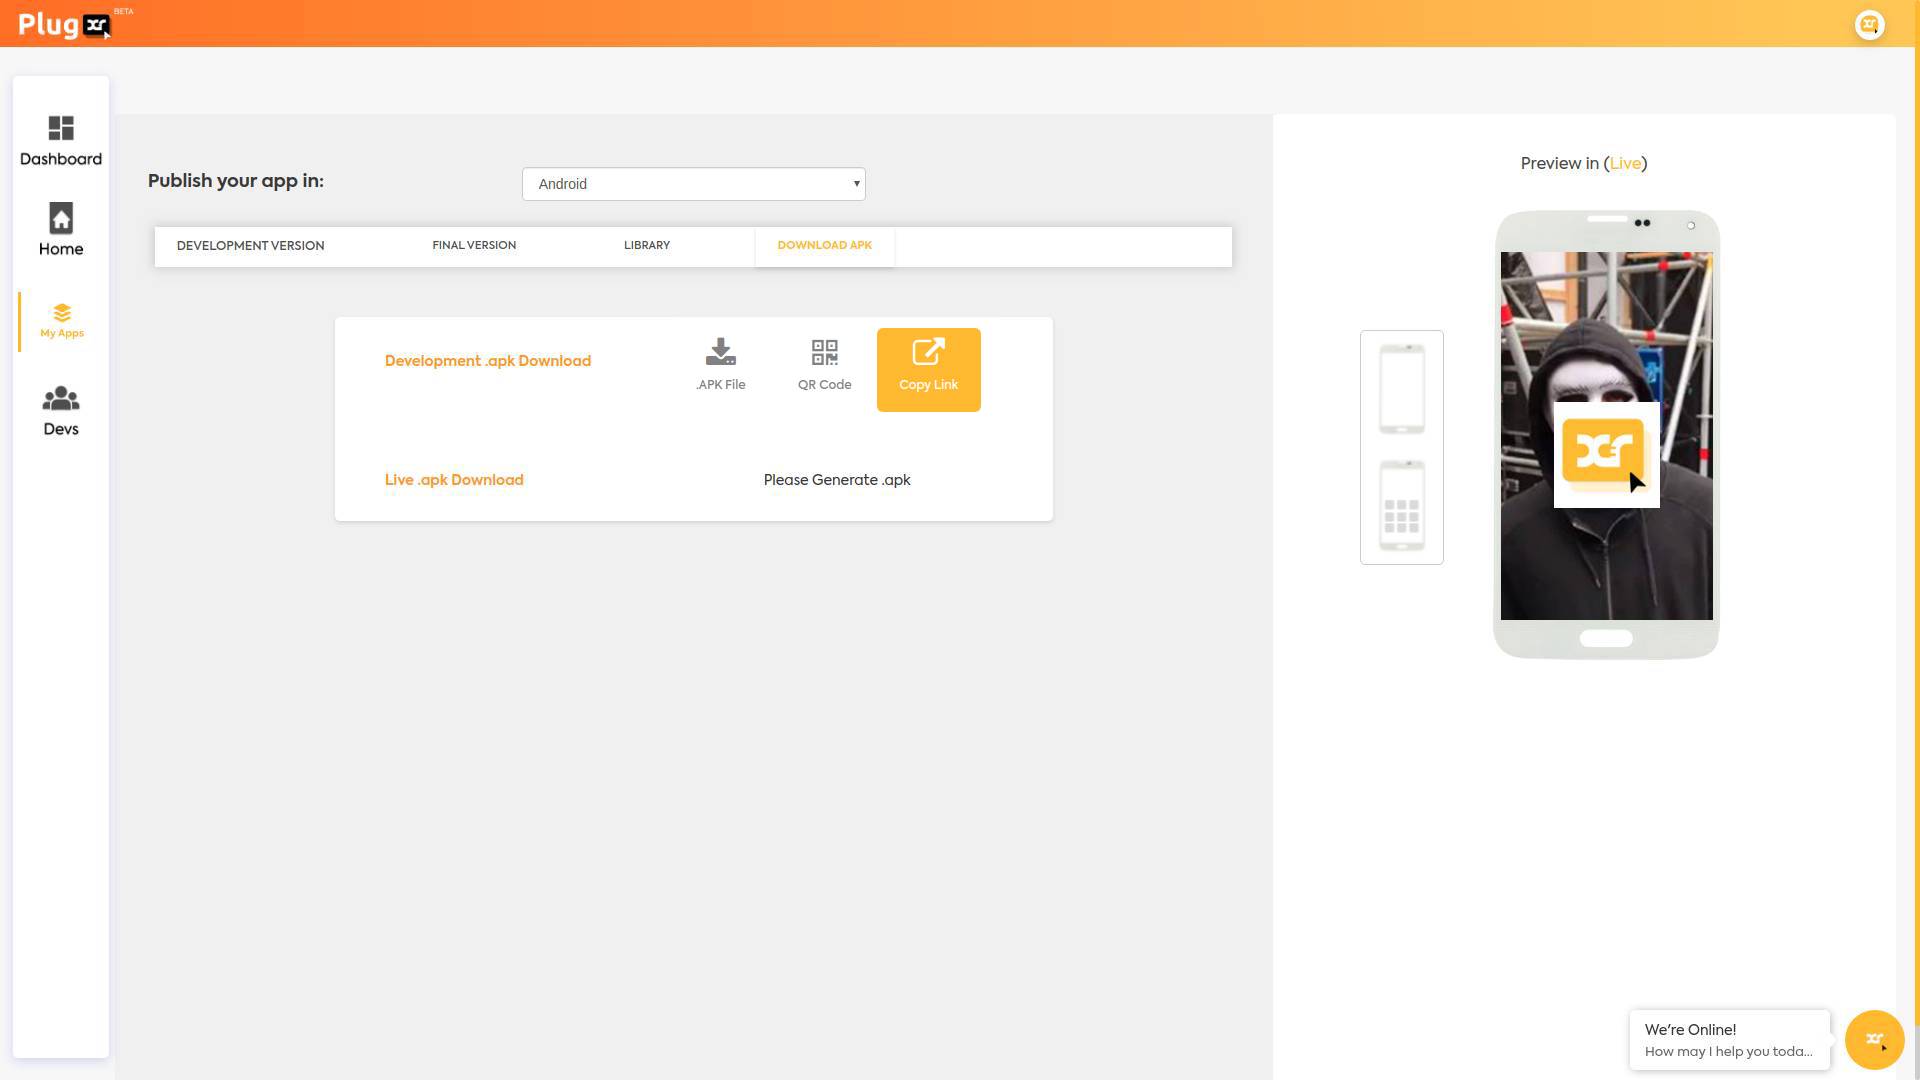
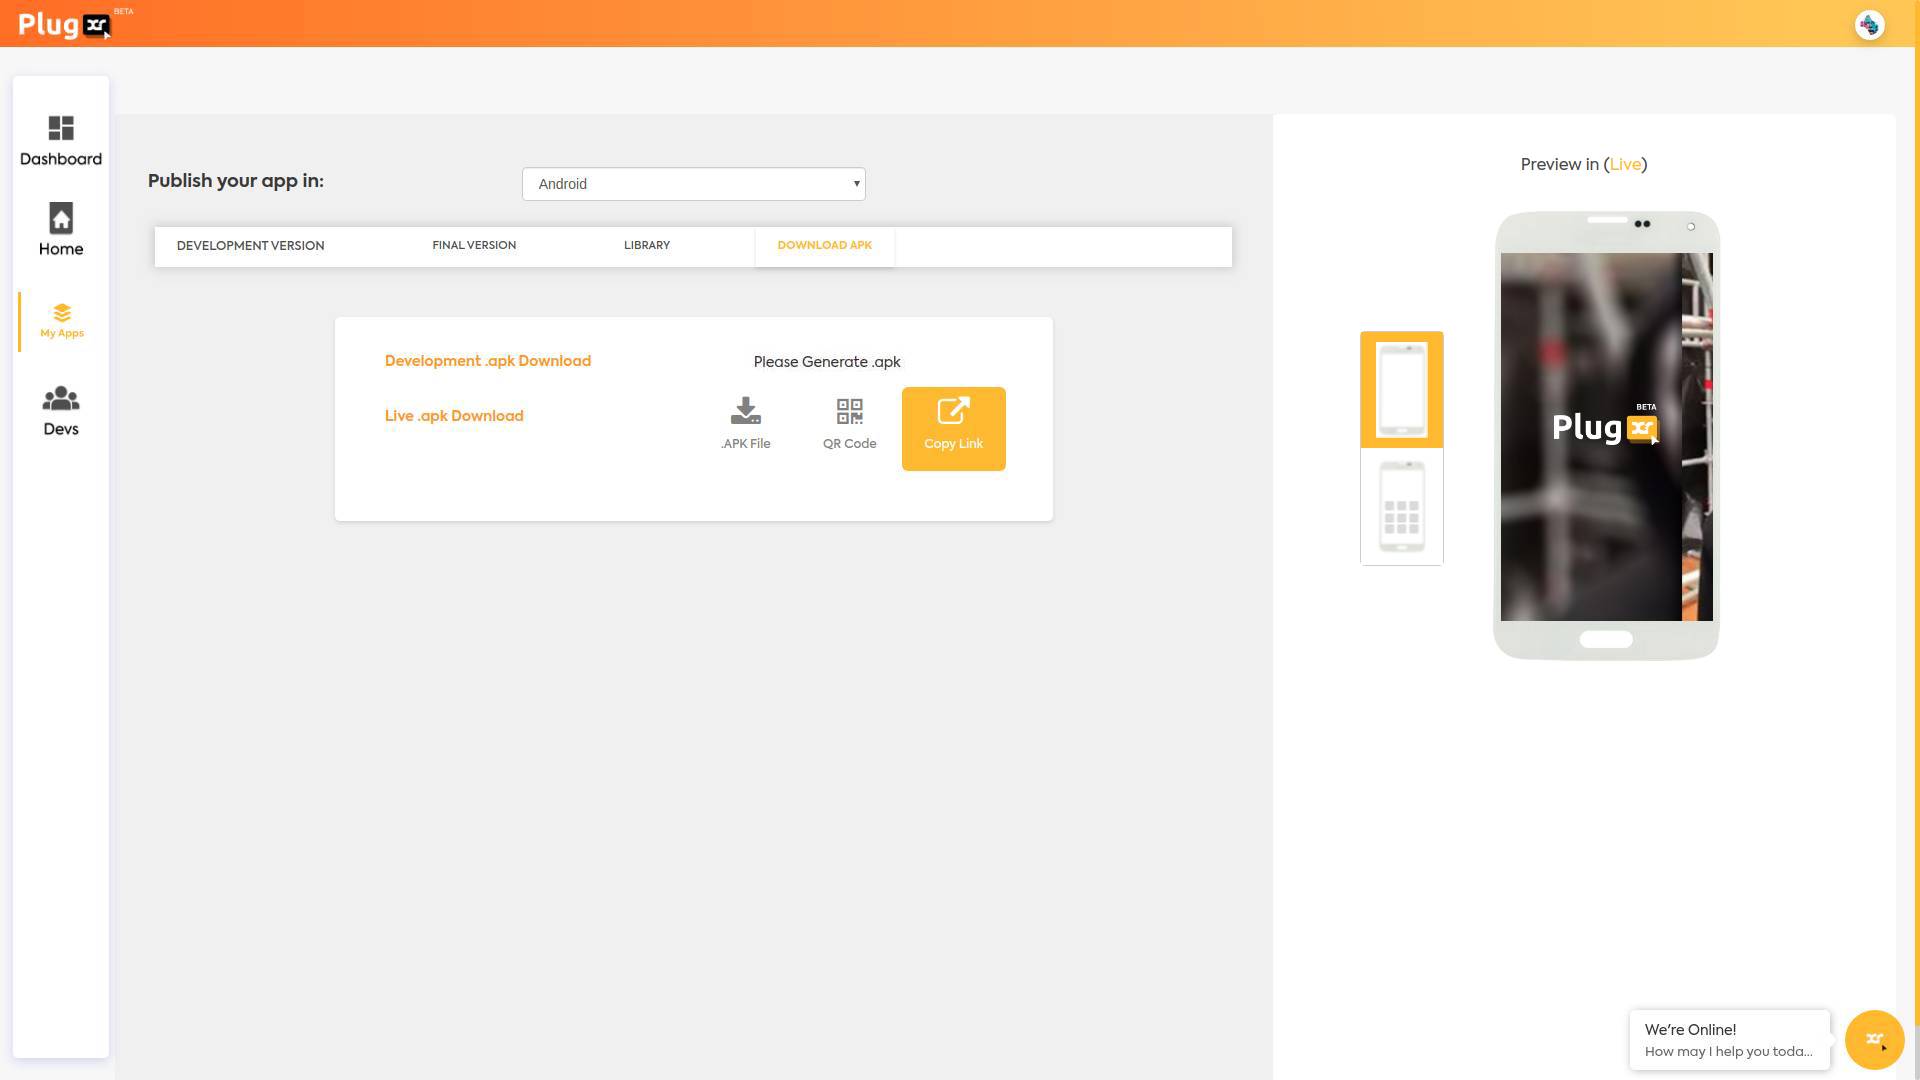
- Copy Link
Click on the Copy Link option and paste the link on any browser to automatically download the .apk files in your system. It is useful to send the links across for your associates to download the .apk file without any hassle.
- Manual Download


- Development Version
- Final Version
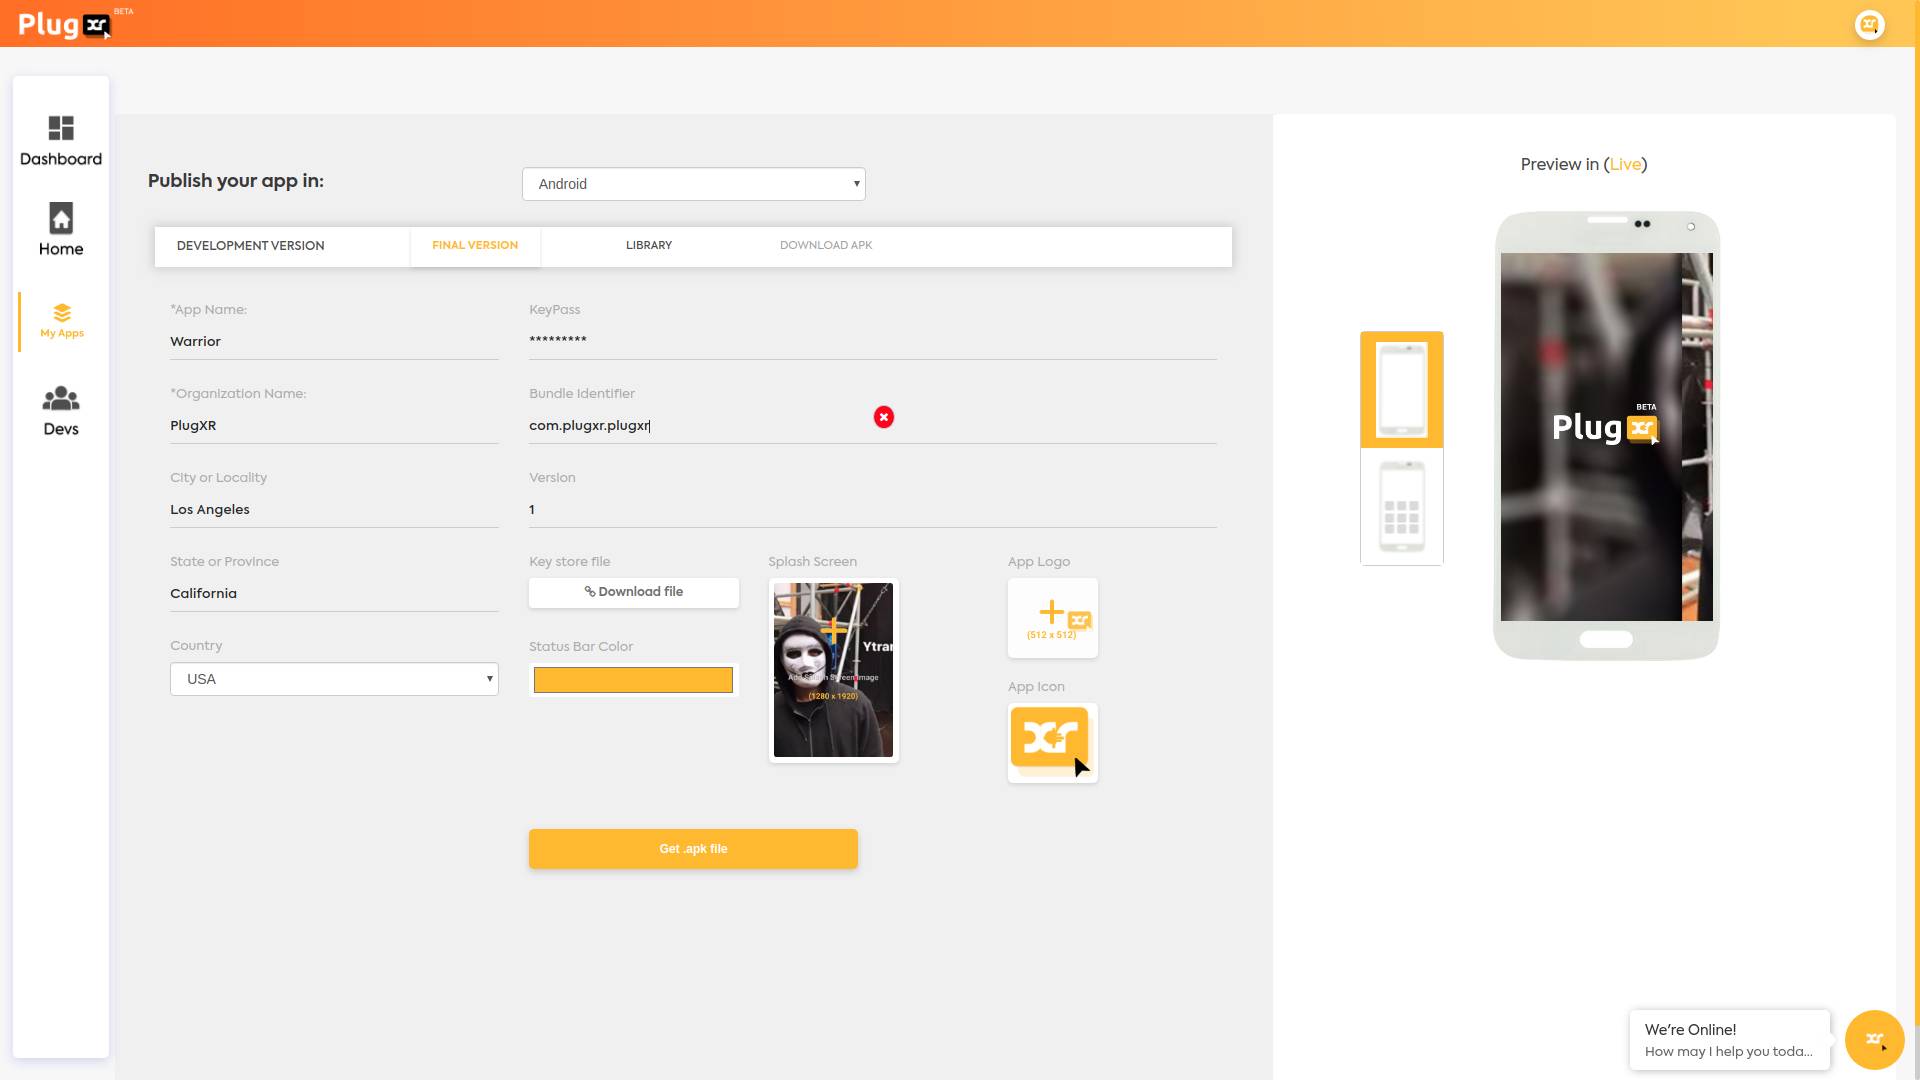
- To get Final Version in Android, enter App Name and Organisation Name in the space provided.
- Enter a KeyPass of your choice in the space provided.
- Enter your City, State, and Country details in the respective spaces.
- Enter Version number in the space provided.
- For successive version upgrade, an additional option called Key Store File is available for download.
- Choose the Status Bar Color from the range of colors provided. Upload suitable images in the Splash Screen, App Icon, and App Logo sections provided and click “Get apk file”.
- Preview the outlook of your Final version on the right side of the App Setup page.
- Visit “Download apk” after a while to find the final apk file, QR Code and Source Link.
- Library
The source files available in the library will help you integrate the AR feature that you created in an existing mobile application.
- Download APK
Visit this page shortly after you have requested either a developmental or final version of the apk files.
- Manual Download
Click on the icon that reads “.APK file” to download the apk file on your system
- QR Code Scanning
Scan the QR Code provided to download the .apk file on your mobile device.
- Copy Link
Click on the Copy Link option and paste the link on any browser to automatically download the .apk files in your system. It is useful to send the links across for your associates to download the .apk file without any hassle.
- Manual Download


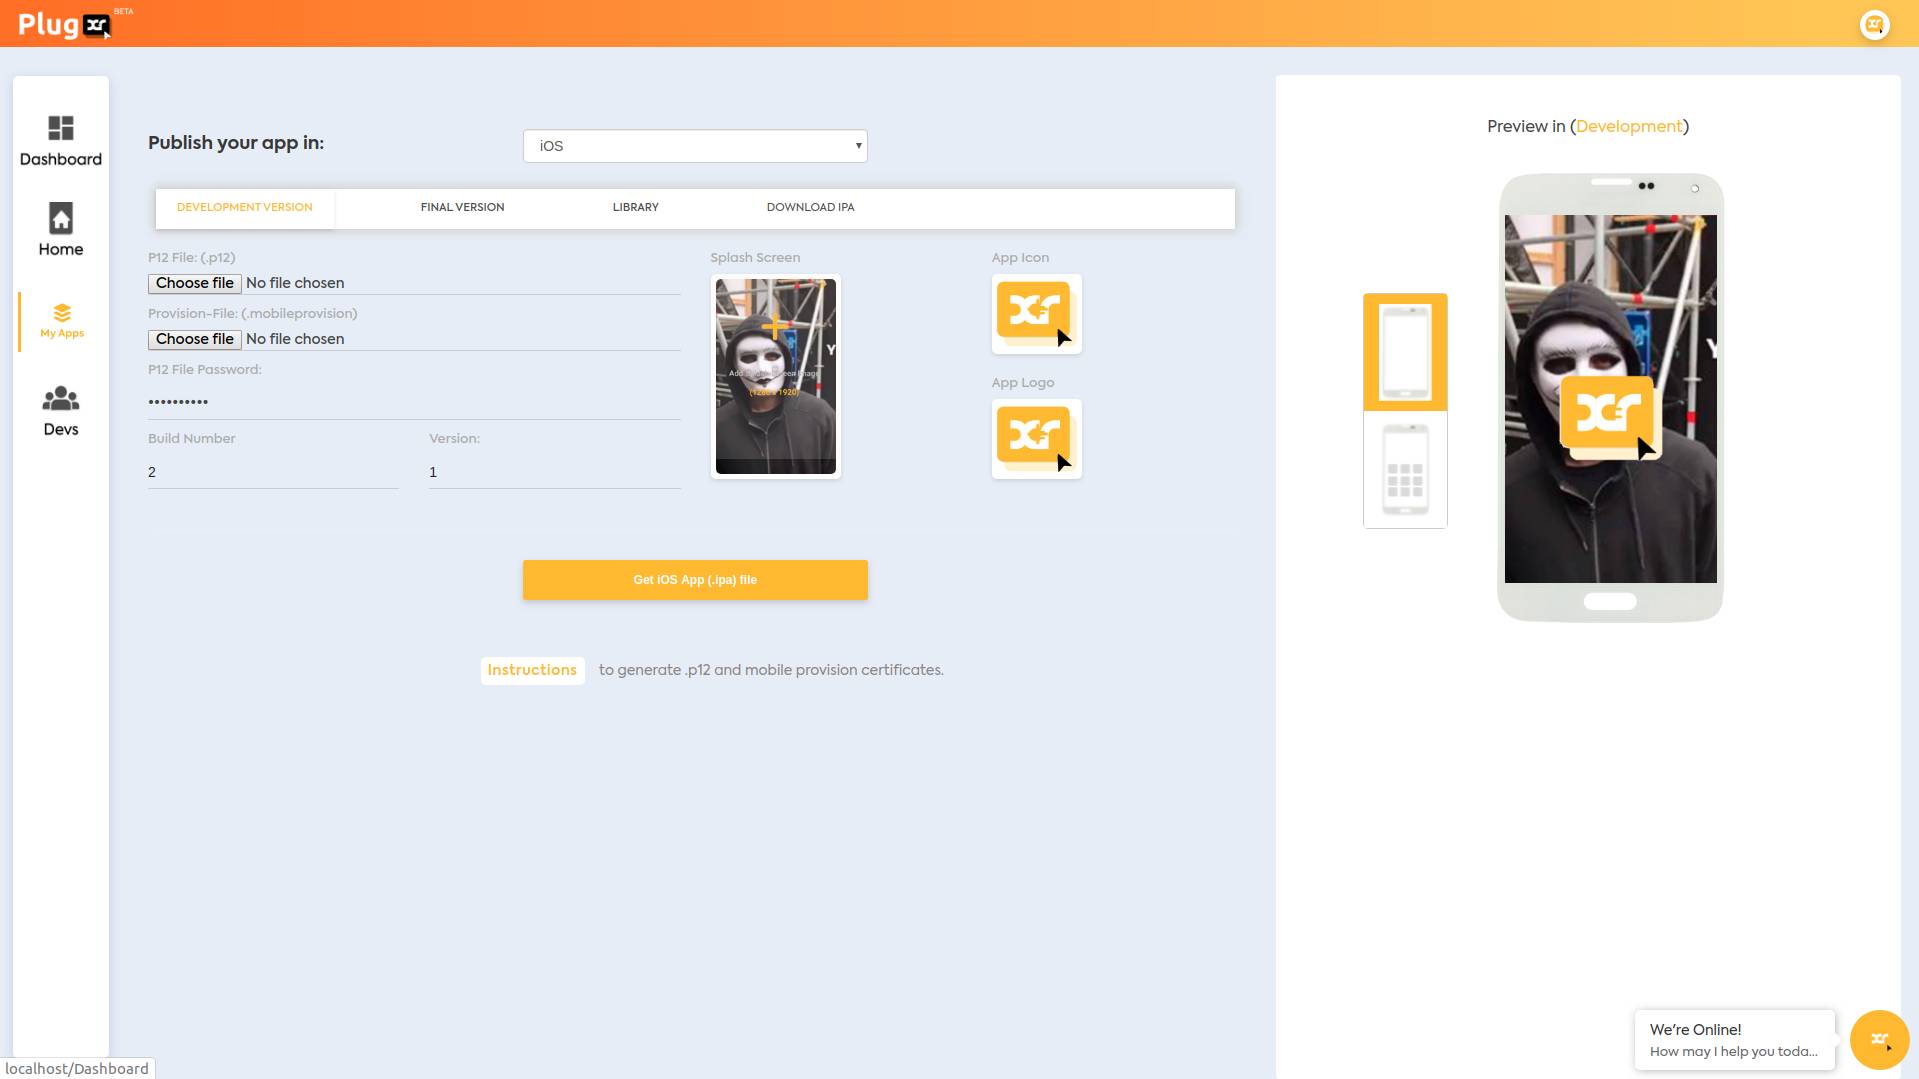
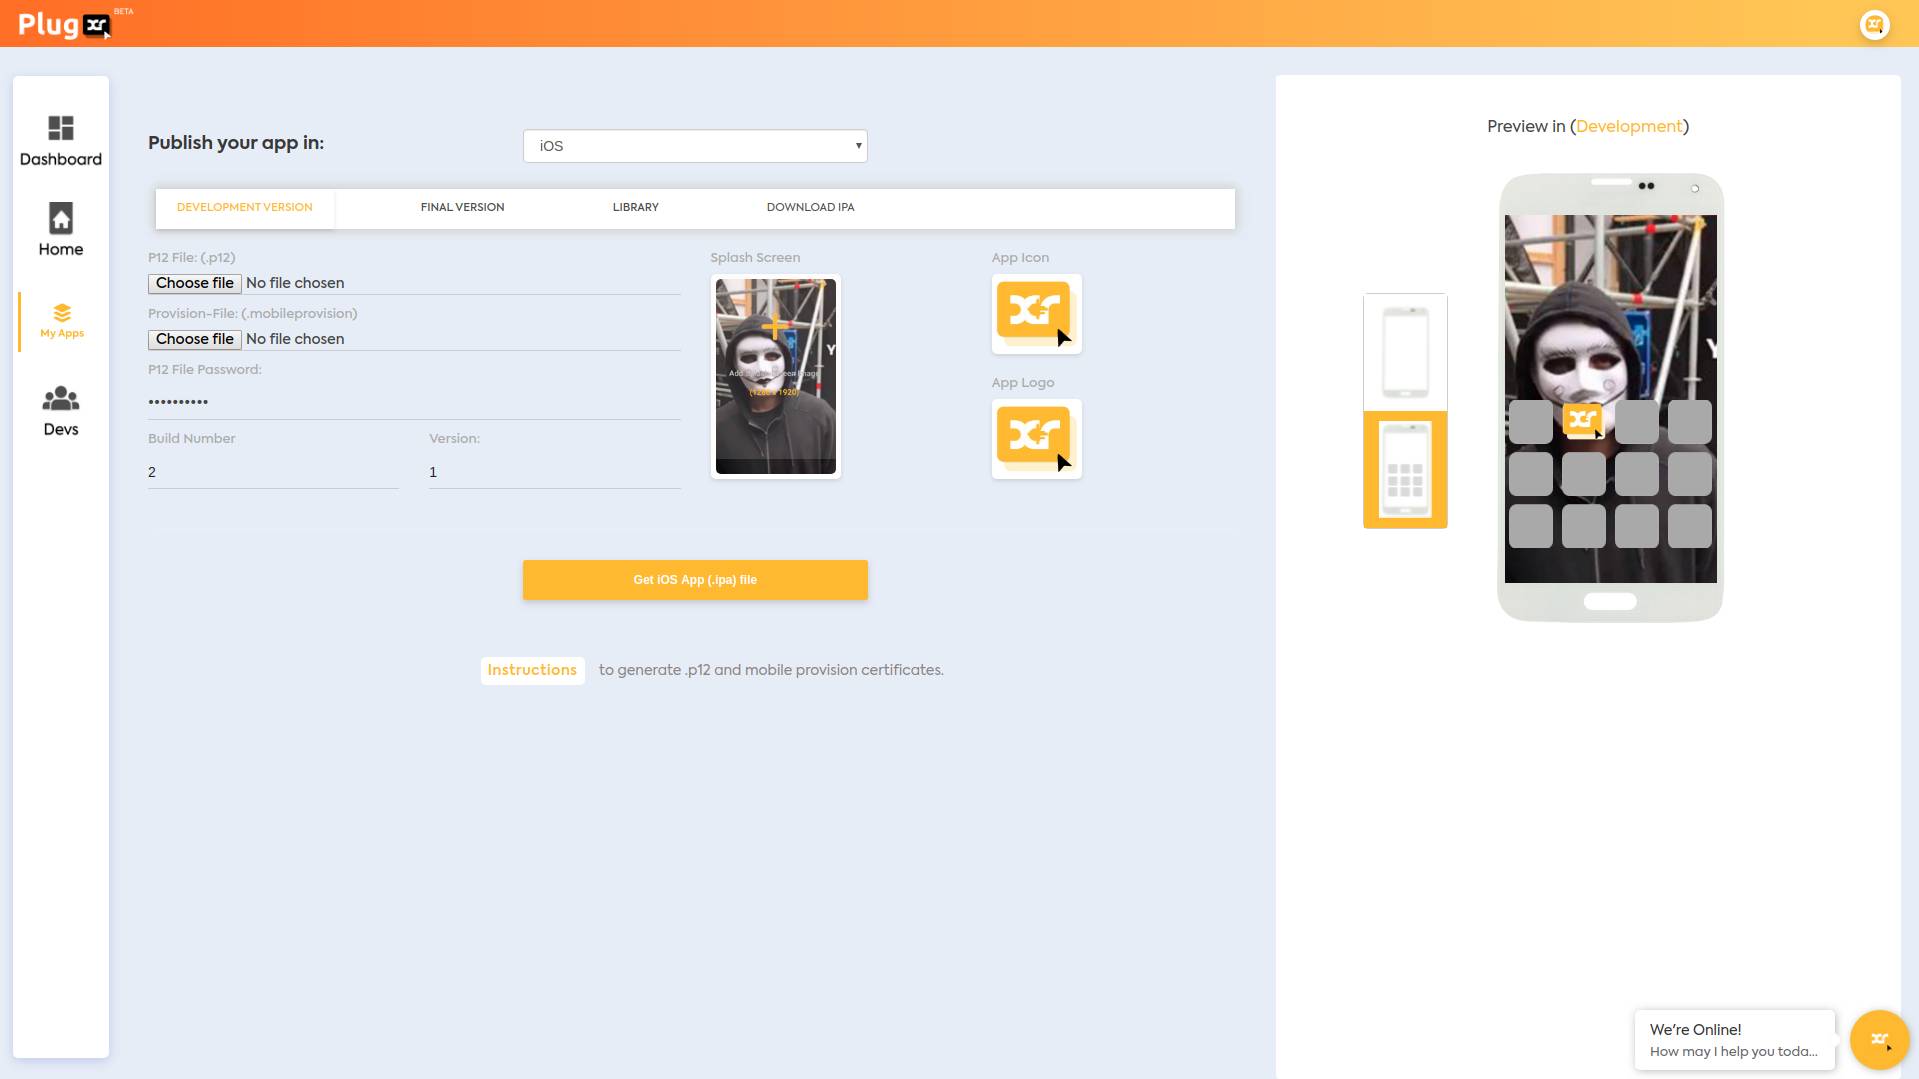
- iOS
In the top section of the App Setup page, select “iOS” in the “Publish your App in” option and click on the “Development Version” option. Watch our tutorial on how to generate .p12 and mobileprovision files and App Specific password to get the ipa file here (https://youtu.be/JRL6OhivMFc)
- Development Version
- Upload “p12 file” and “mobileprovision file” in the spaces provided.
- Enter the “p12 file password” that you would have created.
- Enter “Build Number” and “Version” of your choice.
- Upload suitable images in the Splash Screen, App Icon, and App Logo sections provided and click “Get iOS App file”. Preview the outlook of your Development version on the right side of the App Setup page.
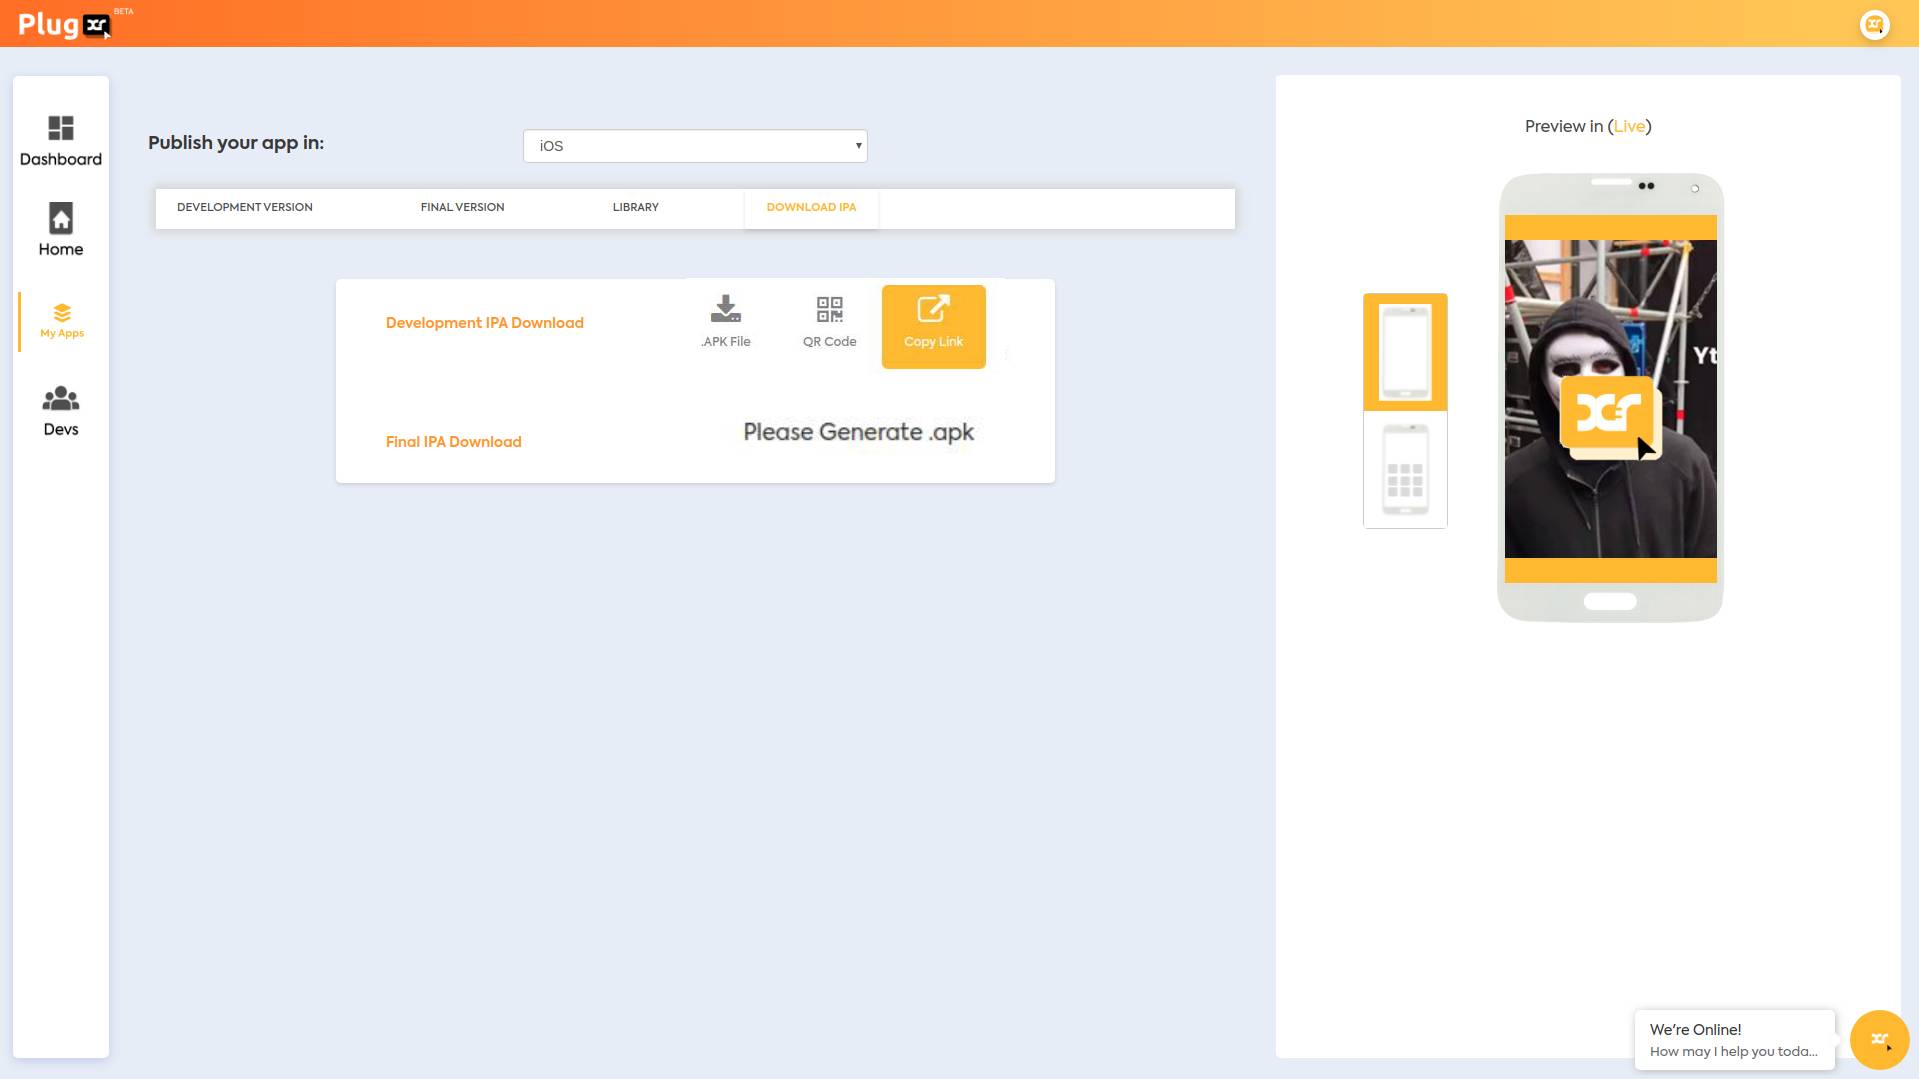
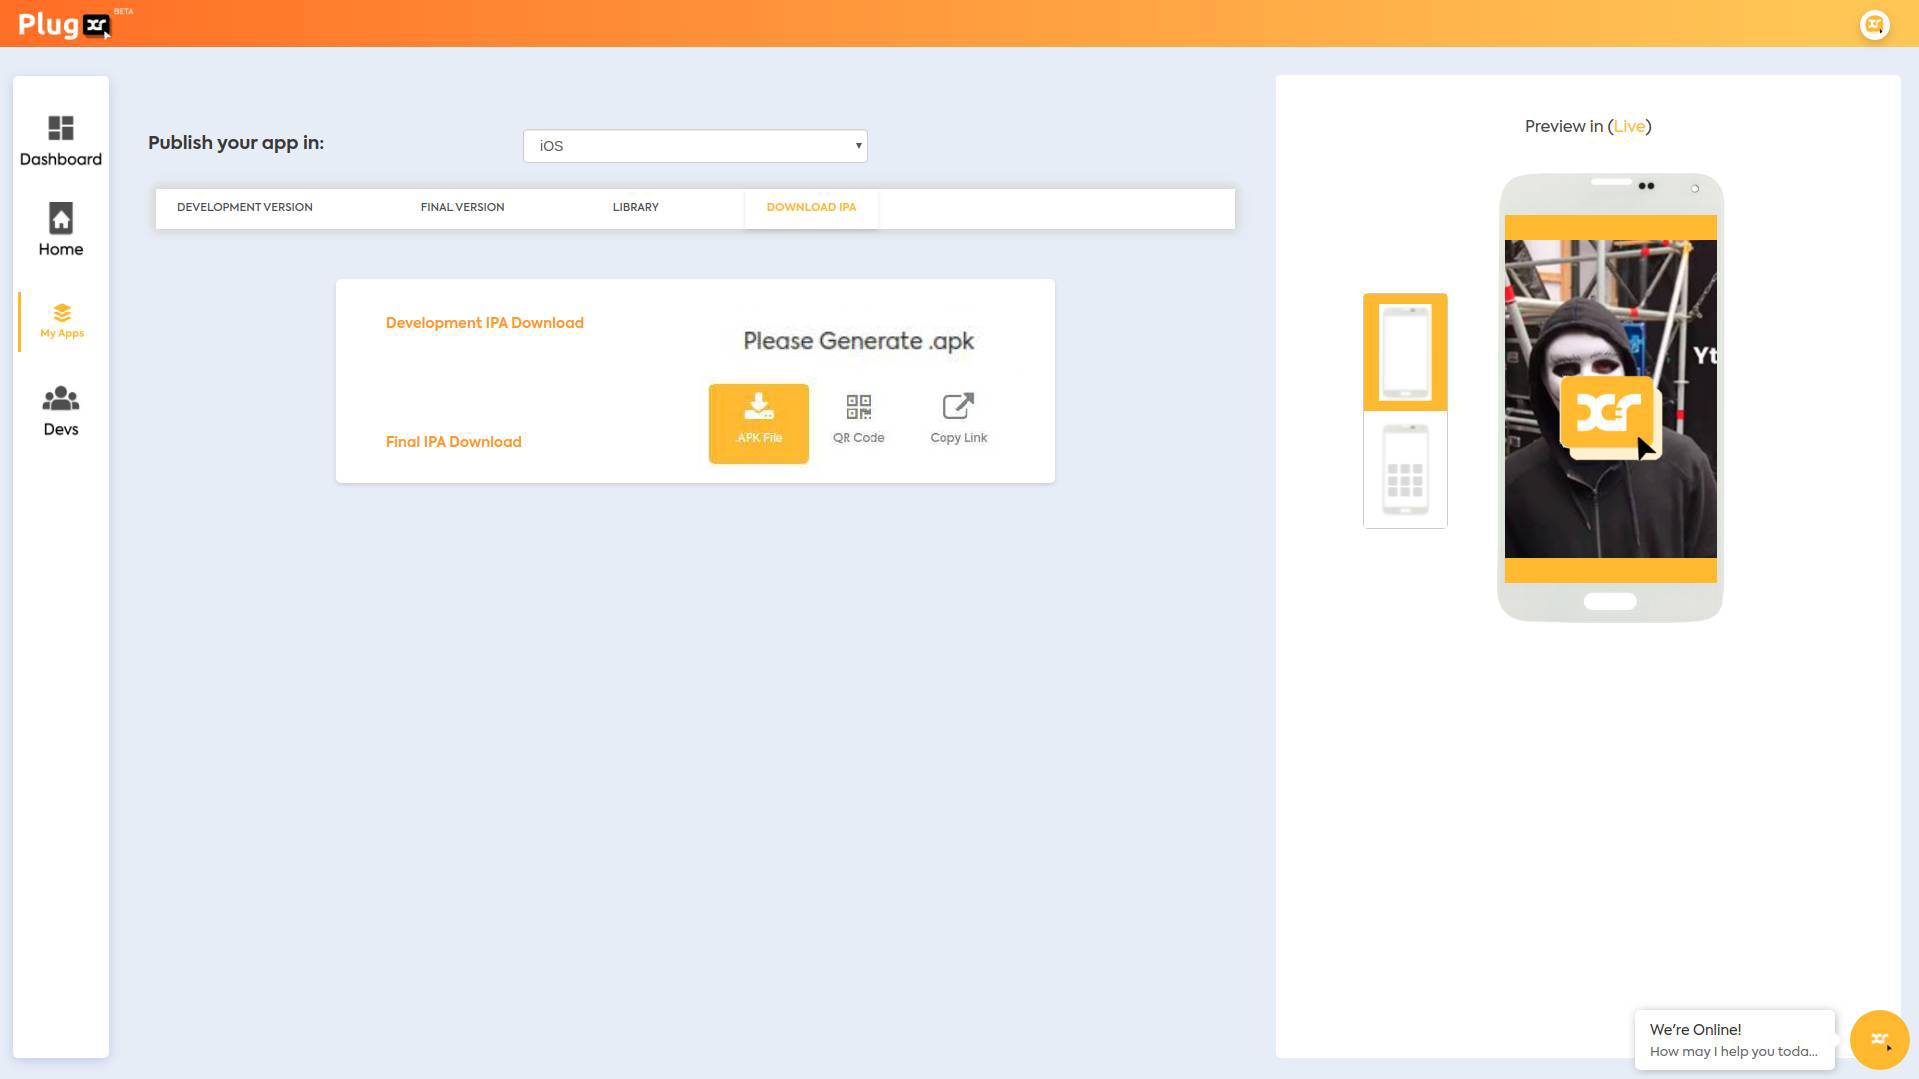
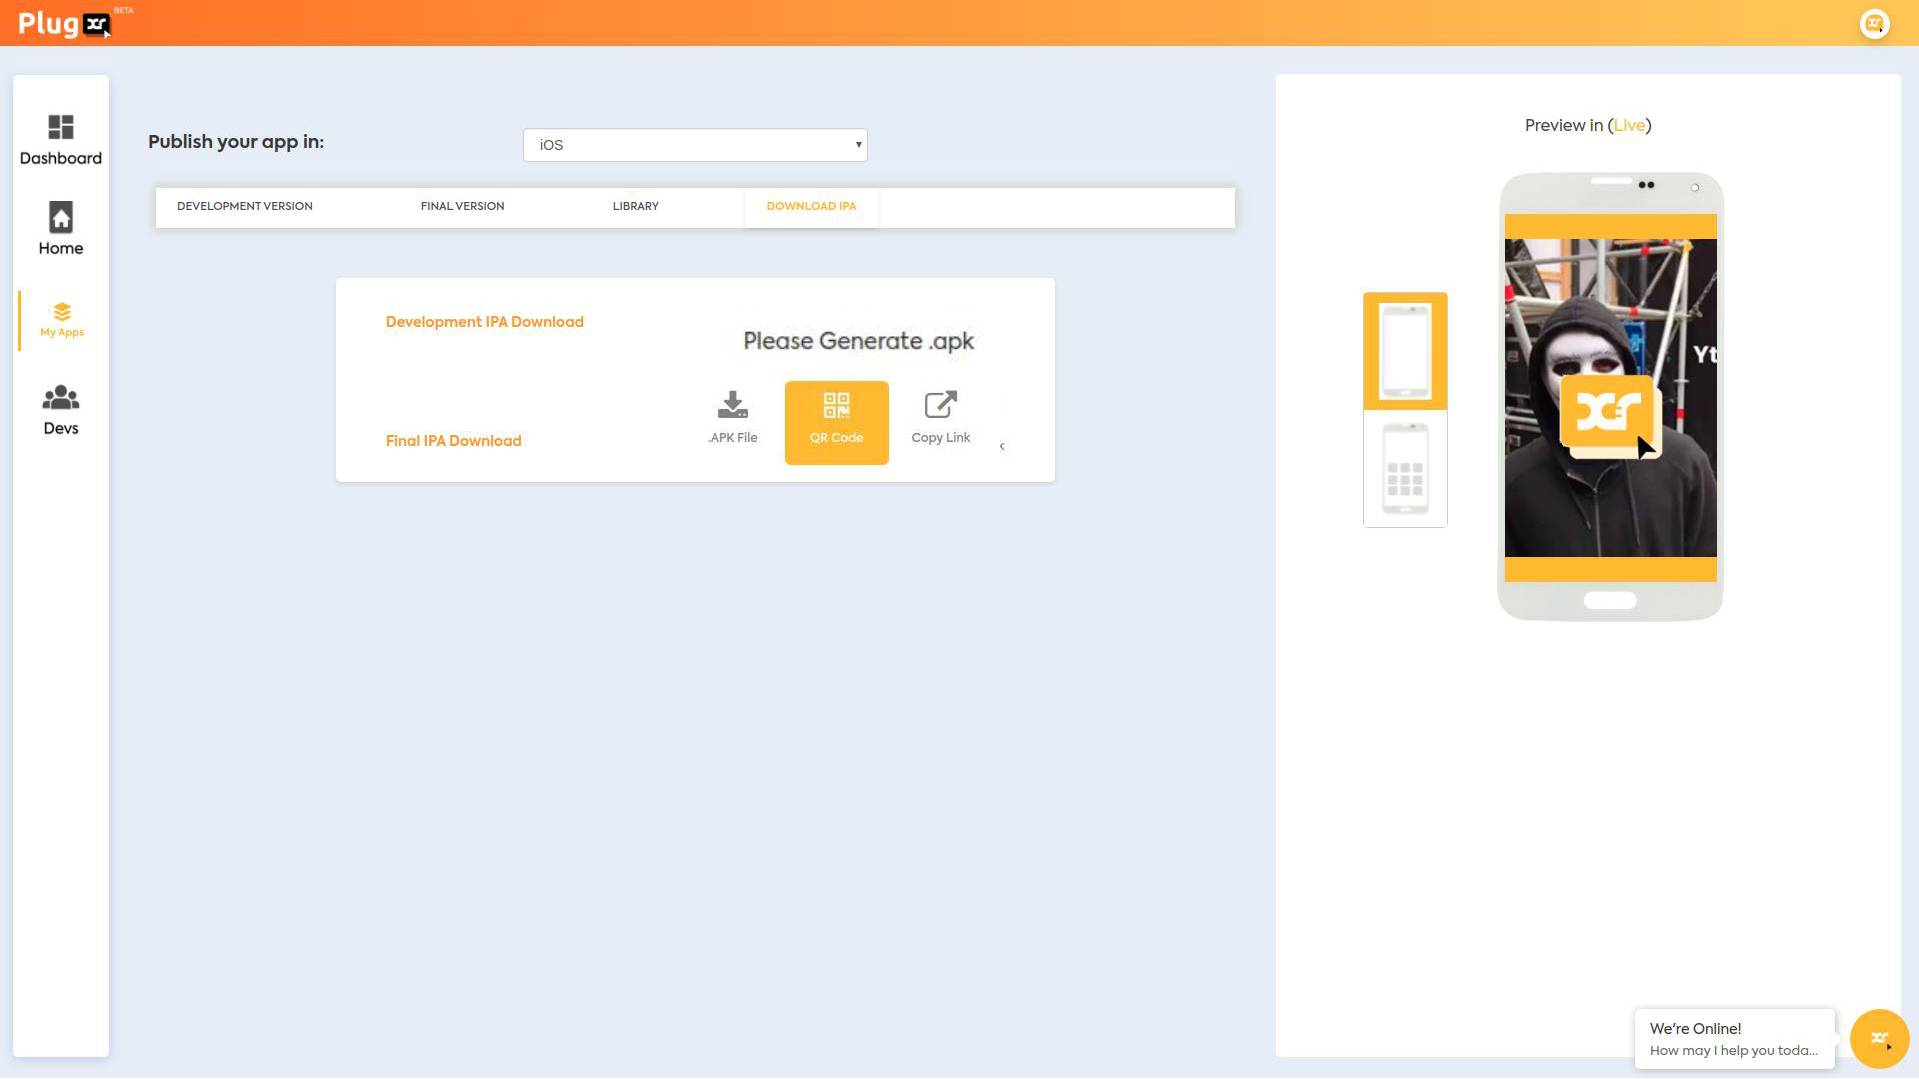
- Visit “Download IPA” after a while to find the development ipa file, QR Code and Source Link.
-
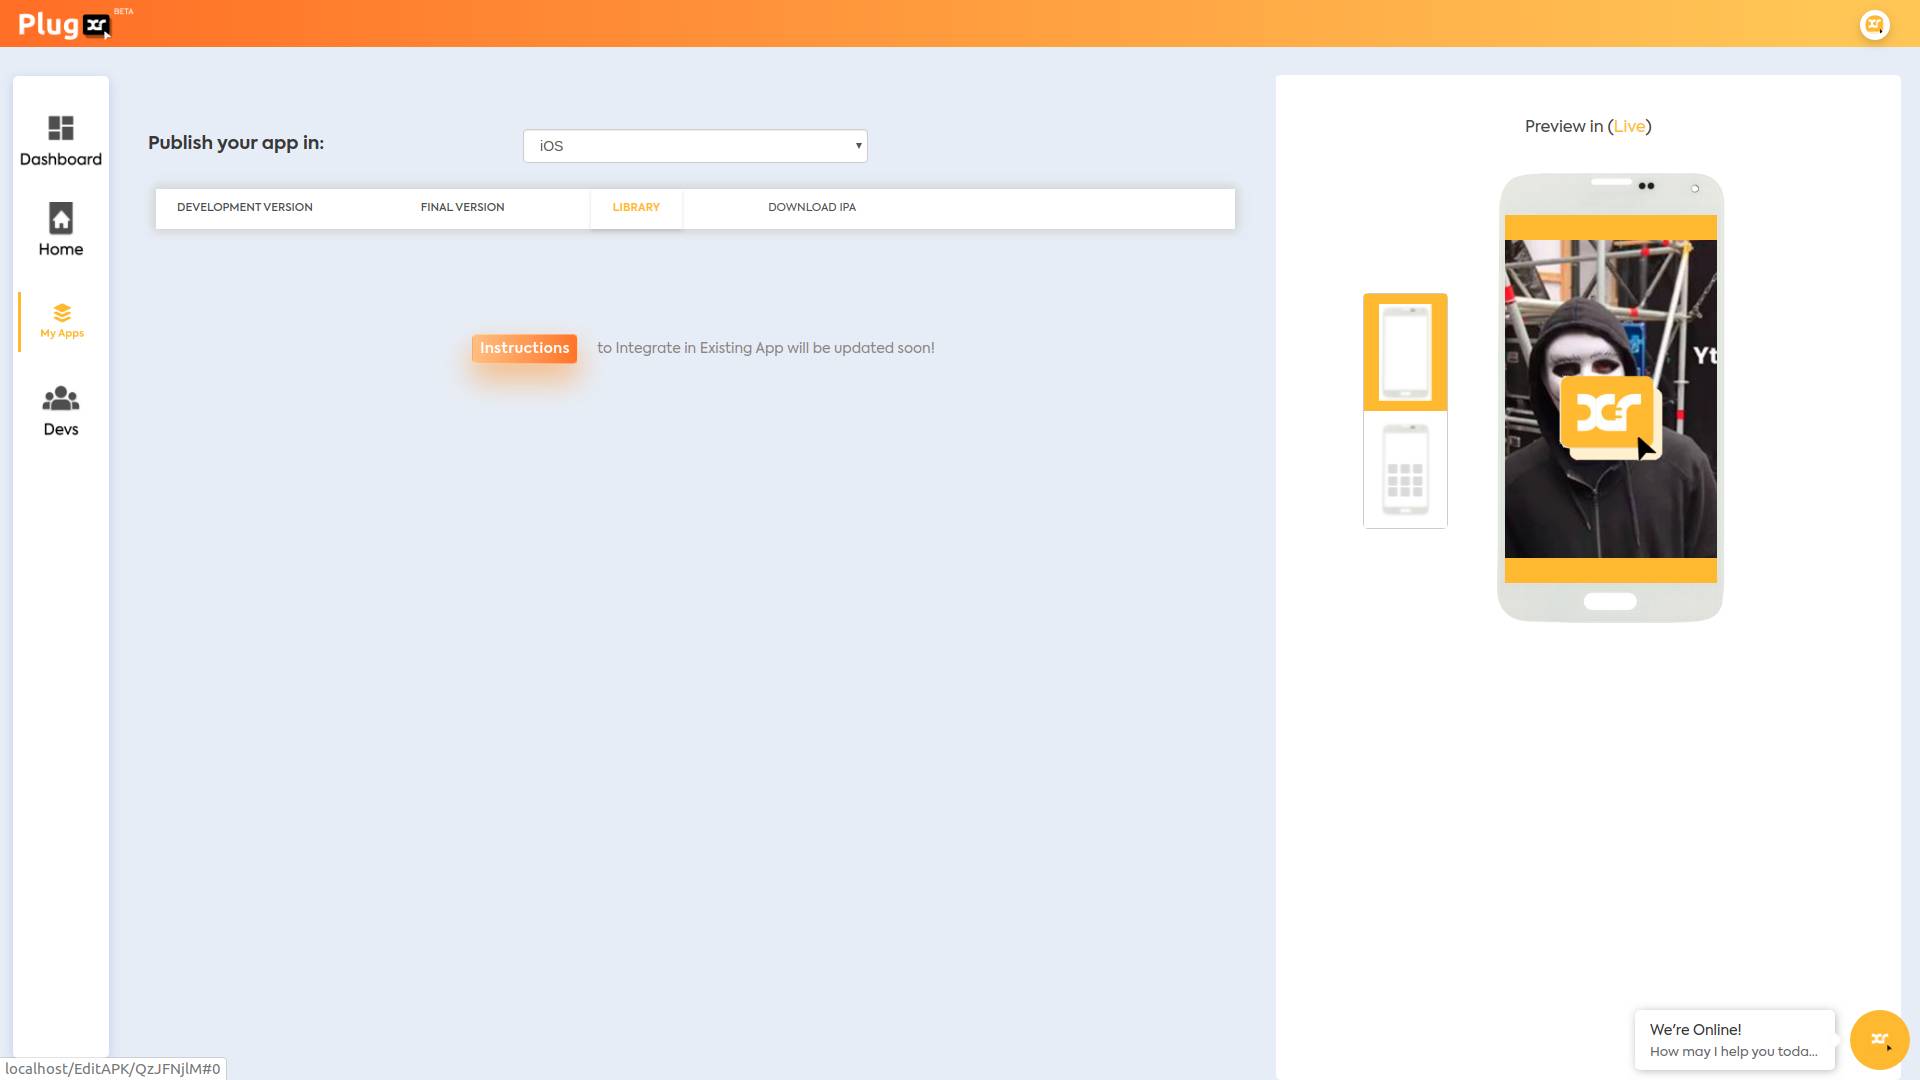
- Library
The source files available in the library will help you integrate the AR feature that you created in an existing mobile application.
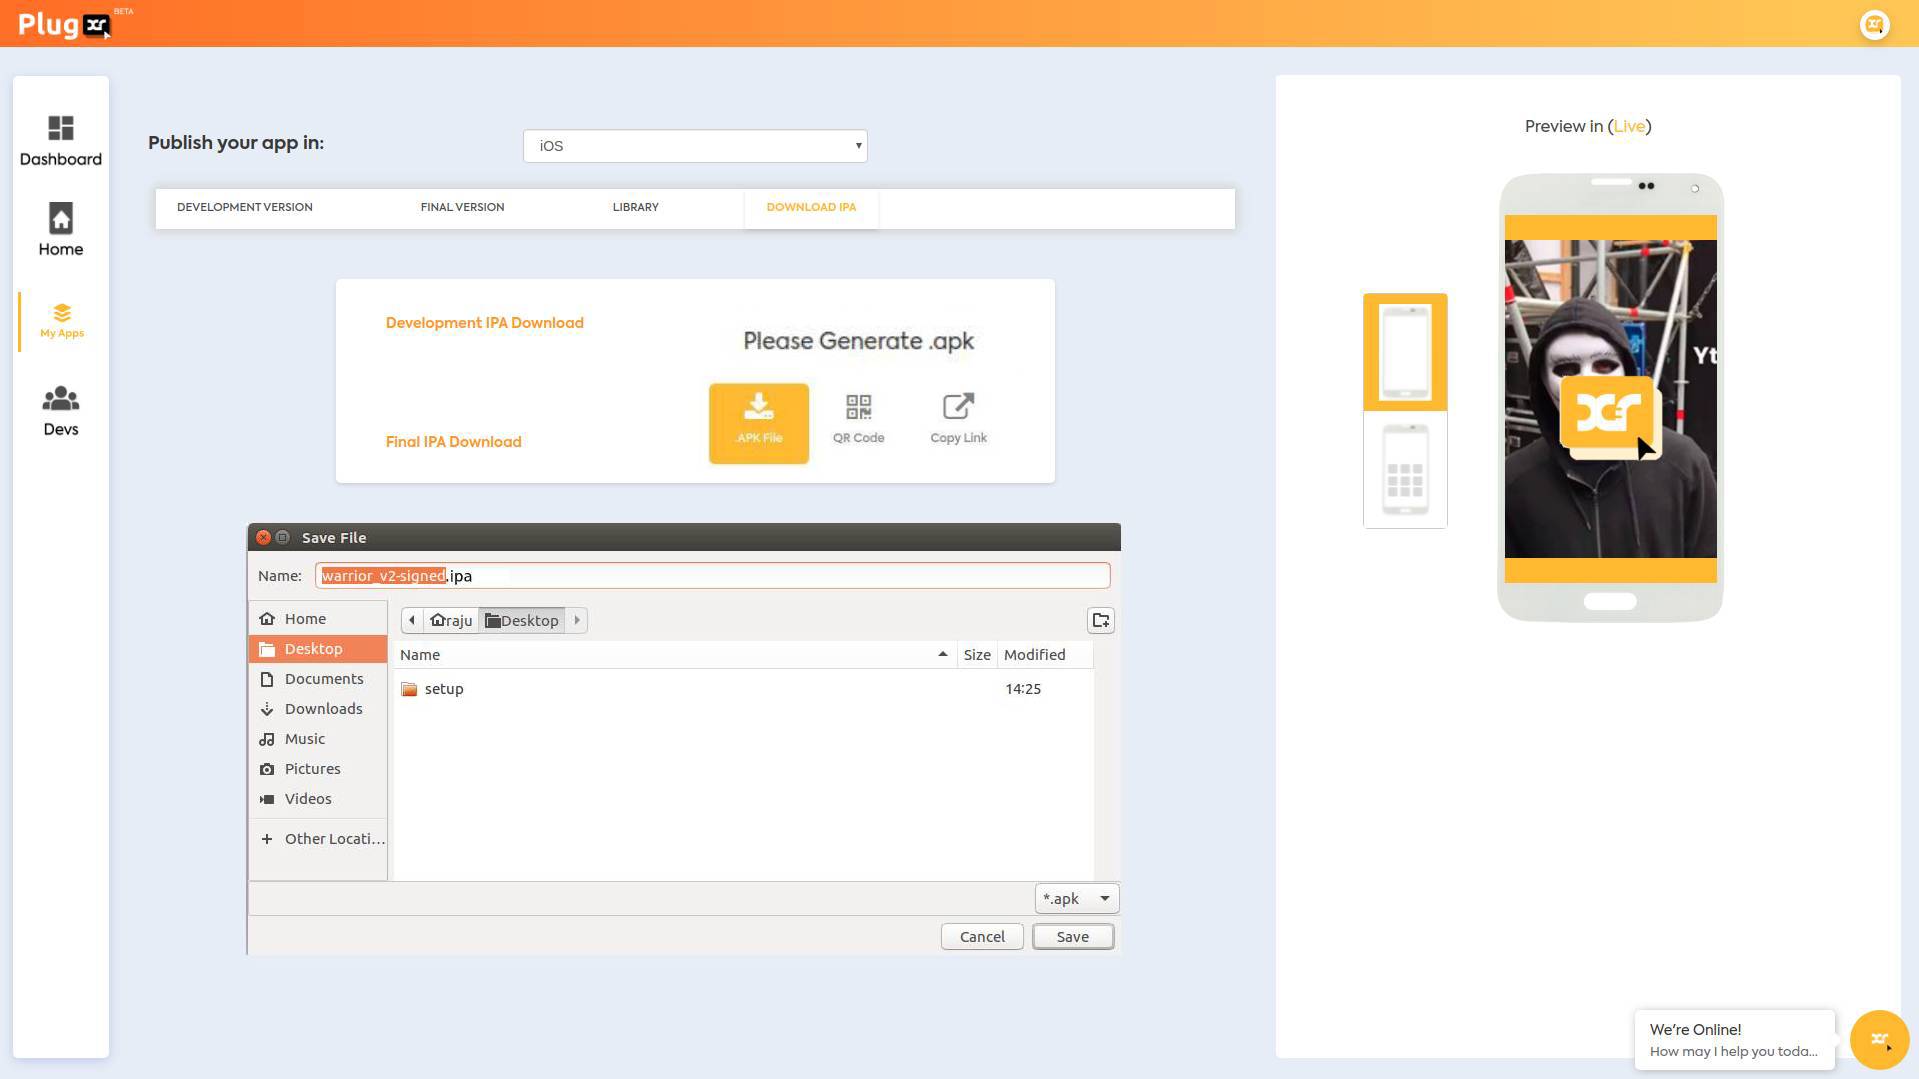
- Download IPA
Visit this page shortly after you have requested either a developmental or final version of the ipa files.
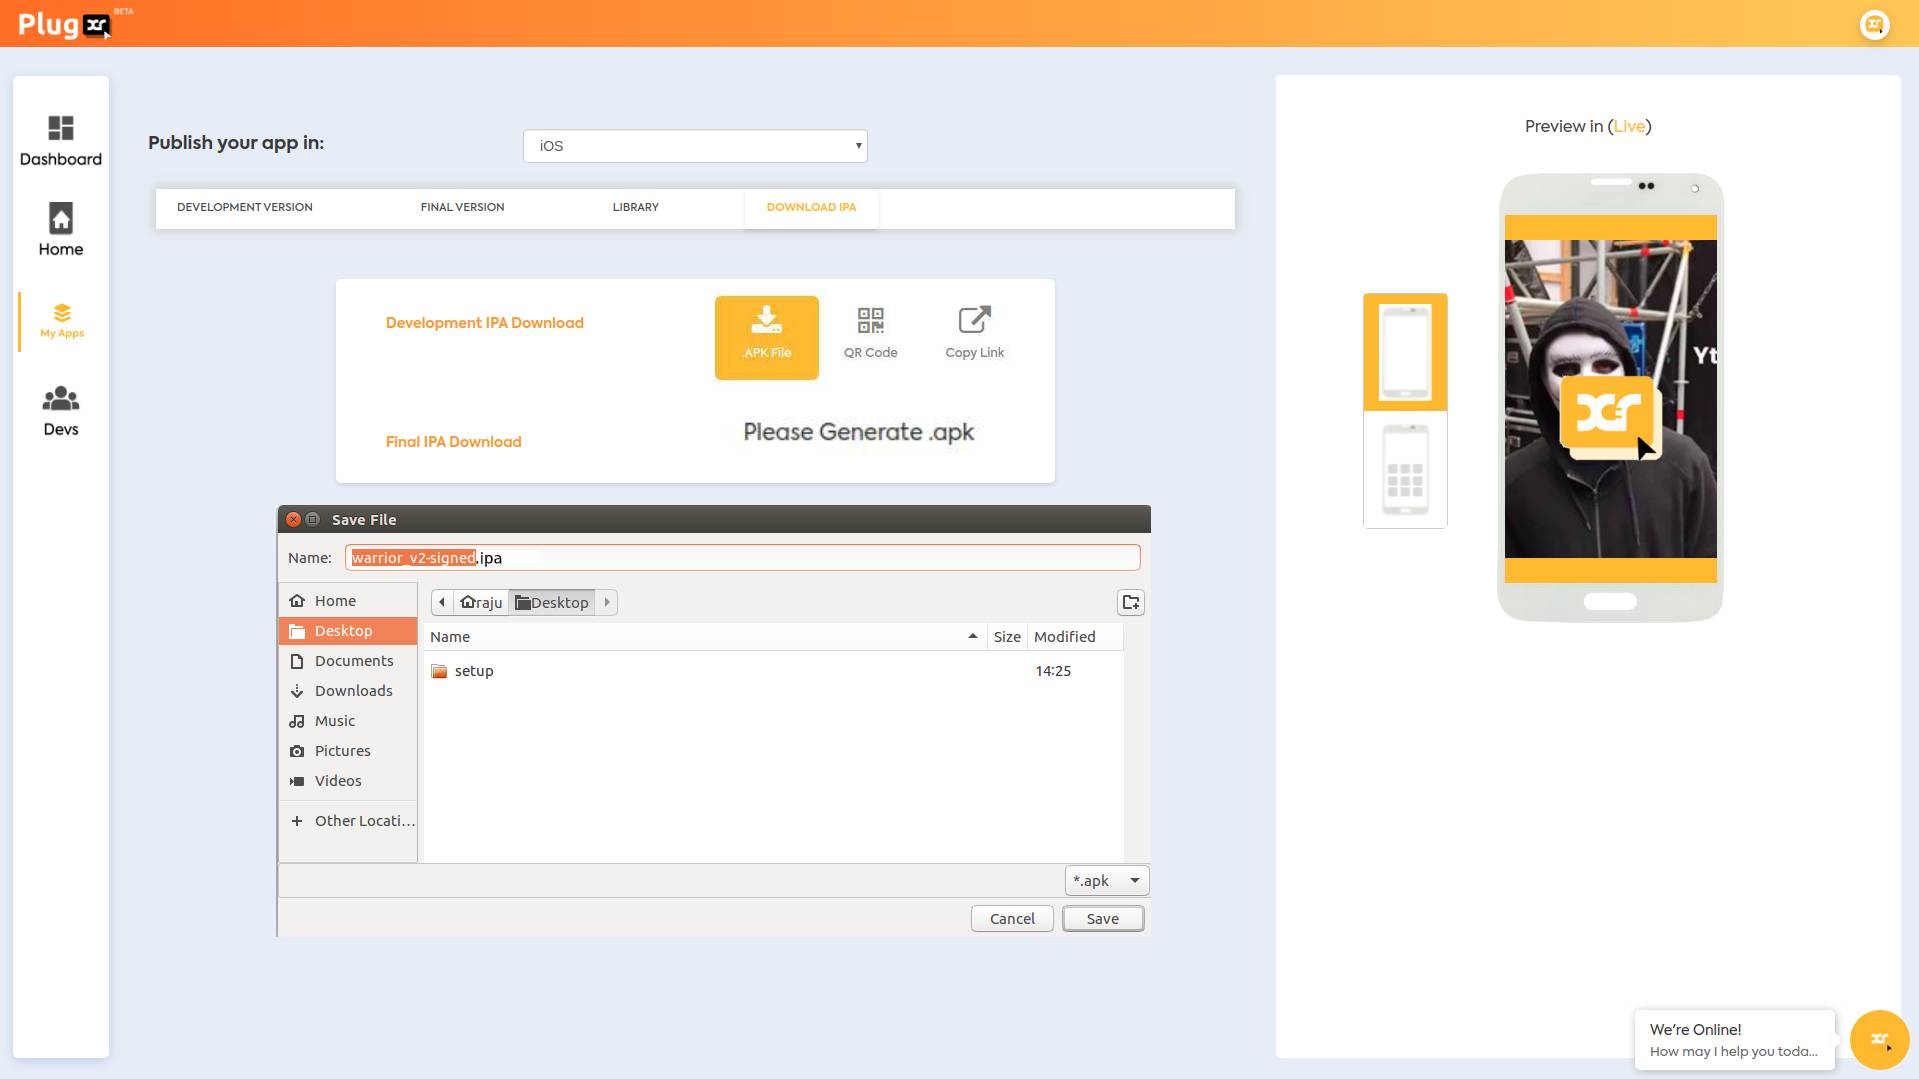
- Manual Download
Click on the icon that reads “.IPA file” to download the .ipa file on your system
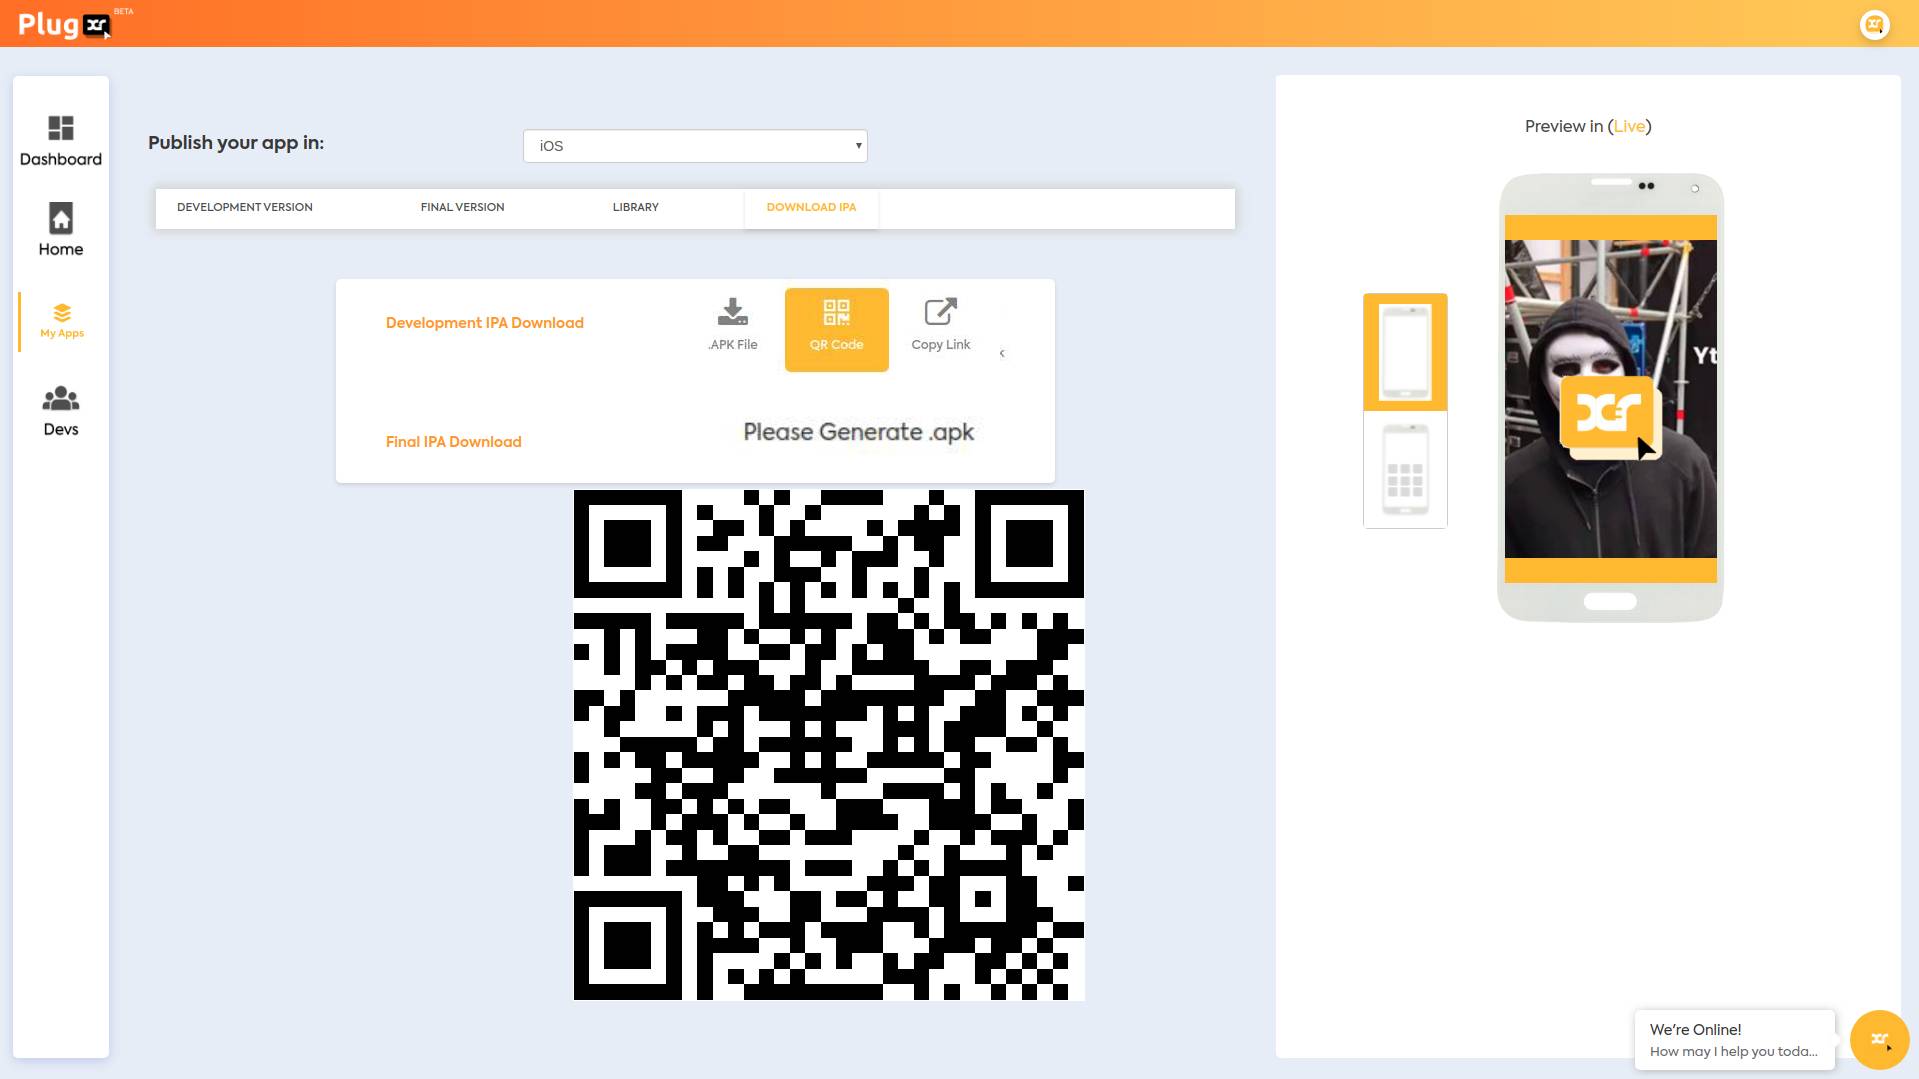
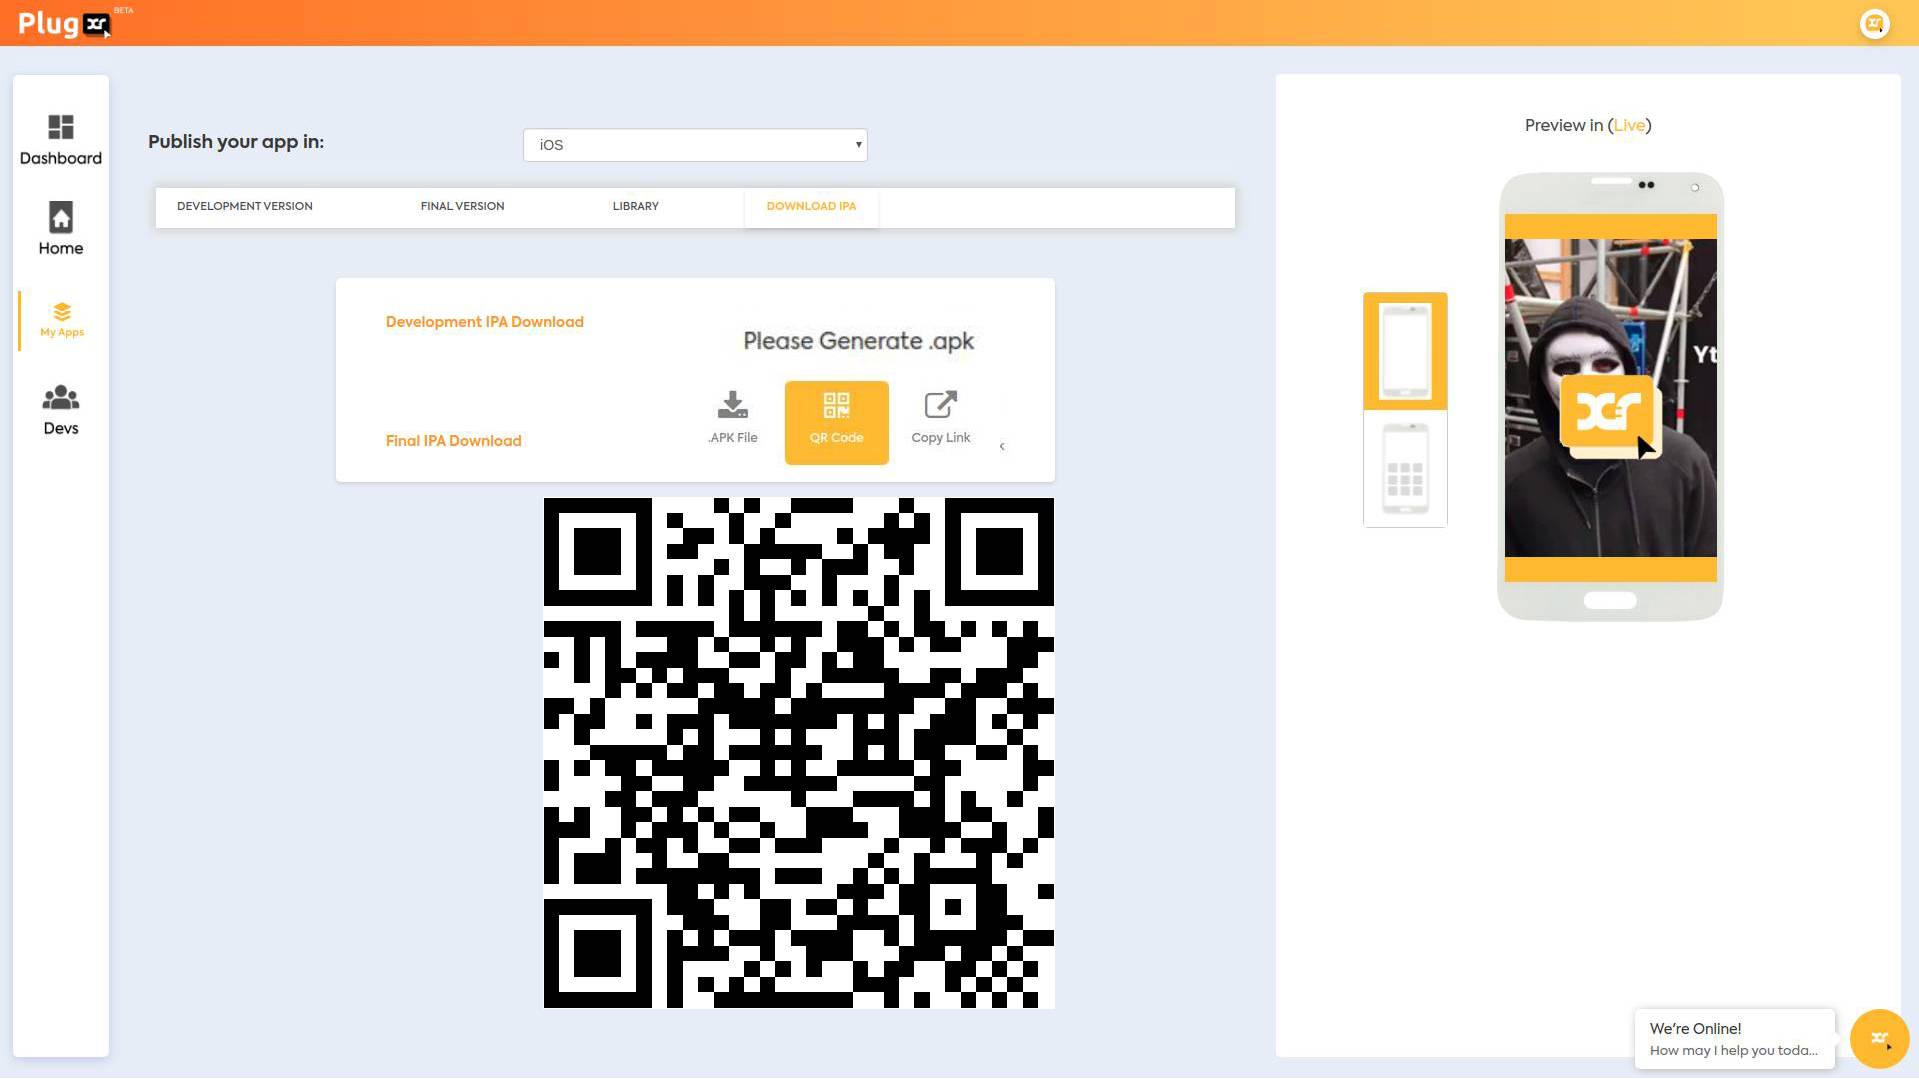
- QR Code Scanning
Scan the QR Code provided to download the .ipa file on your mobile device.
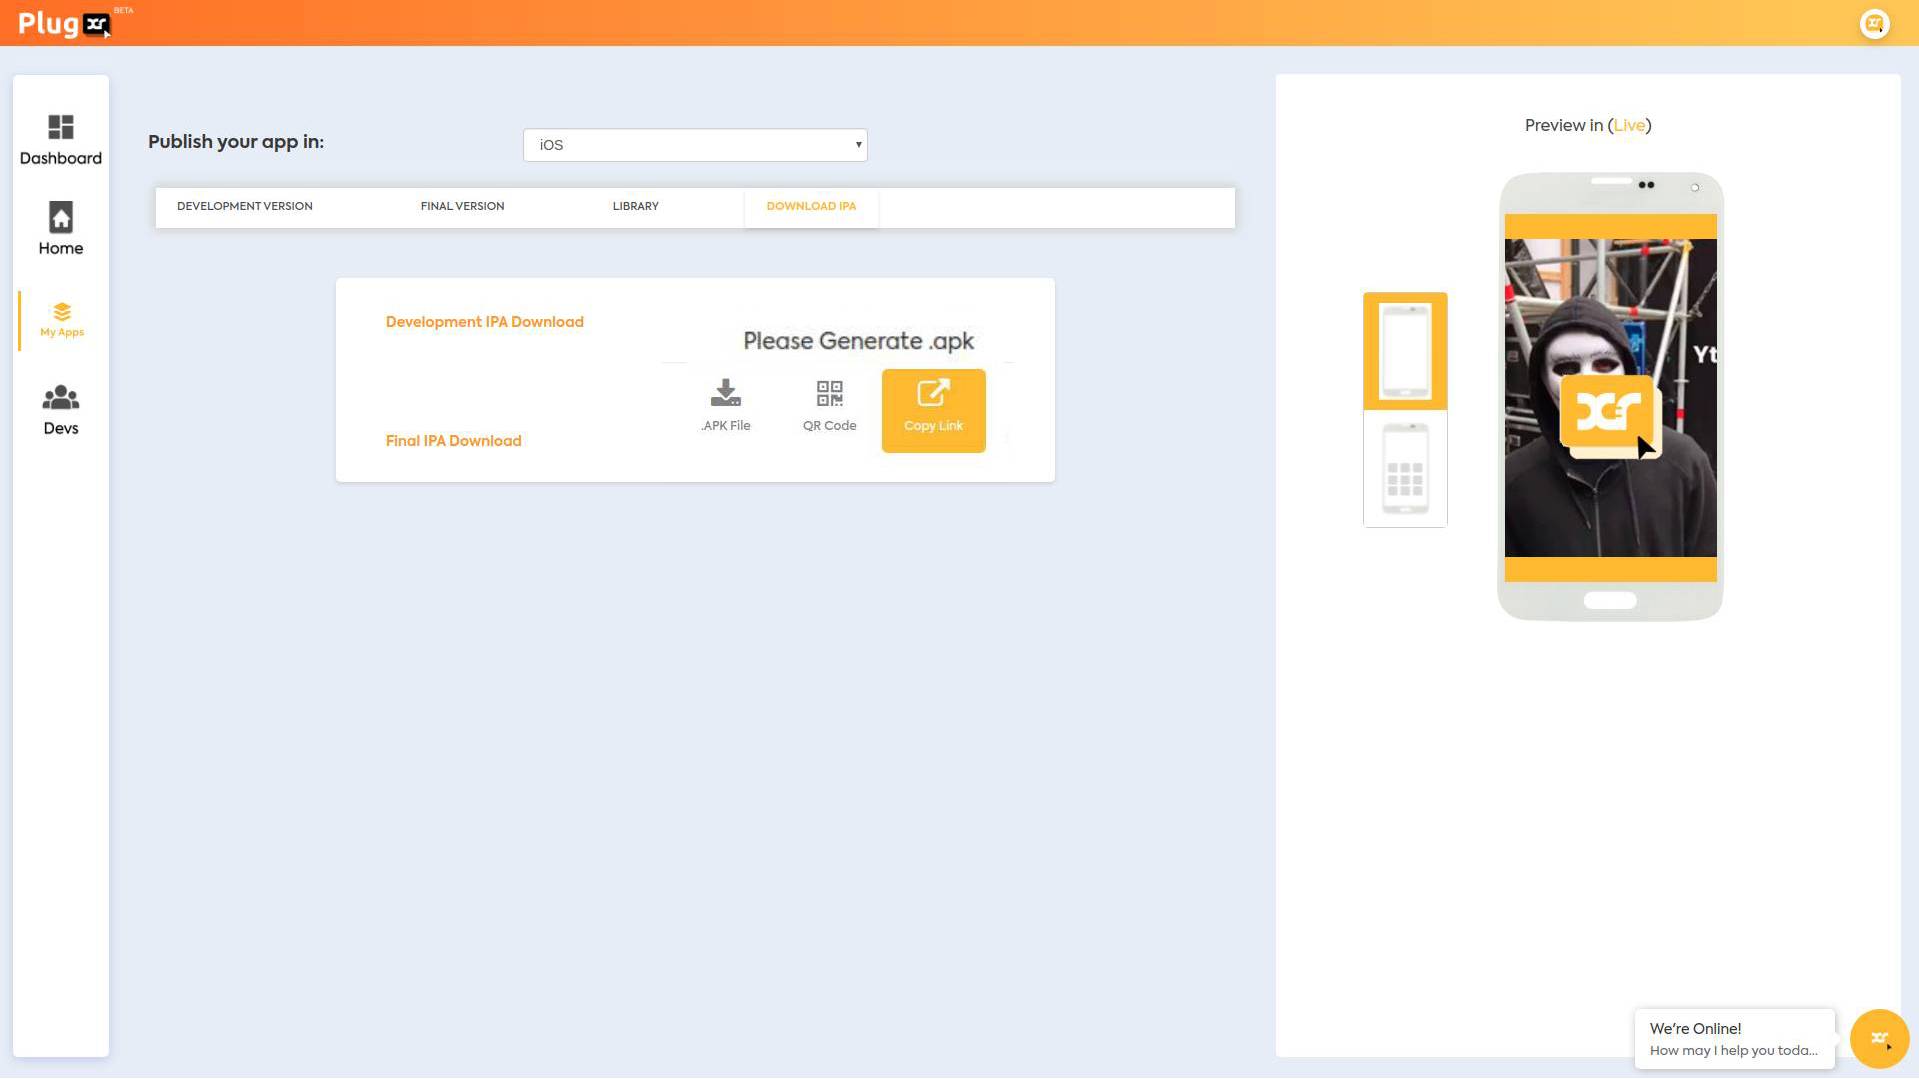
- Copy Link
Click on the Copy Link option and paste the link on any browser to automatically download the .ipa files in your system. It is useful to send the links across for your associates to download the .ipa file without any hassle.

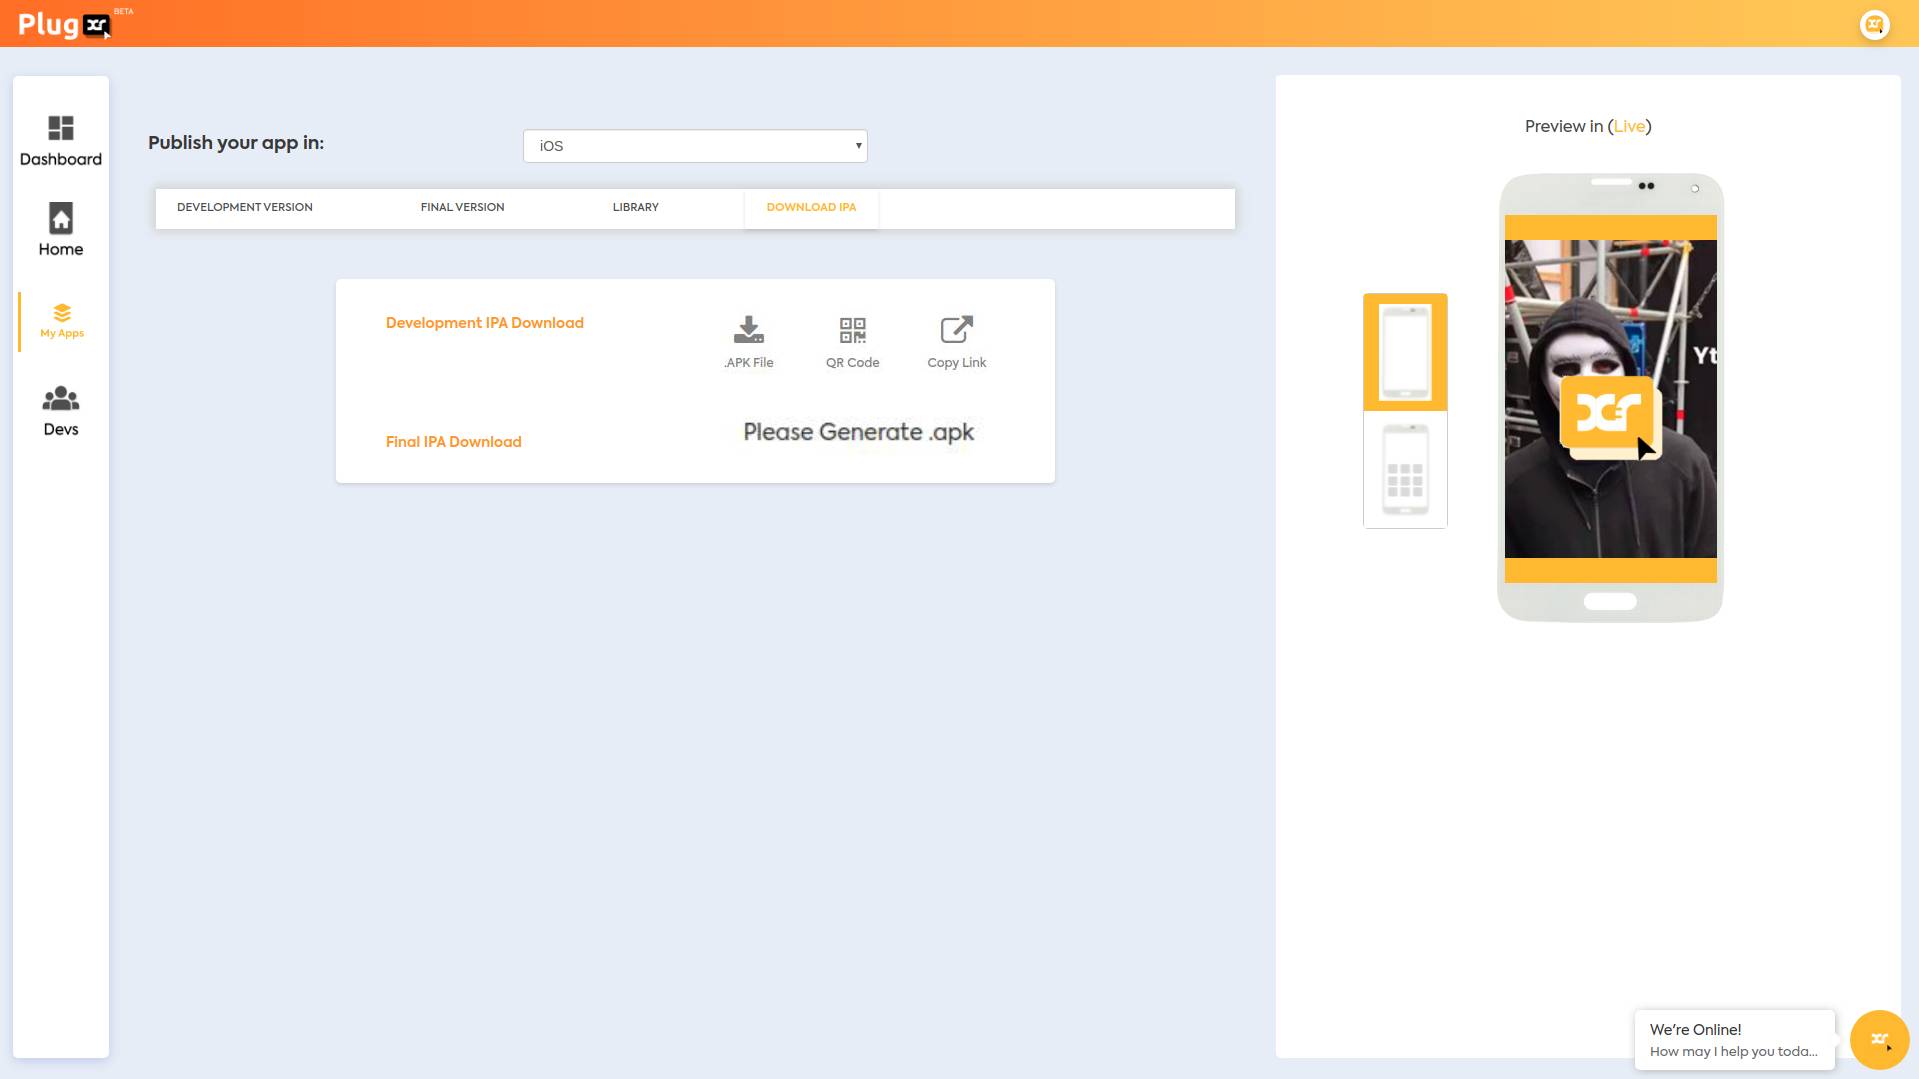
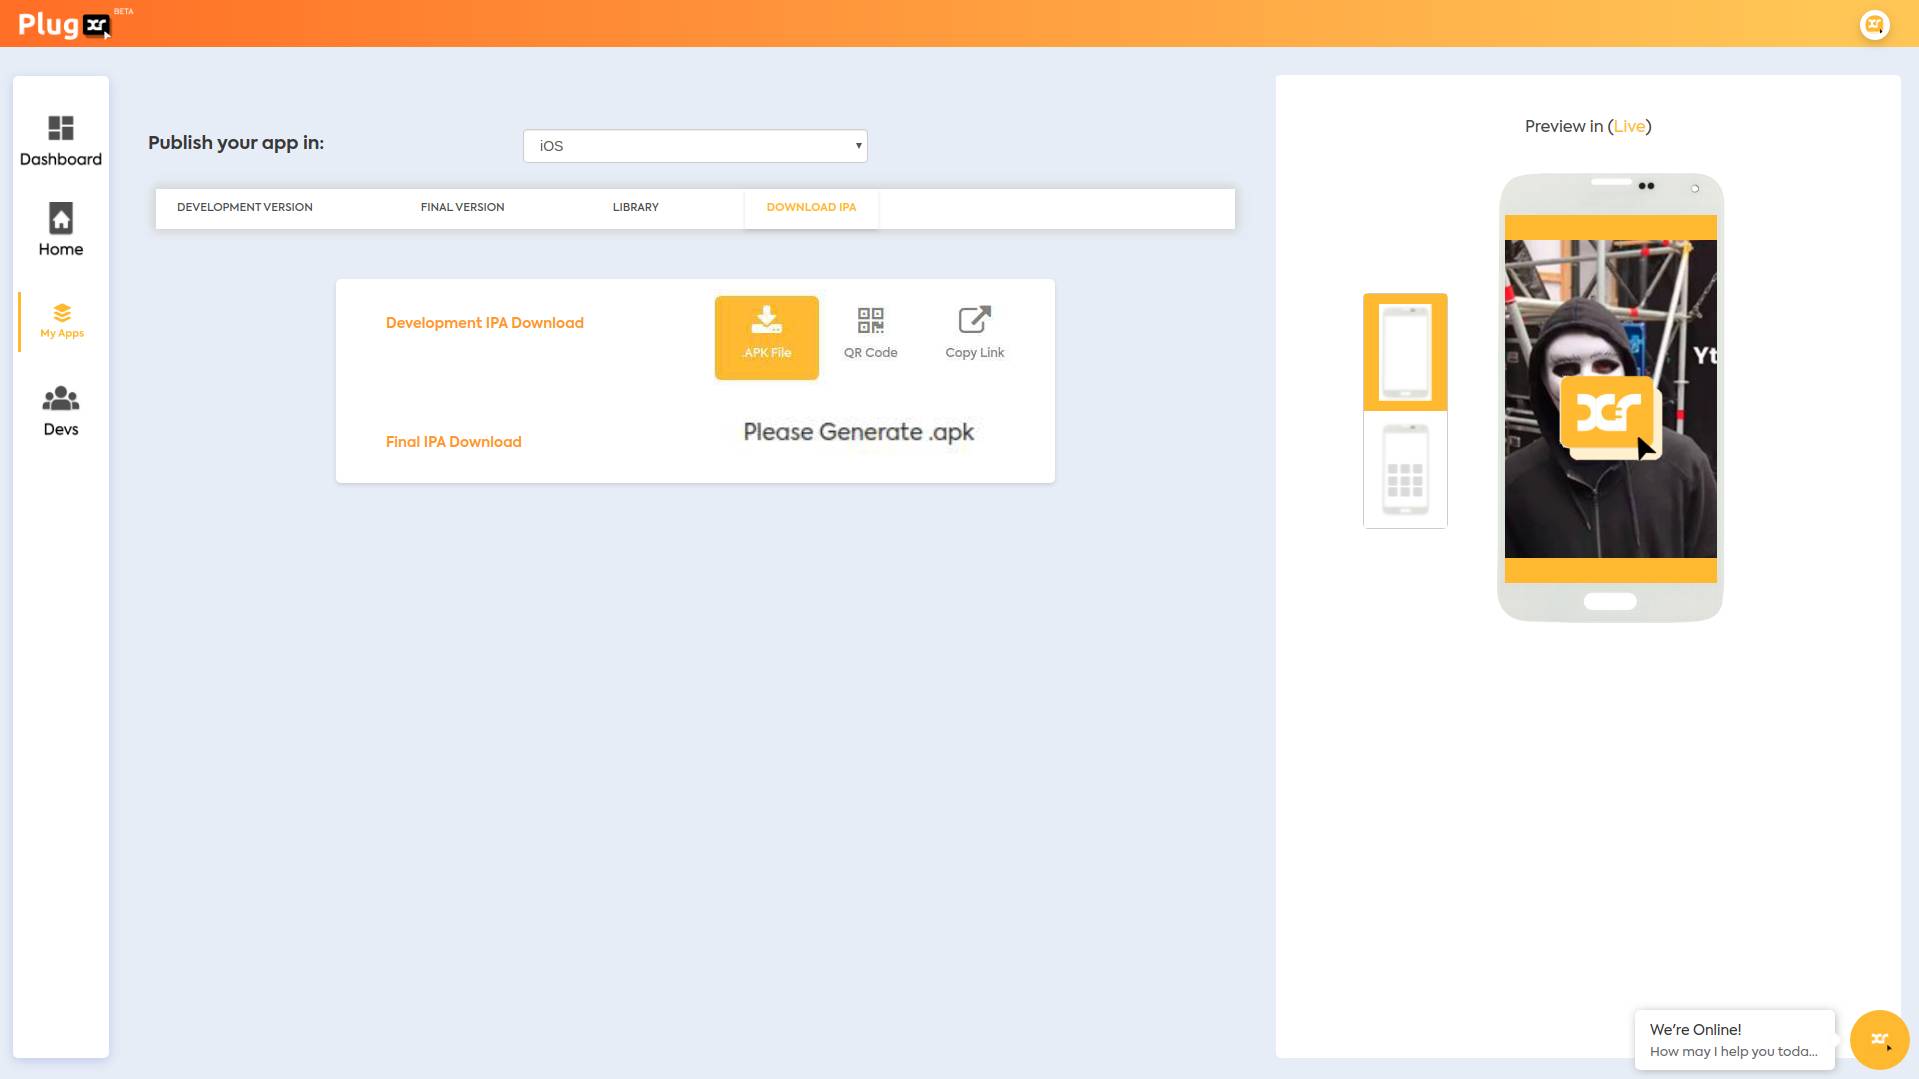

- Manual Download
- Library
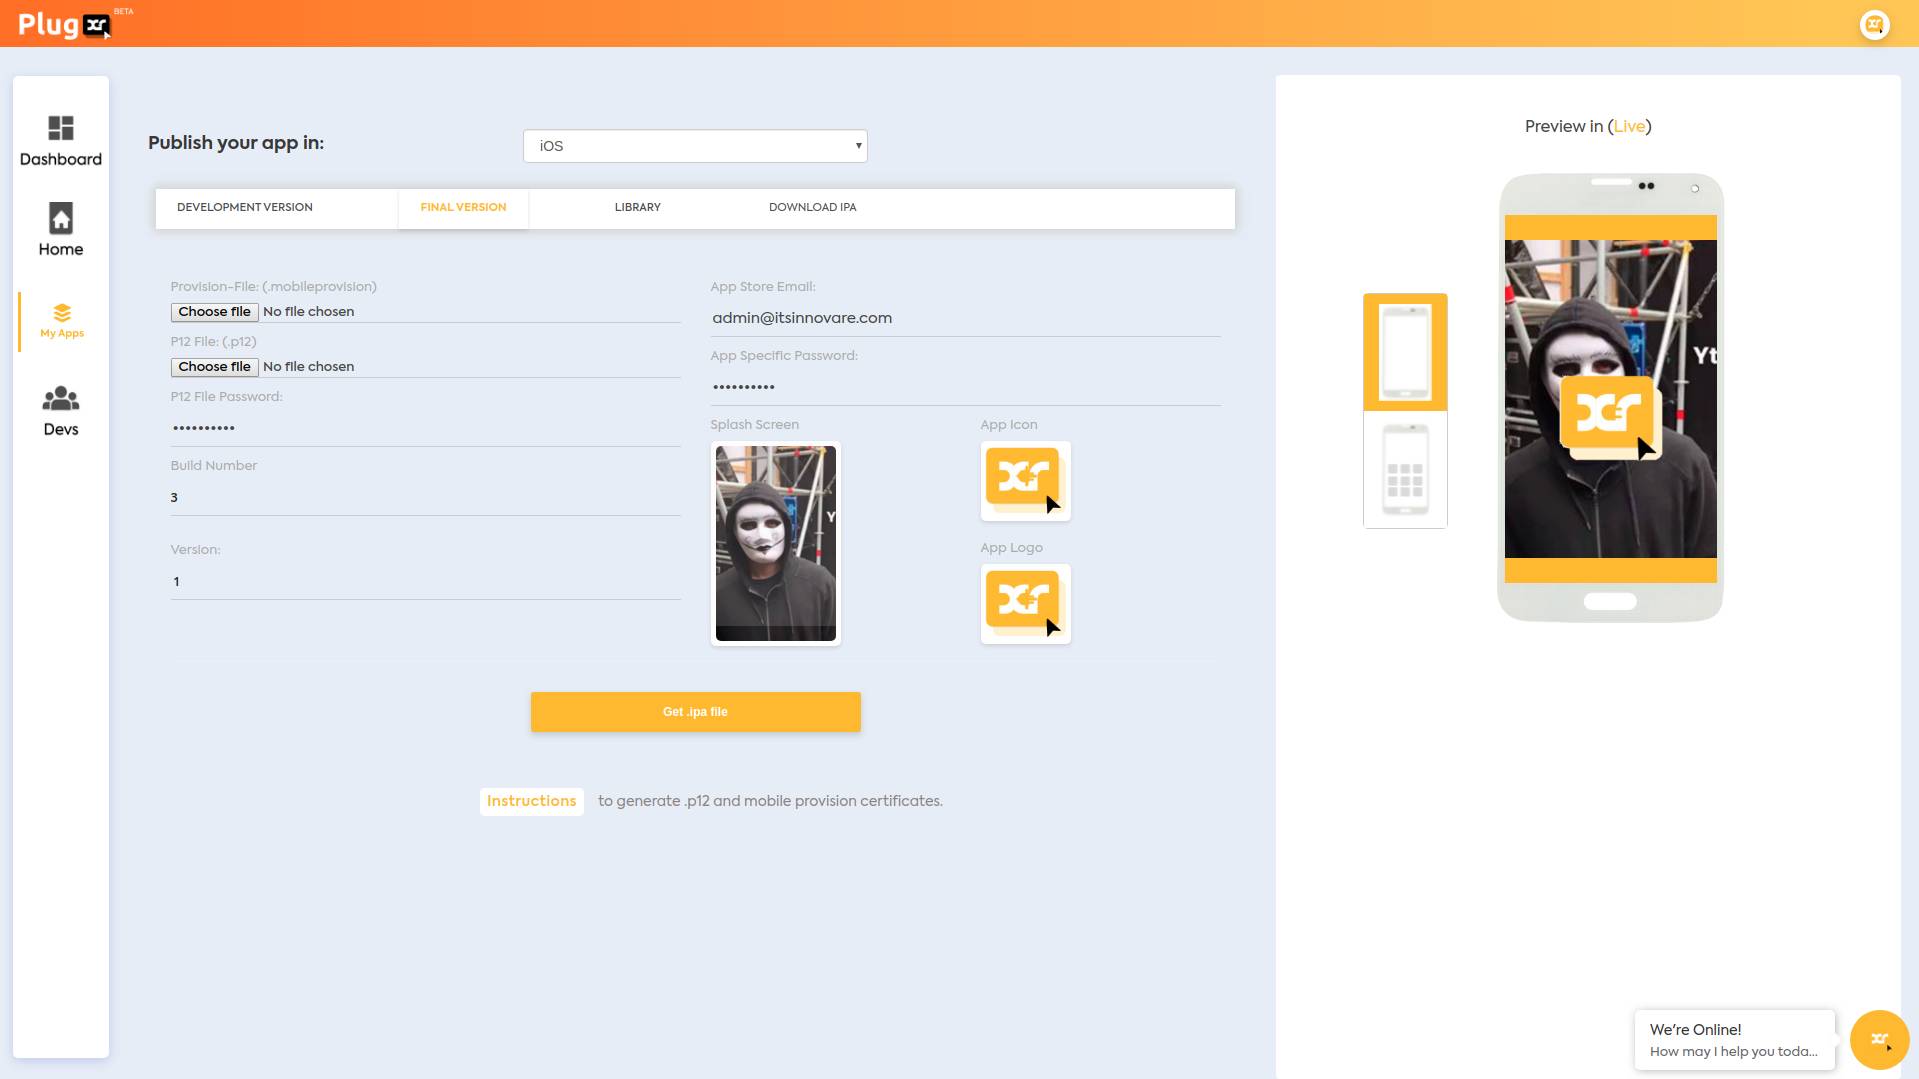
- Final Version
- Upload “p12 file” and “mobileprovision file” in the spaces provided.
- Enter the “p12 file password” that you would have created.
- Enter “Build Number” and “Version” of your choice.
- Enter your App Store Email in the respective space.
- Enter the App Specific Password (xxxx-xxxx-xxxx-xxxx) that you obtained in the process of generating p12 and mobileprovision files.
- Upload suitable images in the Splash Screen, App Icon, and App Logo sections provided and click “Get ipa file”.
- Preview the outlook of your Live version on the right side of the App Setup page.
- Visit “Download IPA” after a while to find the final ipa file, QR Code and Source Link.
- Library
The source files available in the library will help you integrate the AR feature that you created in an existing mobile application.
- Download IPA
Visit this page shortly after you have requested either a developmental or final version of the ipa files.
- Manual Download
Click on the icon that reads “.IPA file” to download the .ipa file on your system
- QR Code Scanning
Scan the QR Code provided to download the .ipa file on your mobile device.
- Copy Link
Click on the Copy Link option and paste the link on any browser to automatically download the .ipa files in your system. It is useful to send the links across for your associates to download the .ipa file without any hassle.
- Manual Download


- Development Version
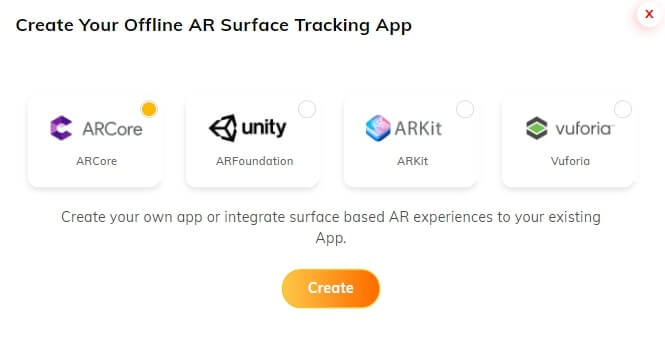
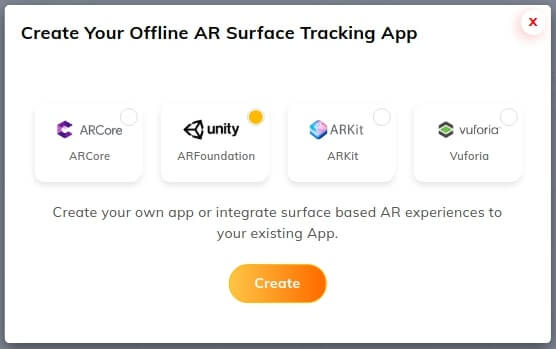
Mobile AR Offline (Surface Targets)
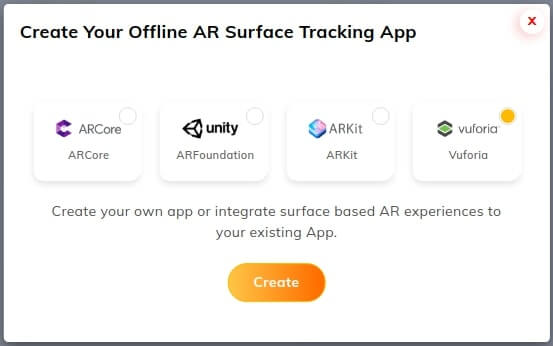
Create your surface-based AR App with the help of an Offline AR App (Surface tracking). Below mentioned are the steps to achieve the same. Click on Offline AR App (Surface Tracking) present on the home page. A pop-up appears with the following details.
Click on the Mobile AR Offline Surface Targets.
Create App
- SDK Details: Enter the SDK license keys in the respective blanks to proceed with the creation of AR Experience. Guidelines to obtain license keys for SDK are given in a link on the bottom of the pop-up. Create your offline AR Surface Tracking App with all the available SDKs. Those are
- AR Core
- AR Foundation
- AR Kit
- Vuforia
- Offline Surface Targets ARCore Steps:
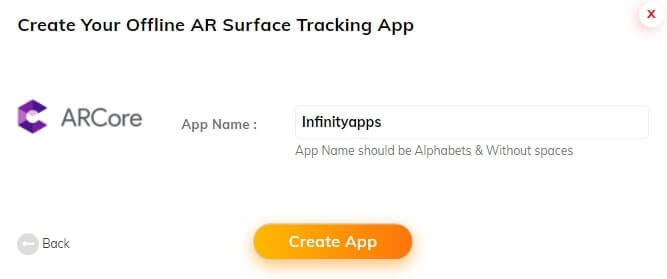
- Add App name: Write the name of the app in the field provided.
- Click on the Create app button.
- Offline Surface Targets ARFoundation Steps:
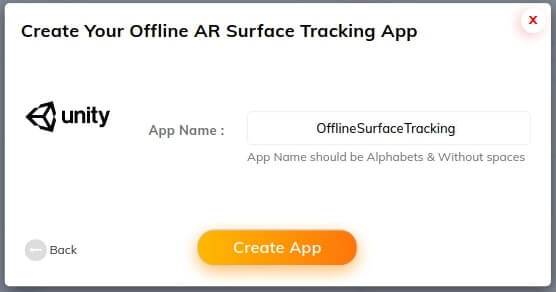
- Add App name: Write the name of the app in the field provided.
- Click on the Create app button.
- Offline Surface Targets ARkit Steps:

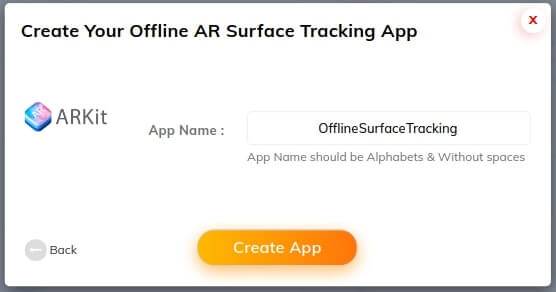
- Add App name: Write the name of the app in the field provided.
- Click on the Create app button.
- Offline Surface Targets VUFORIA Steps:
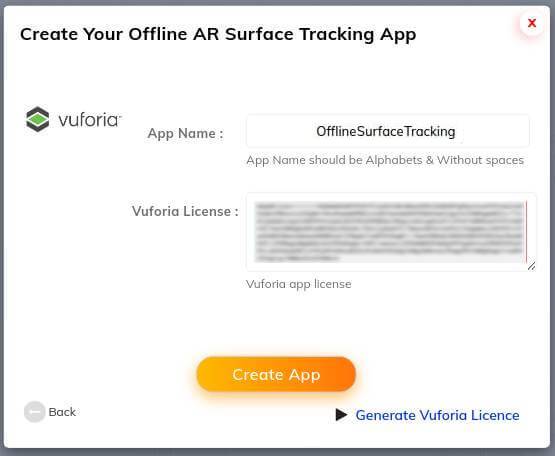 Add Licence Keys (Vuforia )
- Vuforia Free Licence
- To obtain Vuforia License Keys:
- Register with Vuforia for free and provide your details
- Click on the verification link in the mail that you will receive to get access to the Vuforia developer portal.
- Click on “Get Development Key”
- The App License Key obtained can be used during the app creation on PlugXR Creator.
- To obtain Vuforia License Keys:
- Purchase Premium Licence
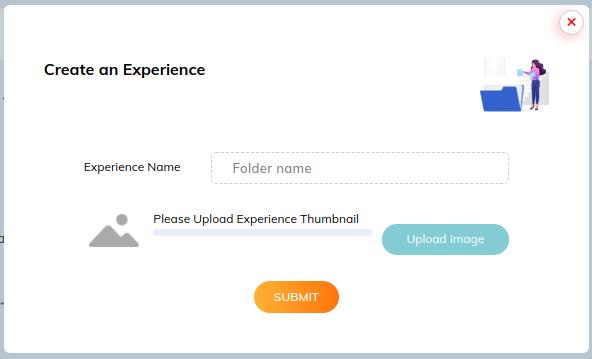
Add Experience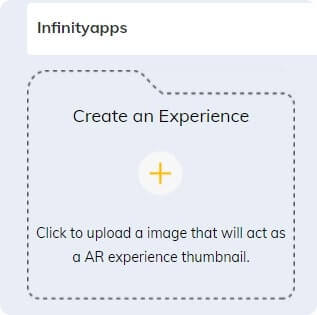
- After clicking on Create App, you will be redirected to the homepage of your app.
- Click on the box that reads “Create an Experience”.
- Upon clicking this, a pop-up appears where you have to do the following:
- Name your Experience
- Upload the image which is less than 2MB
- Upload image in the .jpg or jpeg format.
- Uploaded image will be worked as Your experience thumbnail.
Change License:Click on the change license button present on the top right corner of the page. A pop-up with the heading ‘Change from free license to commercial license’.
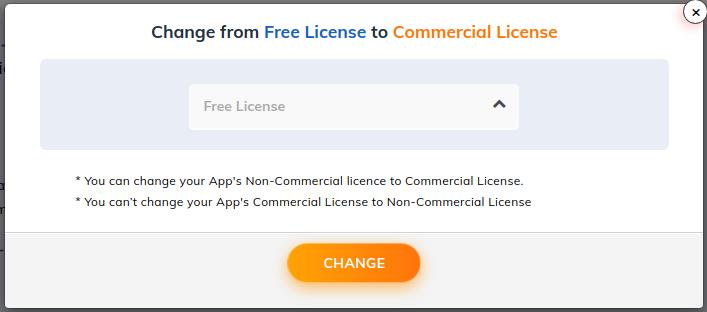
- You can change your App’s non-commercial license to a commercial license.
- You can’t change your App’s commercial license to a Non-commercial license.
- Click on the ‘Commercial app’ to commercialise your app. Once selected, it can’t be changed back to a non-commercial one.
- Click on the ‘Change’ button to commercialise.
This change will be shown in the app set-up page, where a user can publish their apps in the Play Store or App Store.
Folder Structure & Settings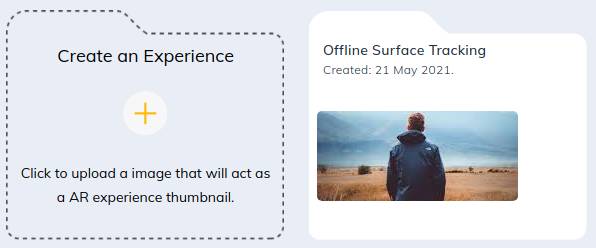
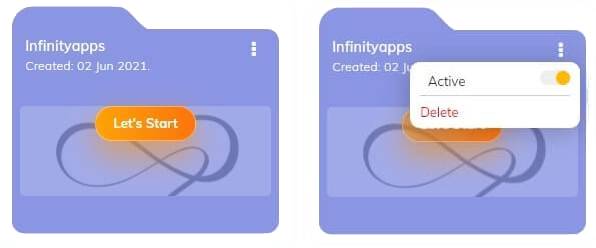
Hover on the folder that was created button. On the right corner, there are three dots present. Click on the three dots, you will find the following fields:
- Active or Inactive Toggle: Slide the toggle button, activate or deactivate the folder. Upon any action, notification will be shown, either deactivation or activation of the folder.
- Delete: Click on the delete button, if you wish to delete this folder.
A confirmation pop-up appears on the top. Choose one of the options to either delete or cancel the request for the same.
You will be directed back to the apps page. Click on the ‘Let’s start’ button. You will be directed to the grid page where experience can be created. (Asset section).
After creating the experience successfully, click on the Save button, to save your work and click on the Publish button to publish your app in the Play Store and App Store. This can be achieved with the help of the App Setup page.
- Vuforia Free Licence
App Setup
Watch our tutorial on how to create an AR App here (https://youtu.be/yIanc3t3PyA))
- Android
In the top section of the App Setup page, select “Android” in the “Publish your App in” option and click on the “Development Version” option.
- Development Version
- To get Development Version in Android, enter App Name and Organisation Name in the space provided.
- Choose the Status Bar Color from the range of colors provided. Upload suitable images in the Splash Screen, App Icon, and App Logo sections provided and click “Get Android App file”. Preview the outlook of your Development version on the right side of the App Setup page.
- Visit “Download apk” after a while to find the development apk file, QR Code and Source Link.
- Library
The source files available in the library will help you integrate the AR feature that you created in an existing mobile application.
- Download APK
Visit this page shortly after you have requested either a developmental or final version of the apk files.
- Manual Download
Click on the icon that reads “.APK file” to download the apk file on your system
- QR Code Scanning
Scan the QR Code provided to download the .apk file on your mobile device.
- Copy Link
Click on the Copy Link option and paste the link on any browser to automatically download the .apk files in your system. It is useful to send the links across for your associates to download the .apk file without any hassle.
- Manual Download
- Development Version
- Final Version
- To get Final Version in Android, enter App Name and Organisation Name in the space provided.
- Enter a KeyPass of your choice in the space provided.
- Enter your City, State, and Country details in the respective spaces.
- Enter Version number in the space provided.
- For successive version upgrade, an additional option called Key Store File is available for download.
- Choose the Status Bar Color from the range of colors provided. Upload suitable images in the Splash Screen, App Icon, and App Logo sections provided and click “Get apk file”.
- Preview the outlook of your Final version on the right side of the App Setup page.
- Visit “Download apk” after a while to find the final apk file, QR Code and Source Link.
- Library
The source files available in the library will help you integrate the AR feature that you created in an existing mobile application.
- Download APK
Visit this page shortly after you have requested either a developmental or final version of the apk files.
- Manual Download
Click on the icon that reads “.APK file” to download the apk file on your system
- QR Code Scanning
Scan the QR Code provided to download the .apk file on your mobile device.
- Copy Link
Click on the Copy Link option and paste the link on any browser to automatically download the .apk files in your system. It is useful to send the links across for your associates to download the .apk file without any hassle.
- Manual Download
- iOS
In the top section of the App Setup page, select “iOS” in the “Publish your App in” option and click on the “Development Version” option. Watch our tutorial on how to generate .p12 and mobileprovision files and App Specific password to get the ipa file here (https://youtu.be/JRL6OhivMFc)
- Development Version
- Upload “p12 file” and “mobileprovision file” in the spaces provided.
- Enter the “p12 file password” that you would have created.
- Enter “Build Number” and “Version” of your choice.
- Upload suitable images in the Splash Screen, App Icon, and App Logo sections provided and click “Get iOS App file”. Preview the outlook of your Development version on the right side of the App Setup page.
- Visit “Download IPA” after a while to find the development ipa file, QR Code and Source Link.
-
- Library
The source files available in the library will help you integrate the AR feature that you created in an existing mobile application.
- Download IPA
Visit this page shortly after you have requested either a developmental or final version of the ipa files.
- Manual Download
Click on the icon that reads “.IPA file” to download the .ipa file on your system
- QR Code Scanning
Scan the QR Code provided to download the .ipa file on your mobile device.
- Copy Link
Click on the Copy Link option and paste the link on any browser to automatically download the .ipa files in your system. It is useful to send the links across for your associates to download the .ipa file without any hassle.
- Manual Download
- Library
- Final Version
- Upload “p12 file” and “mobileprovision file” in the spaces provided.
- Enter the “p12 file password” that you would have created.
- Enter “Build Number” and “Version” of your choice.
- Enter your App Store Email in the respective space.
- Enter the App Specific Password (xxxx-xxxx-xxxx-xxxx) that you obtained in the process of generating p12 and mobileprovision files.
- Upload suitable images in the Splash Screen, App Icon, and App Logo sections provided and click “Get ipa file”.
- Preview the outlook of your Live version on the right side of the App Setup page.
- Visit “Download IPA” after a while to find the final ipa file, QR Code and Source Link.
- Library
The source files available in the library will help you integrate the AR feature that you created in an existing mobile application.
- Download IPA
Visit this page shortly after you have requested either a developmental or final version of the ipa files.
- Manual Download
Click on the icon that reads “.IPA file” to download the .ipa file on your system
- QR Code Scanning
Scan the QR Code provided to download the .ipa file on your mobile device.
- Copy Link
Click on the Copy Link option and paste the link on any browser to automatically download the .ipa files in your system. It is useful to send the links across for your associates to download the .ipa file without any hassle.
- Manual Download
- Development Version
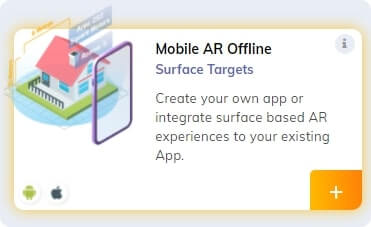
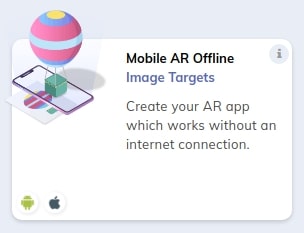
Mobile AR Offline (Image Targets)
Below mentioned is the process of creating AR Experiences and publishing them into its Offline white-labelled application on Android/iOS. Click on “Mobile AR Offline (Image Targets)” in the “Home screen” on the platform.
Create App
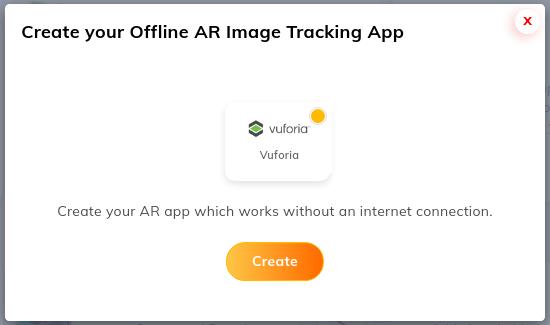
Hover on the Mobile AR Offline Image Targets and you can see a + plus button, click on the plus button, a pop-up emerges with available SDKs.
- SDK Details: Enter the SDK license keys in the respective blanks to proceed with the creation of AR Experience. Guidelines to obtain license keys for SDK are given in a link on the bottom of the pop-up. Create your offline AR Surface Tracking App with all the available SDKs. Those are
- Vuforia (Available)
- Mobile AR Offline VUFORIA Steps:
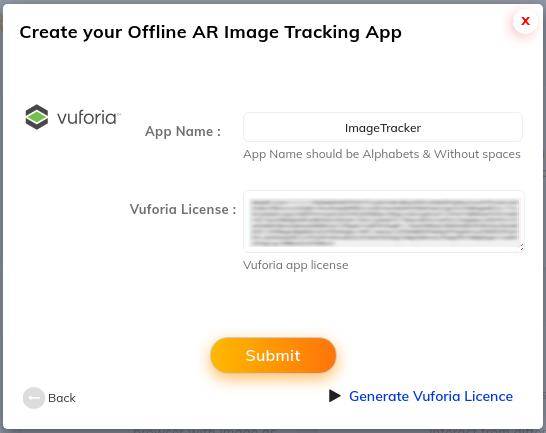 Add Licence Keys (Vuforia )
- Vuforia Free Licence
- To obtain Vuforia License Keys:
- Register with Vuforia for free and provide your details
- Click on the verification link in the mail that you will receive to get access to the Vuforia developer portal.
- Click on “Get Development Key”
- The App License Key obtained can be used during the app creation on PlugXR Creator.
- Click on “Add Database” and provide database name and select “Cloud”
- Click on “Database Access Key” to get “Client and Server Access Keys”
- On the Vuforia page, click on Target Manager. Create a database. Give it a name and select the type of database as ‘Device’. Click on the create button. After creation, add the target in your database by filling the following fields:
- Type: Choose among Single Image, Cloud, Cylinder, & 3D Object.
- File: Browse in your device for jpg or png (max file size 2MB).
- Width: Enter the width of your target as 5 in scene units. The size of the target should be on the same scale as the augmented virtual content.
- Name: Name must be unique to a database. When a target is detected in your application this will be reported in the API.
- Add: Click on the add button. Add another target as done above.
- Download the database by selecting the development platform as ‘Android studio, Xcode or visual studio’. After downloading, click on the download file. (It is in the zip format)
- Extract the zip file.
- To obtain Vuforia License Keys:
- Purchase Premium Licence
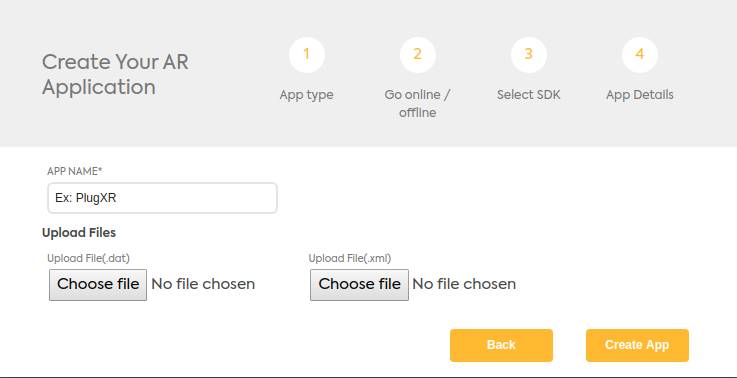
Add Folder (Experiences)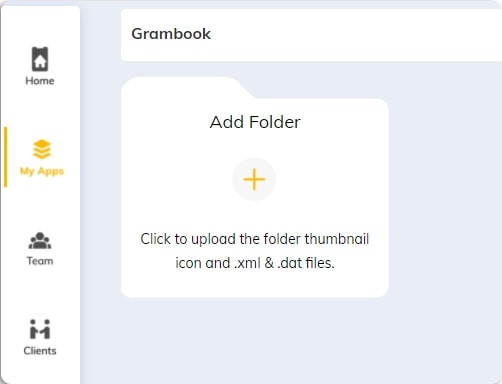
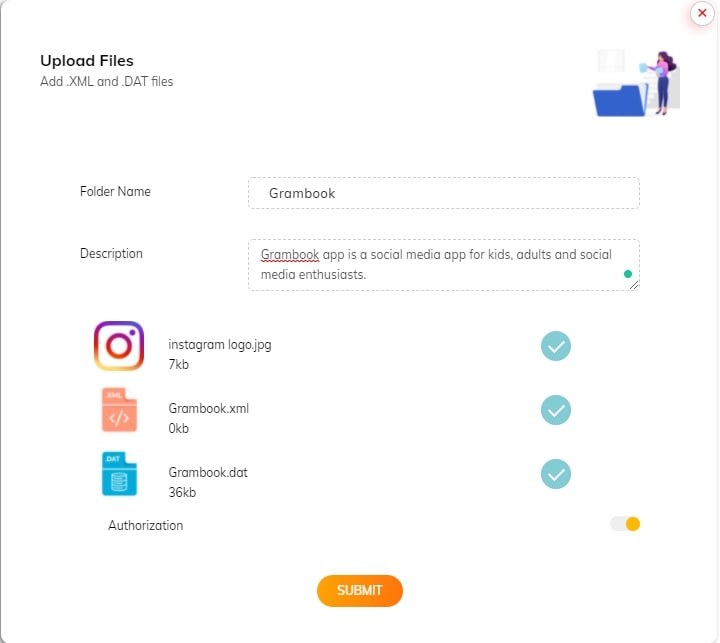
- After clicking on the Add Folder button, you will see the following image

- Folder Name: Write the name of the folder.
- Description: Write something about the folder, as in describing some important points or features.
- Upload Folder Icon: Choose an image from your device for the folder icon. The image must be in Jpeg or jpg format.
- Upload .XML file: Upload the .XML file. It is the file that will be available after extracting the ZIP file.
- Upload .DAT file: Upload the.DAT file. It is the file that will be available after extracting the ZIP file.
- Authorization: Move the toggler for authorization.
- Submit: Click on the submit button after filling in all the above fields.
It has the following fields:
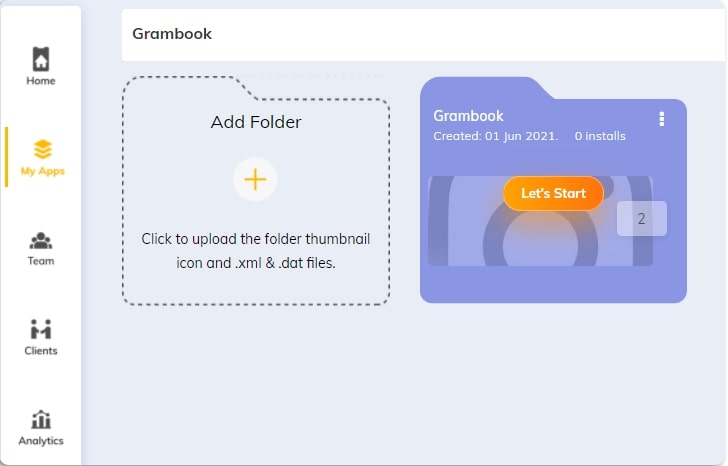
After clicking on the Submit button, you will be directed to the My Apps page, where you can see your marker.
Click on the Let’s Start button to start the creation process.
On the top right corner, you will find two actions: Users list & Change License.
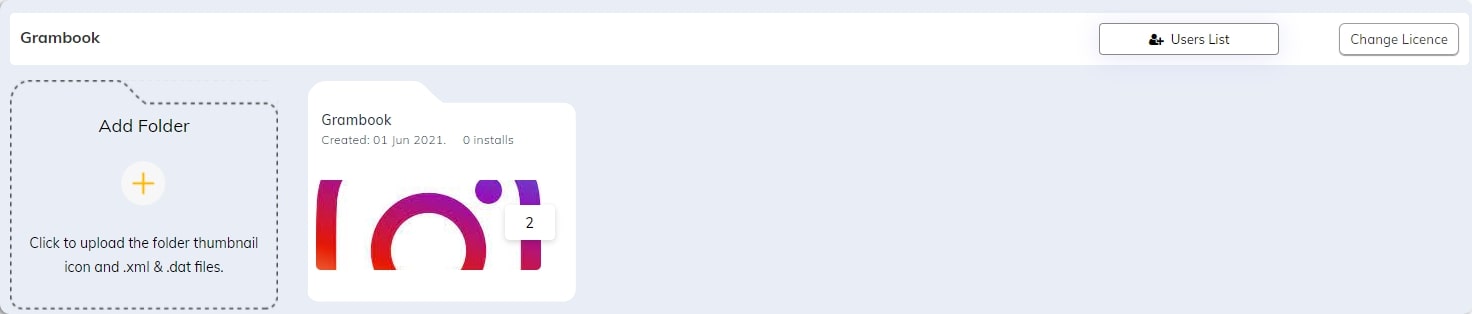
Users List: Click on the ‘Users’ button present on the top right corner of the page. A new page opens up with Users as the heading.

- The number of codes developed will be shown here. Eg: 1 or 5.
- Device ID: The ID of the device in which the user has installed the folder will be mentioned here.
- Activated on: The date of activation of the app will be mentioned here.
- Folder Installed: The number of folders being installed will be mentioned here.
Change License:Click on the change license button present on the top right corner of the page. A pop-up with the heading ‘Change from free license to commercial license’.
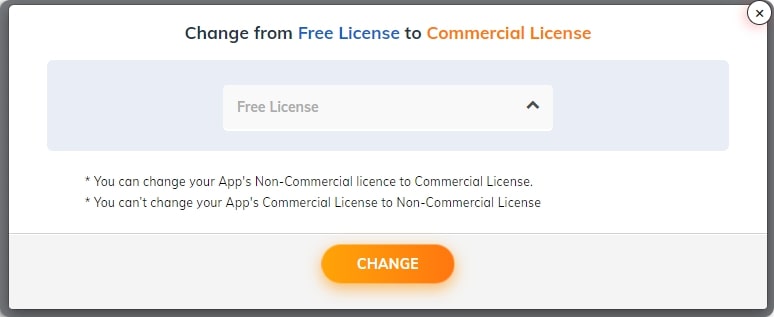
- You can change your App’s non-commercial license to a commercial license.
- You can’t change your App’s commercial license to a Non-commercial license.
- Click on the ‘Commercial app’ to commercialise your app. Once selected, it can’t be changed back to a non-commercial one.
- Click on the ‘Change’ button to commercialise.
This change will be shown in the app set-up page, where a user can publish their apps in the Play Store or App Store.
Folder Structure & Settings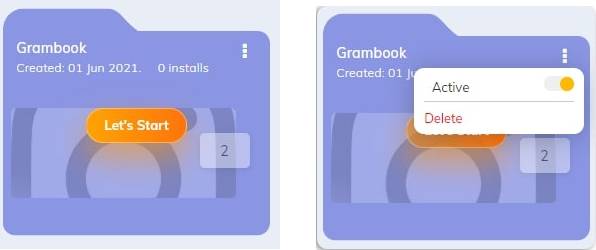
Hover on the folder that was created button. On the right corner, there are three dots present. Click on the three dots, you will find the following fields:
- Active or Inactive Toggle: Slide the toggle button, activate or deactivate the folder. Upon any action, notification will be shown, either deactivation or activation of the folder.
- Delete: Click on the delete button, if you wish to delete this folder.
A confirmation pop-up appears on the top. Choose one of the options to either delete or cancel the request for the same.
Click on the Let’s Start button of the folder. You will be directed to the markers page.
This marker page has two markers. These were uploaded at the time of XML and DAT file creation.
On the top right corner, there are two actions: Codes & Edit folder.

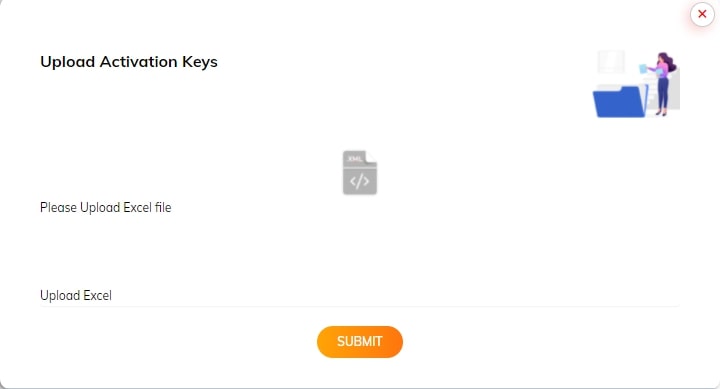
Codes: Click on the Codes button, a new page will open.

-
Upload code: Click on the Upload code button, to upload the activation code. As soon as a user clicks on the Upload code button, a pop-up appears.
Upload the excel file and click on the Submit button.
-
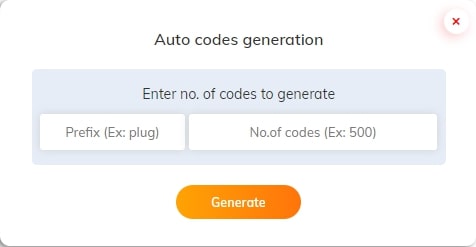
Auto-Generation code: Click on the auto-generation code to generate code automatically. A pop-up appears after clicking on Auto-generation code.
-
Download: Click on the download button to download the excel file.
-
Table: A tabular column appears on the list view page, it has the following fields:
- S.No
- Codes
- Devices
- Devices used
- Created on
- Status
- Edit
-
Edit folder: Edit folder helps a user to edit the already created folder. Click on the edit folder button to edit the folder.
A user can edit all the above fields and click on the submit button to make changes.
After clicking on the submit button, you will be directed back to the markers page. Click on any marker where it is marked ‘Let’s start’ button. You will be directed to the grid page where experience can be created. (Asset section).
After creating the experience successfully, click on the Save button, to save your work and click on the Publish button to publish your app in the Play Store and App Store. This can be achieved with the help of the App Setup page.
- Vuforia Free Licence
App Setup
Watch our tutorial on how to create an AR App here (https://youtu.be/yIanc3t3PyA))
- Android
In the top section of the App Setup page, select “Android” in the “Publish your App in” option and click on the “Development Version” option.
- Development Version
- To get Development Version in Android, enter App Name and Organisation Name in the space provided.
- Choose the Status Bar Color from the range of colors provided. Upload suitable images in the Splash Screen, App Icon, and App Logo sections provided and click “Get Android App file”. Preview the outlook of your Development version on the right side of the App Setup page.
- Go to the Home Screen. Enter the Main Heading, Description, Button text, and text to display in the field. Choose the colour for each field simultaneously.
- Choose category text colour, Background colour, Button colour, Card colour, Card Title colour, and Input background colour.
- Insert the menu icon.
- Go to the Menu Screen. Enter the Menu Title, Contact Title, Help Title, About Title, Contact Description, Help description, and About description.
- Insert Back Icon, Contact Icon, Help icon and About Icon.
- Choose Menu text colour and Options text colour.
- Visit “Download apk” after a while to find the development apk file, QR Code and Source Link.
- Library
The source files available in the library will help you integrate the AR feature that you created in an existing mobile application.
- Download APK
Visit this page shortly after you have requested either a developmental or final version of the apk files.
- Manual Download
Click on the icon that reads “.APK file” to download the apk file on your system
- QR Code Scanning
Scan the QR Code provided to download the .apk file on your mobile device.
- Copy Link
Click on the Copy Link option and paste the link on any browser to automatically download the .apk files in your system. It is useful to send the links across for your associates to download the .apk file without any hassle.
- Manual Download
- Development Version
- Final Version
- To get Final Version in Android, enter App Name and Organisation Name in the space provided.
- Enter a KeyPass of your choice in the space provided.
- Enter your City, State, and Country details in the respective spaces.
- Enter Version number in the space provided.
- For successive version upgrade, an additional option called Key Store File is available for download.
- Choose the Status Bar Color from the range of colors provided. Upload suitable images in the Splash Screen, App Icon, and App Logo sections provided and click “Get apk file”.
- Preview the outlook of your Final version on the right side of the App Setup page.
- Visit “Download apk” after a while to find the final apk file, QR Code and Source Link.
- Library
The source files available in the library will help you integrate the AR feature that you created in an existing mobile application.
- Download APK
Visit this page shortly after you have requested either a developmental or final version of the apk files.
- Manual Download
Click on the icon that reads “.APK file” to download the apk file on your system
- QR Code Scanning
Scan the QR Code provided to download the .apk file on your mobile device.
- Copy Link
Click on the Copy Link option and paste the link on any browser to automatically download the .apk files in your system. It is useful to send the links across for your associates to download the .apk file without any hassle.
- Manual Download
- iOS
In the top section of the App Setup page, select “iOS” in the “Publish your App in” option and click on the “Development Version” option. Watch our tutorial on how to generate .p12 and mobileprovision files and App Specific password to get the ipa file here (https://youtu.be/JRL6OhivMFc)
- Development Version
- Upload “p12 file” and “mobileprovision file” in the spaces provided.
- Enter the “p12 file password” that you would have created.
- Enter “Build Number” and “Version” of your choice.
- Upload suitable images in the Splash Screen, App Icon, and App Logo sections provided and click “Get iOS App file”. Preview the outlook of your Development version on the right side of the App Setup page.
- Go to the Home Screen. Enter the Main Heading, Description, Button text, and text to display in the field. Choose the colour for each field simultaneously.
- Choose category text colour, Background colour, Button colour, Card colour, Card Title colour, and Input background colour.
- Insert the menu icon.
- Go to the Menu Screen. Enter the Menu Title, Contact Title, Help Title, About Title, Contact Description, Help description, and About description.
- Choose Menu text colour and Options text colour.
- Visit “Download IPA” after a while to find the development ipa file, QR Code and Source Link.
-
- Library
The source files available in the library will help you integrate the AR feature that you created in an existing mobile application.
- Download IPA
Visit this page shortly after you have requested either a developmental or final version of the ipa files.
- Manual Download
Click on the icon that reads “.IPA file” to download the .ipa file on your system
- QR Code Scanning
Scan the QR Code provided to download the .ipa file on your mobile device.
- Copy Link
Click on the Copy Link option and paste the link on any browser to automatically download the .ipa files in your system. It is useful to send the links across for your associates to download the .ipa file without any hassle.
- Manual Download
- Library
- Final Version
- Upload “p12 file” and “mobileprovision file” in the spaces provided.
- Enter the “p12 file password” that you would have created.
- Enter “Build Number” and “Version” of your choice.
- Enter your App Store Email in the respective space.
- Enter the App Specific Password (xxxx-xxxx-xxxx-xxxx) that you obtained in the process of generating p12 and mobileprovision files.
- Upload suitable images in the Splash Screen, App Icon, and App Logo sections provided and click “Get ipa file”.
- Preview the outlook of your Live version on the right side of the App Setup page.
- Visit “Download IPA” after a while to find the final ipa file, QR Code and Source Link.
- Library
The source files available in the library will help you integrate the AR feature that you created in an existing mobile application.
- Download IPA
Visit this page shortly after you have requested either a developmental or final version of the ipa files.
- Manual Download
Click on the icon that reads “.IPA file” to download the .ipa file on your system
- QR Code Scanning
Scan the QR Code provided to download the .ipa file on your mobile device.
- Copy Link
Click on the Copy Link option and paste the link on any browser to automatically download the .ipa files in your system. It is useful to send the links across for your associates to download the .ipa file without any hassle.
- Manual Download
- Development Version
WebAR (Surface Targets)
To create WebAR experience, click on the “WebAR (Surface Targets)” option in the “Home” screen of the platform.

A pop-up emerges, where the name of the experience has to be mentioned.
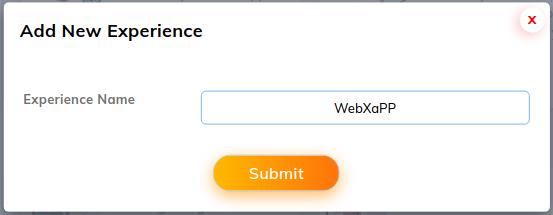
Write the name of the experience and click on the Submit button.
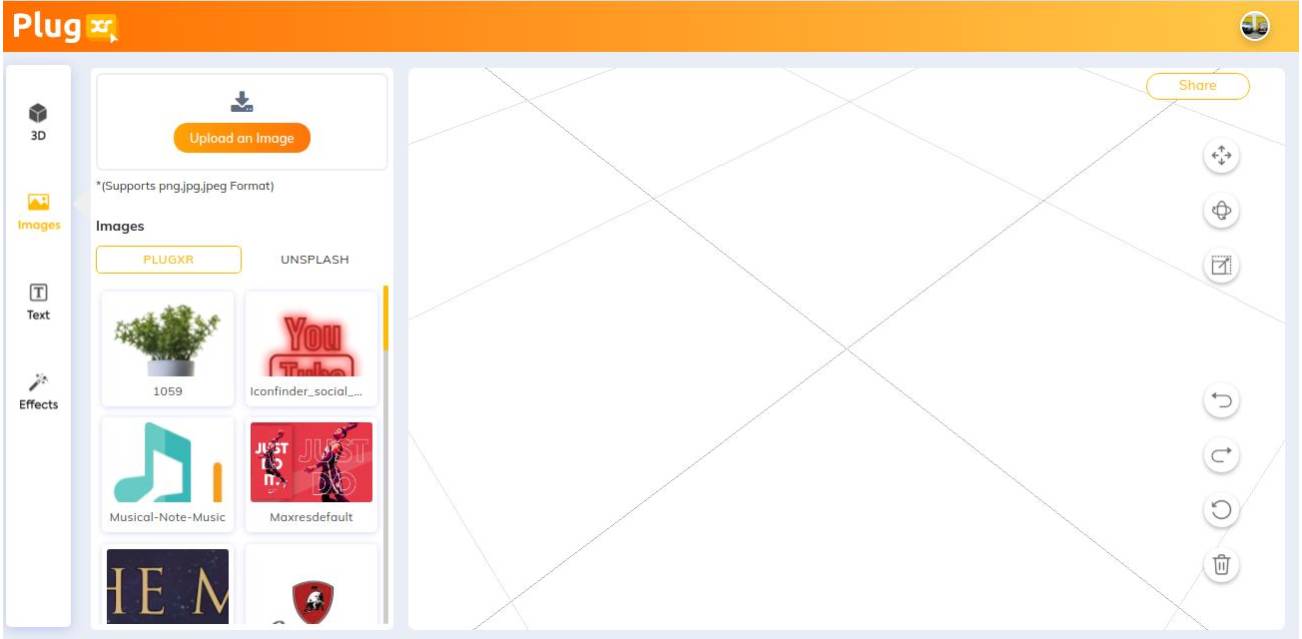
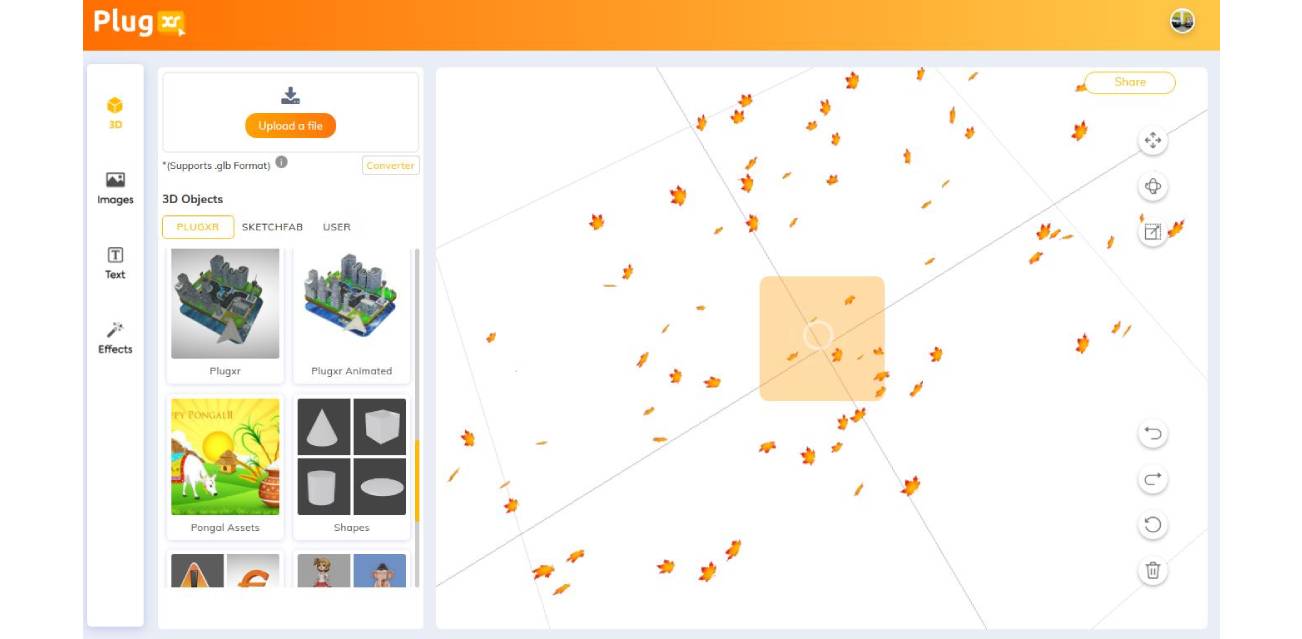
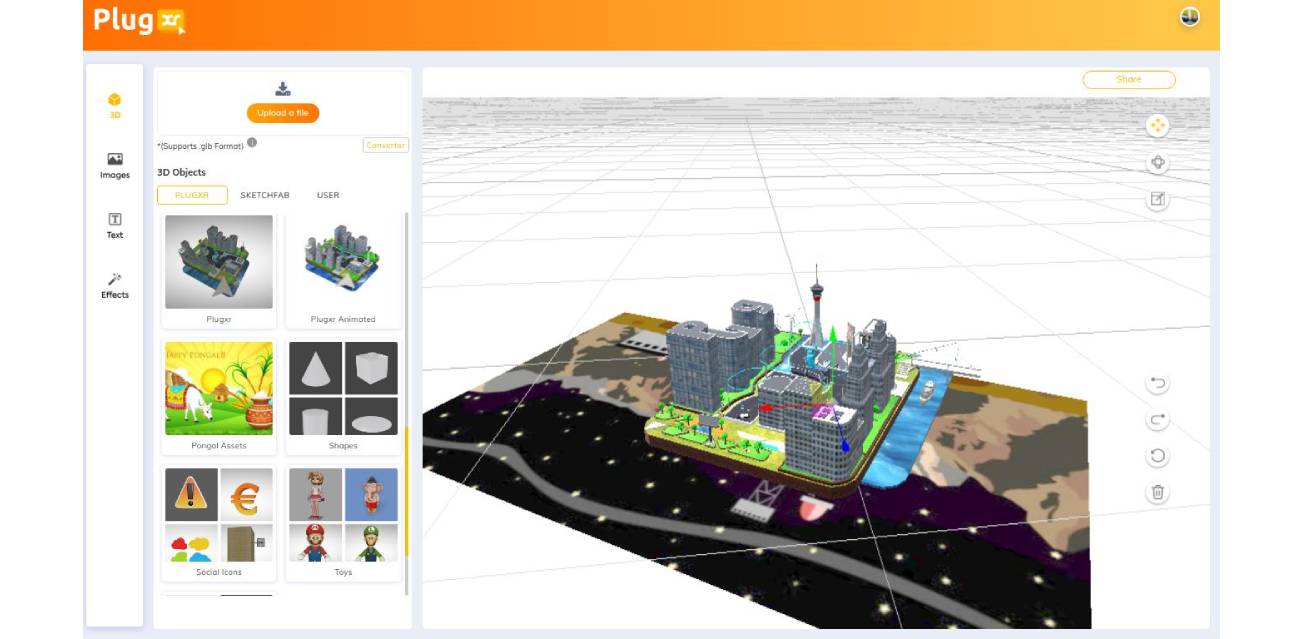
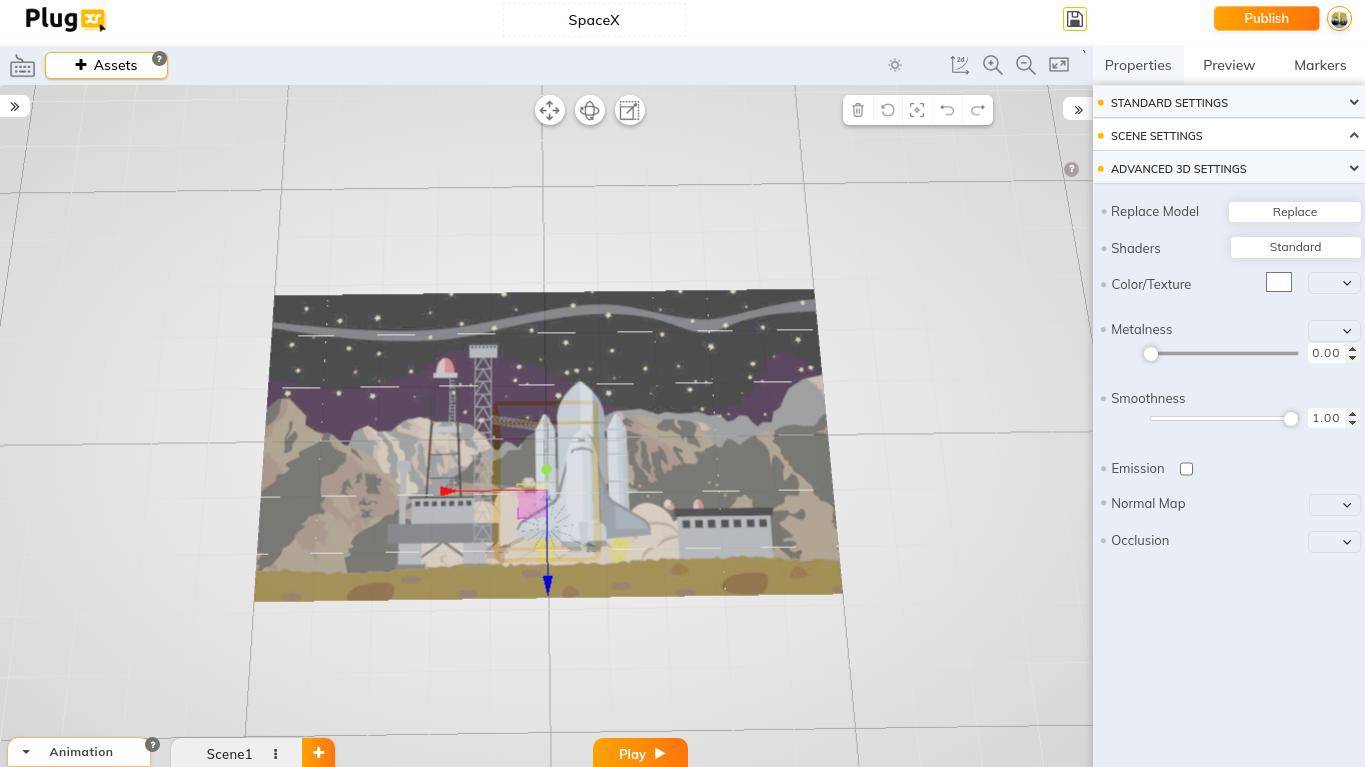
You will be redirected to the grid page. It has the following properties on the left side of the page:
- 3D Models:
- PlugXR: Choose themes from the PlugXR library and select any model.
- Sketchfab
- User (Your own uploaded models)
- Images:
- PlugXR: Choose any image from the library of PlugXR.
- Unsplash: Choose any image from the library of Unsplash.
- User (Upload images of your choice by the Upload an image button. The file must be a jpeg. or jpg.)
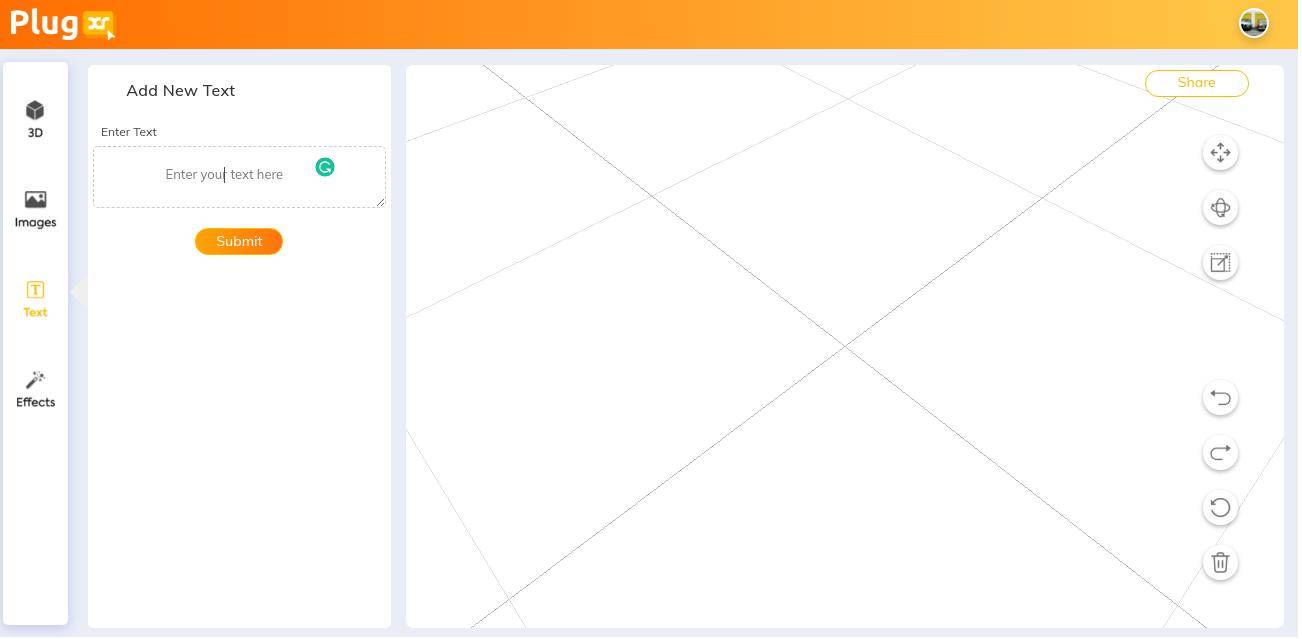
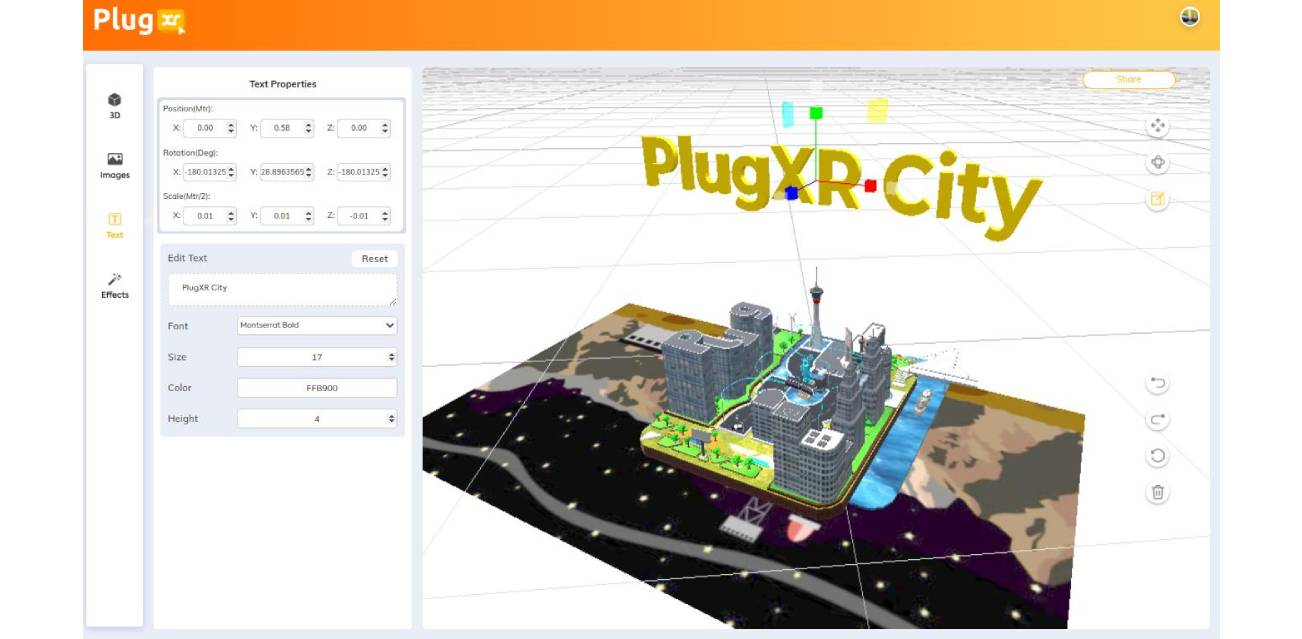
- Text: Add the text here. Click on the submit button and the text will be added to the grid.
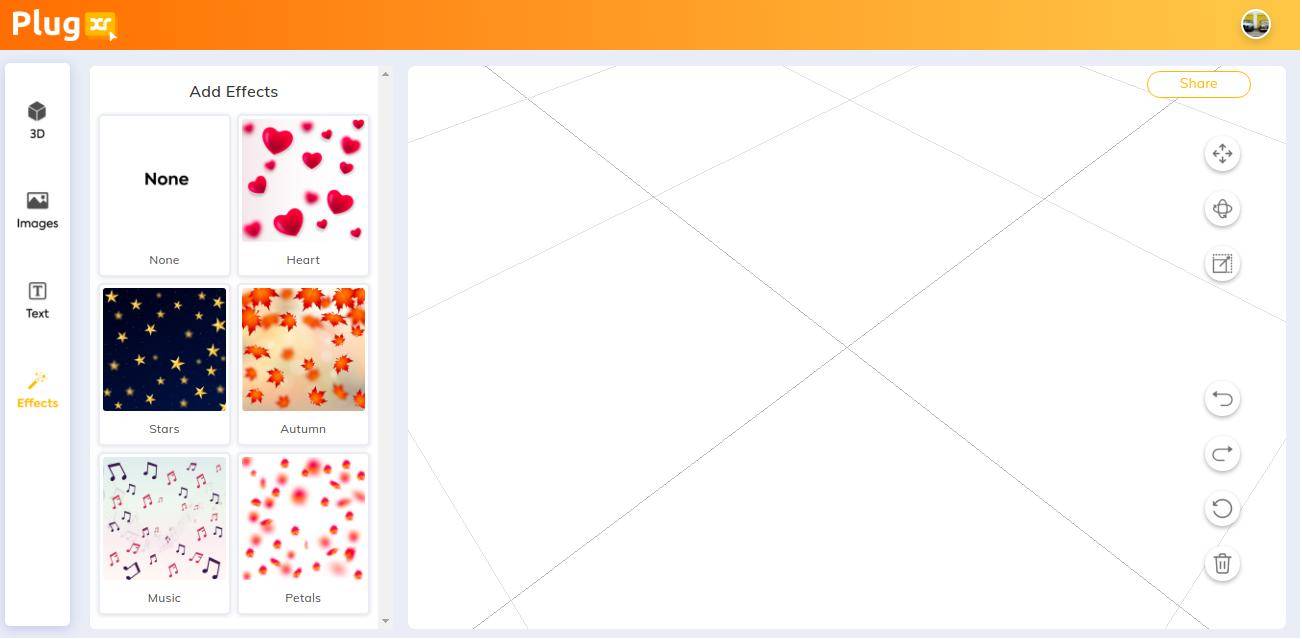
- Particle Effects: Add the effects of your choice. Select from the list provided.

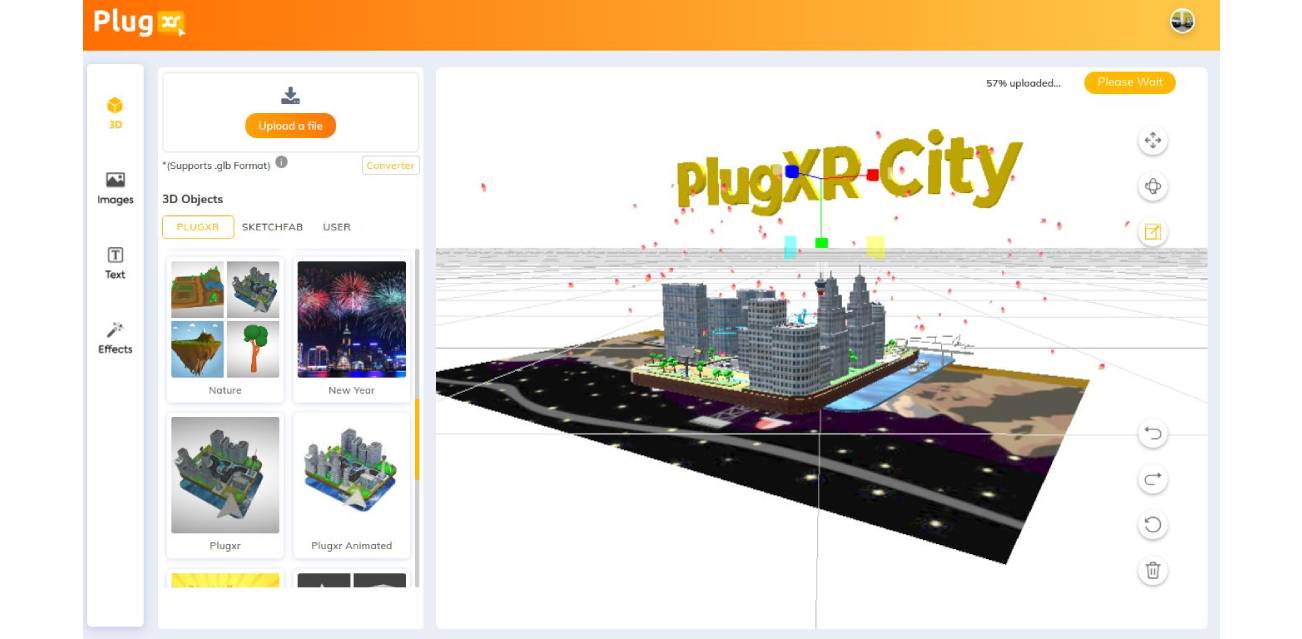
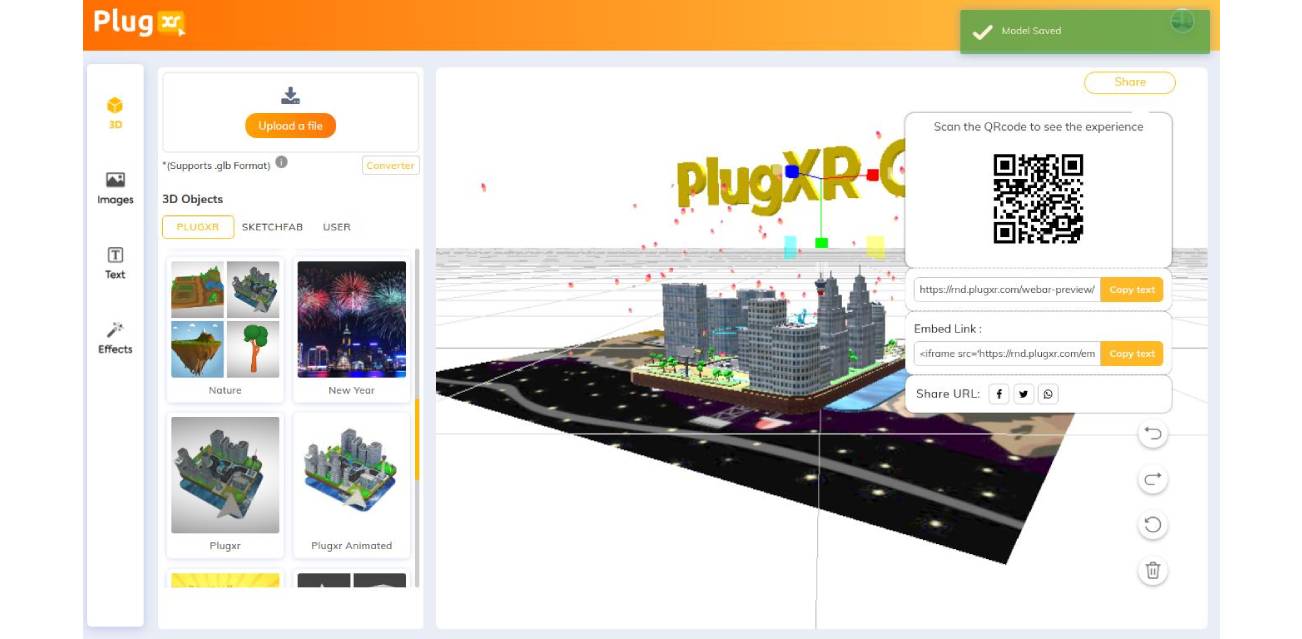
Click on the SHARE button, you will one popup card, with
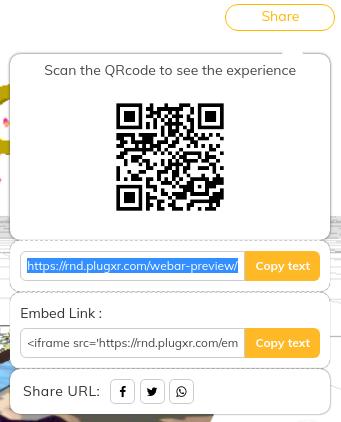
- QR Code: Scan the QR code on your device to view the experience.
- Copy Link: Copy the link, open it in any browser on any device to view the experience.
- Embedded link: Create hyperlinks with the help of embedded links to view the experience.
- Share URL: Share the URL on Twitter, Facebook, and What’s App.
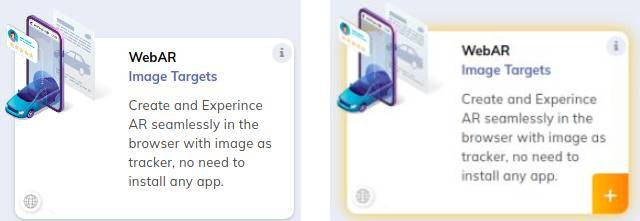
Web AR (Image Targets)
Create and experience AR seamlessly in the browser with an image as a tracker, no need to install any app
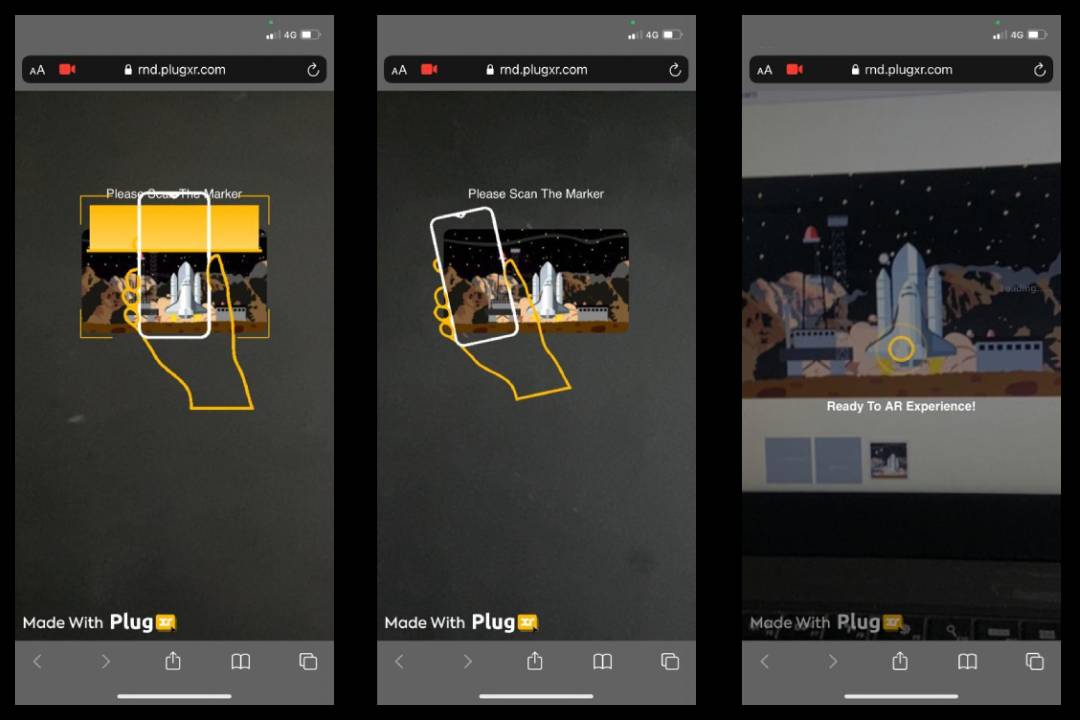
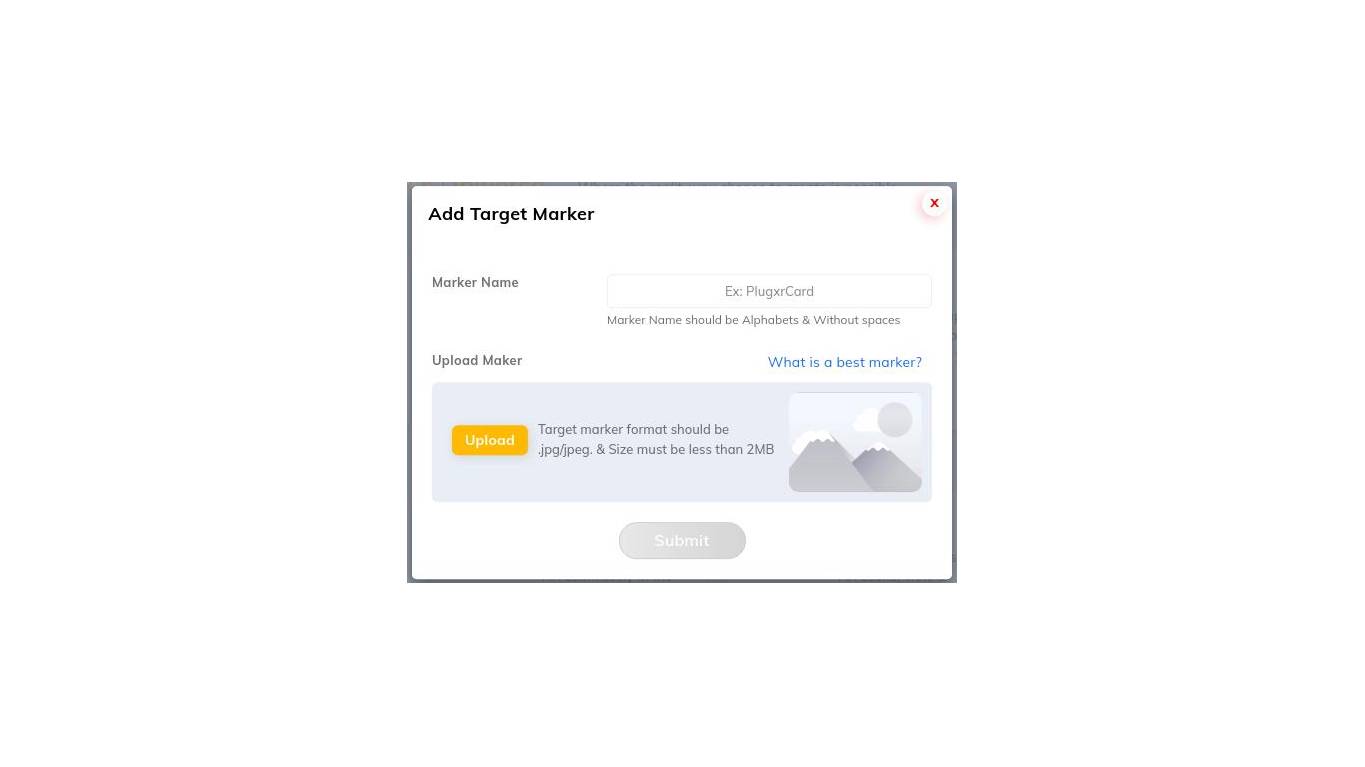
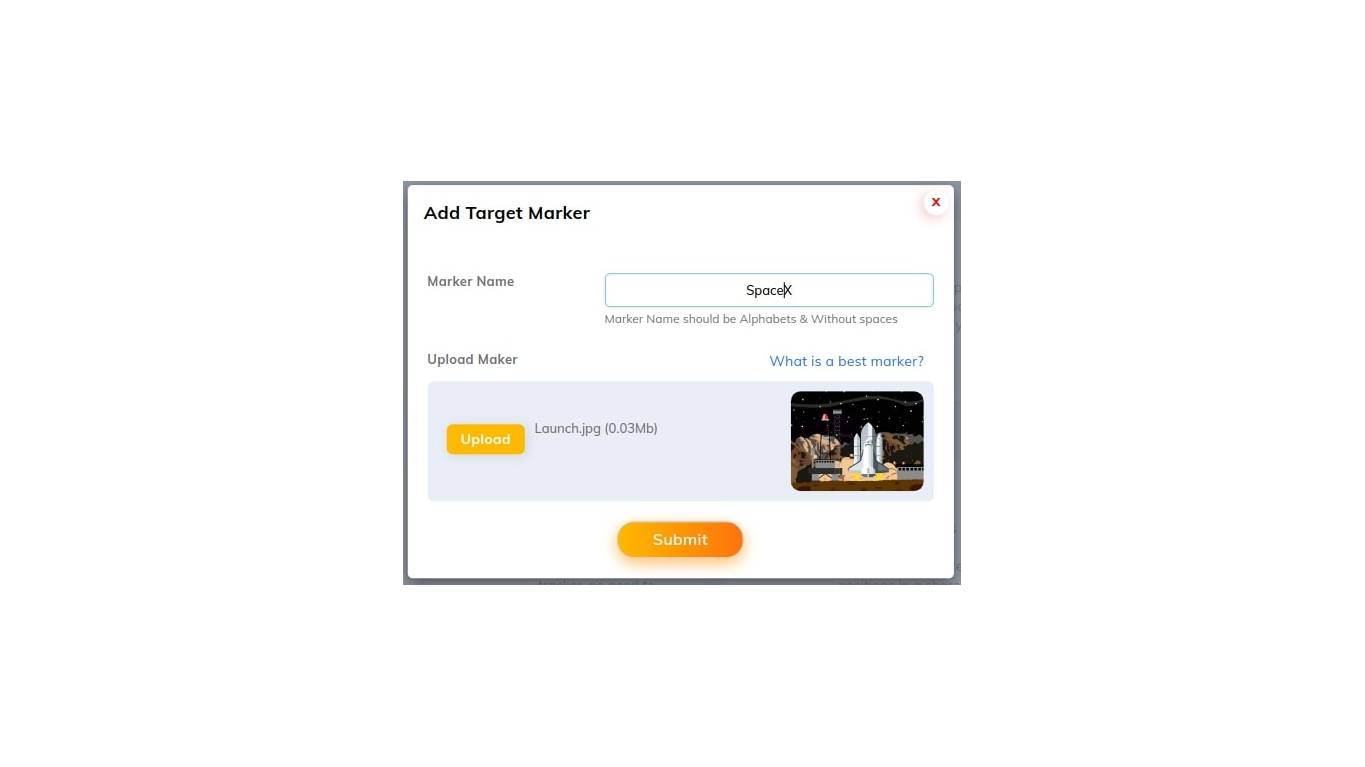
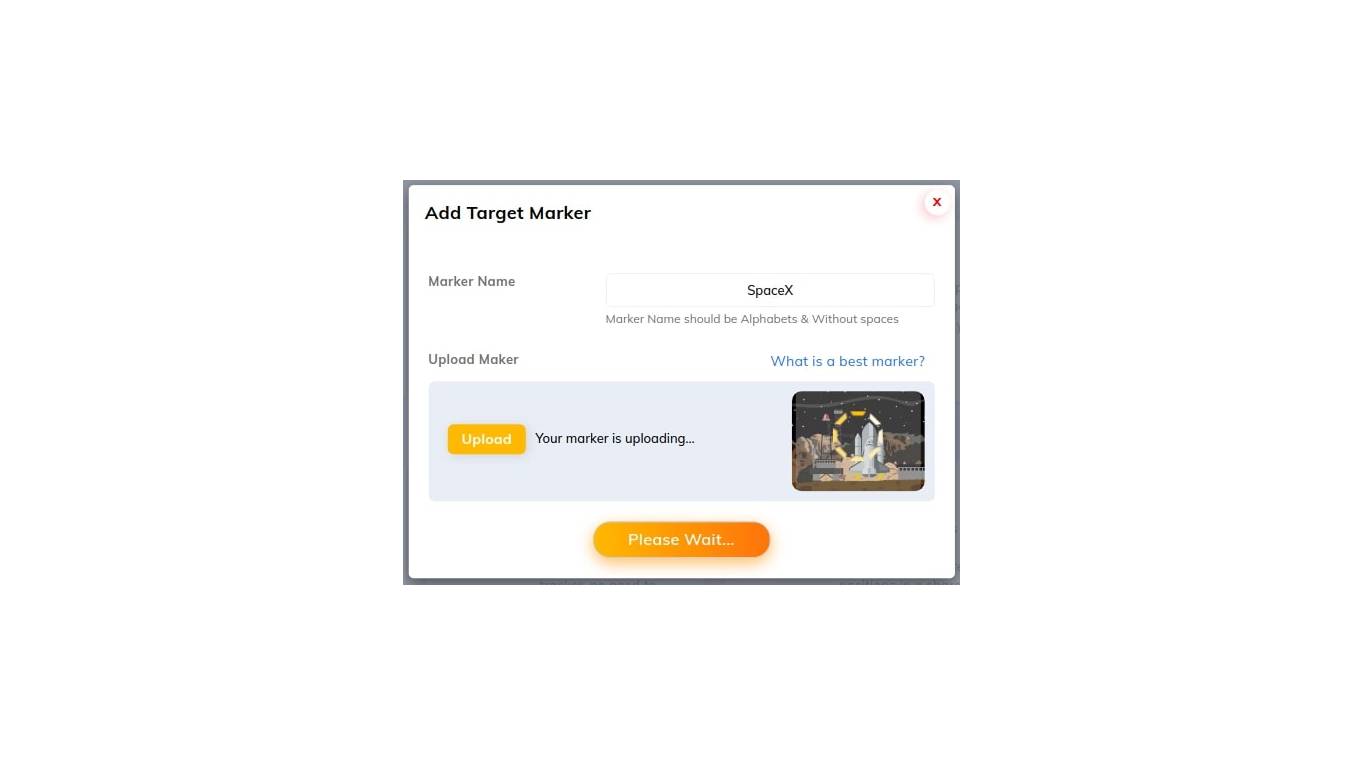
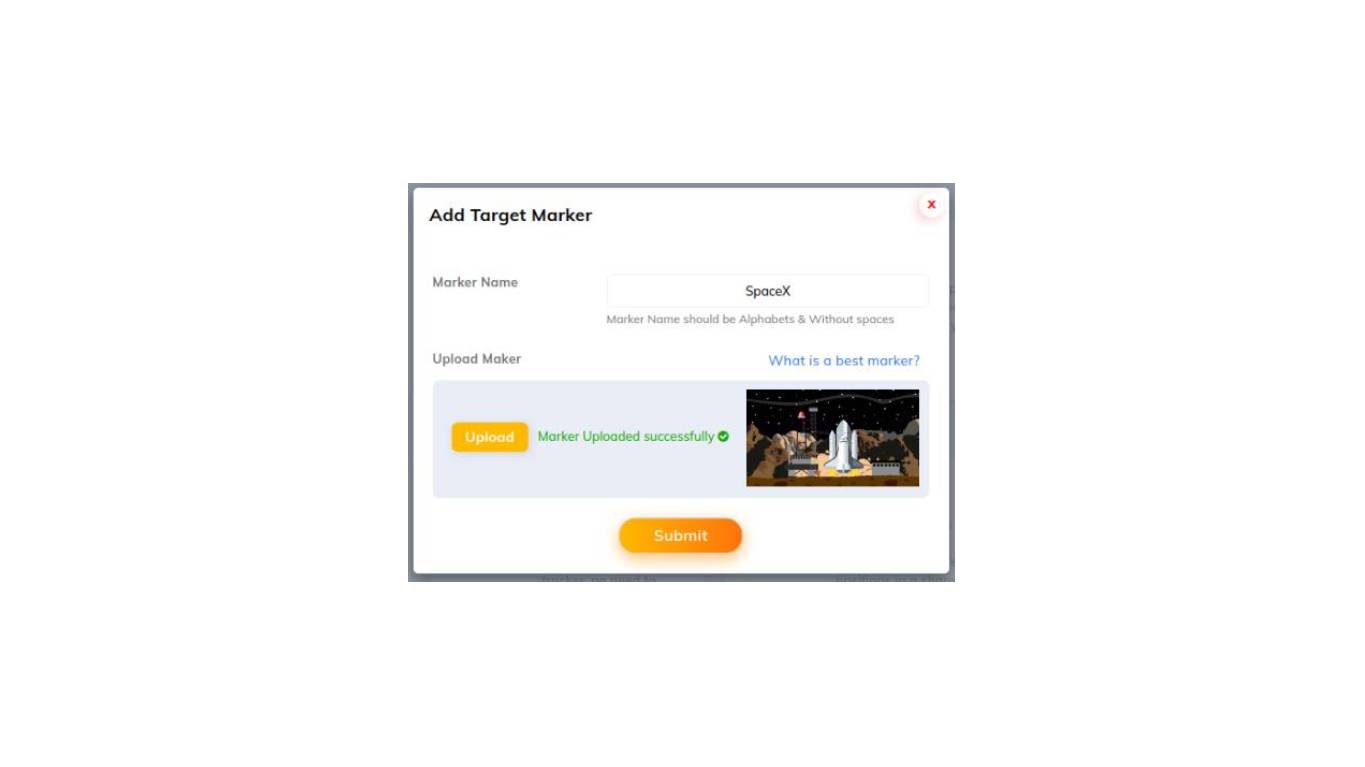
Add Marker: Click on the WebAR (Image tracking). A pop-up will appear, with the headline Add Target Marker. It has the following fields:
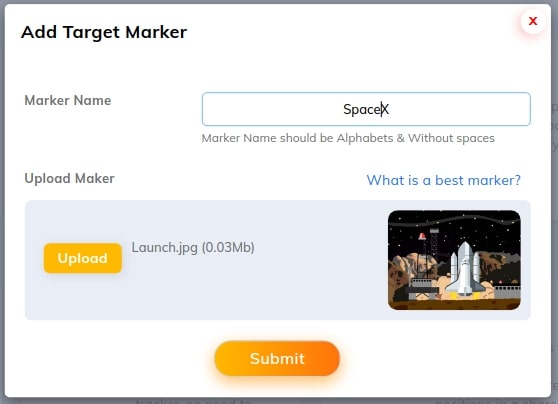
- Marker name: The name must be alphabets and without space.
- Upload Marker: The target marker format should be jpg or jpeg and the size should be less than 2MB.
- Submit: Click on the Submit button to proceed.
Best Marker: Complex images with a lot of contrast tend to work very well by making it easier for the Mobile Camera to recognize the marker. Avoid flat and monochromatic images as much as possible. If you want markers that will always work, use images with a lot of information and high resolution. If you are going to print the image, make sure it is a good print. If you are going to use screens, check the device luminosity.
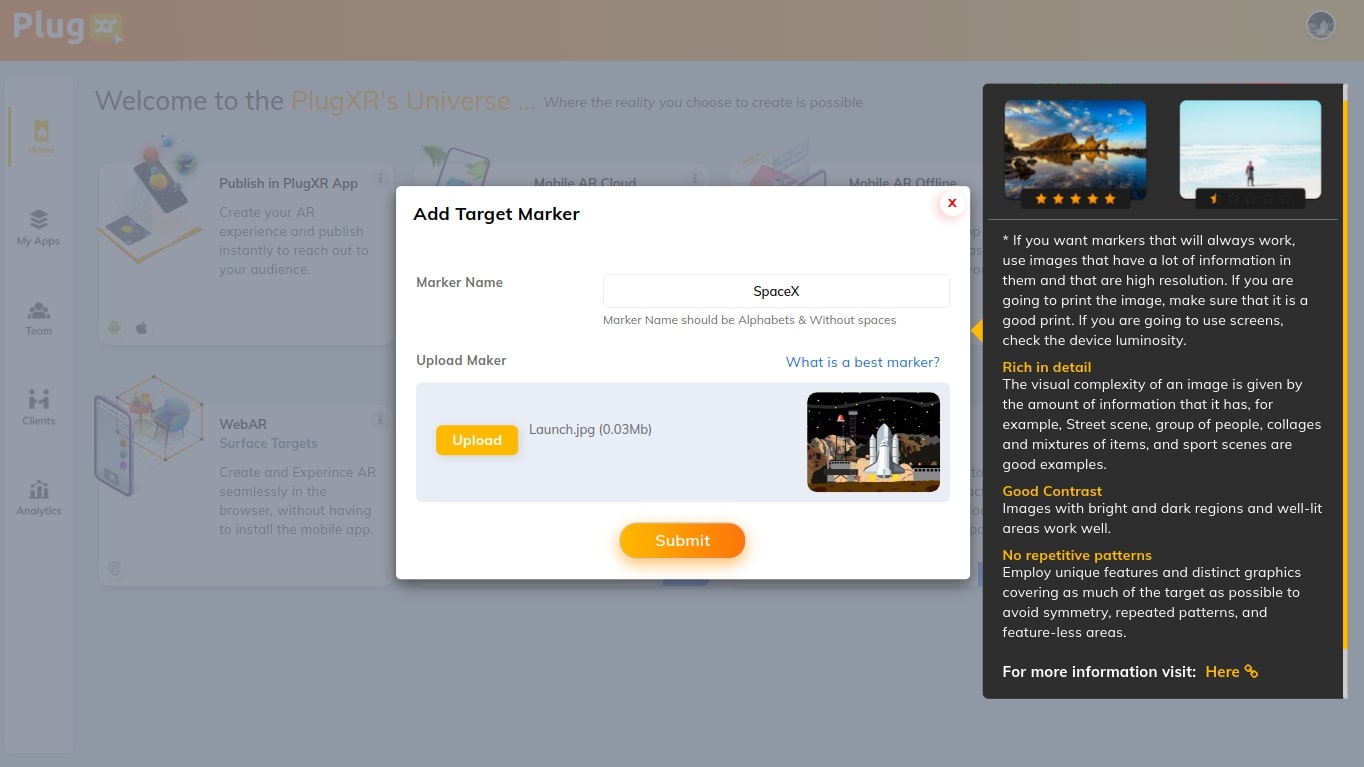
- Rich in details: The visual complexity of an image is given by the amount of information that it has, for example, a Street scene, group of people, collages and mixtures of items, and sports scenes are a good example.
- Good contrast: Images with bright and dark regions and well-lit areas work well.
- No repetitive patterns: Employ unique features and distinct graphics covering as much of the target as possible to avoid symmetry, repeated patterns, and featureless areas.
Create & Publish Experience
Hover on the Web AR Image Targets and you can see a + plus button, click on the plus button, a pop-up emerges to add marker. See the pictorial flow below.

After creating the experience successfully, click on the Save button, to save your work and click on the Publish button to publish your work in WebAR apps.
- Save: Click on the Save button to save your work.
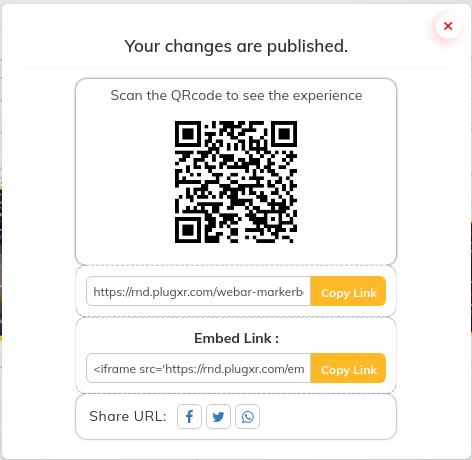
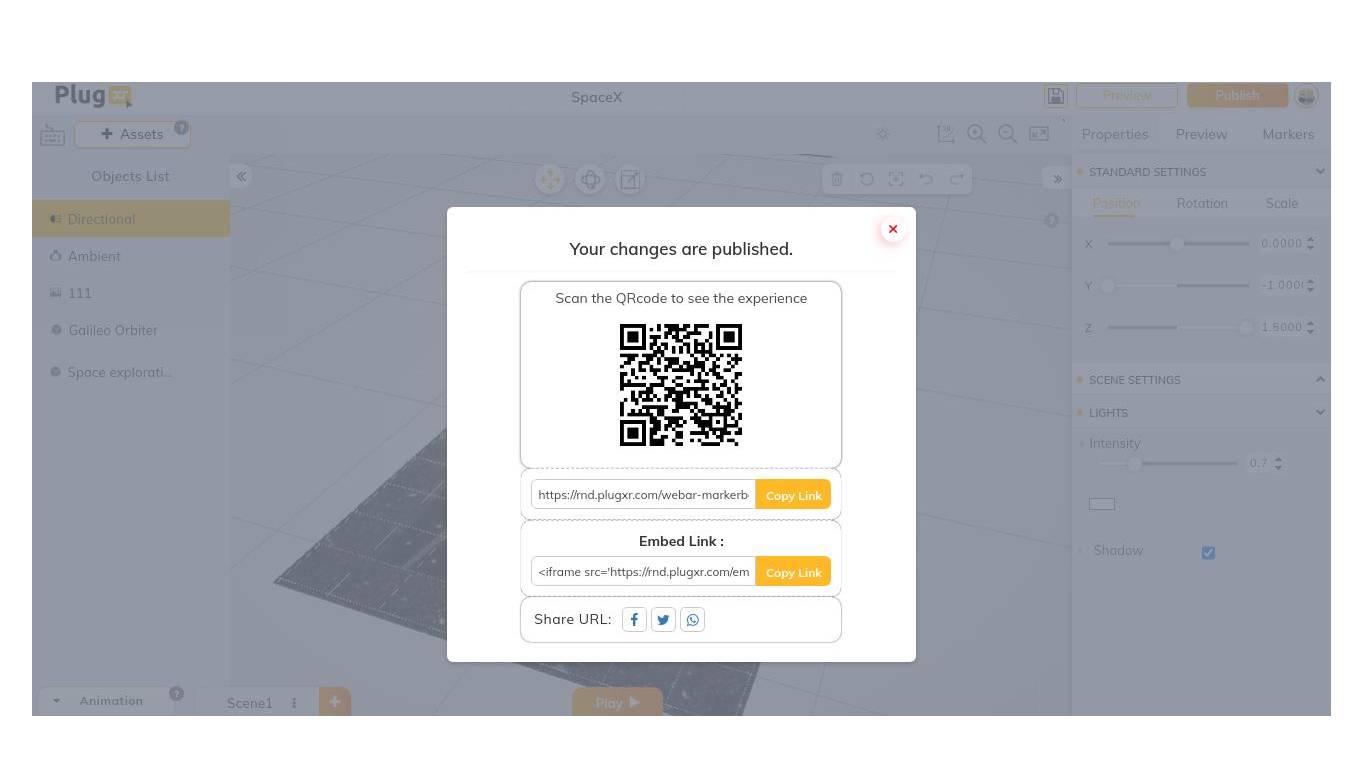
- Publish: Click on the Publish button. Wait for 2-5 secs. A pop-up with three options appear:
- QR code: Scan the QR code on your device to view the experience.
- Copy Link: Copy the link, open it in any browser on any device to view the experience.
- Embedded link: Create hyperlinks with the help of embedded links to view the experience.
- Share URL: Share the URL on Twitter, Facebook, and What’s App.
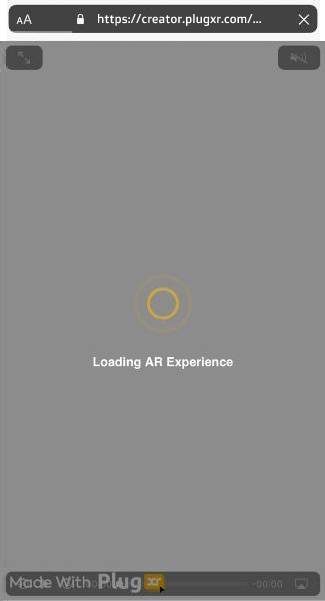
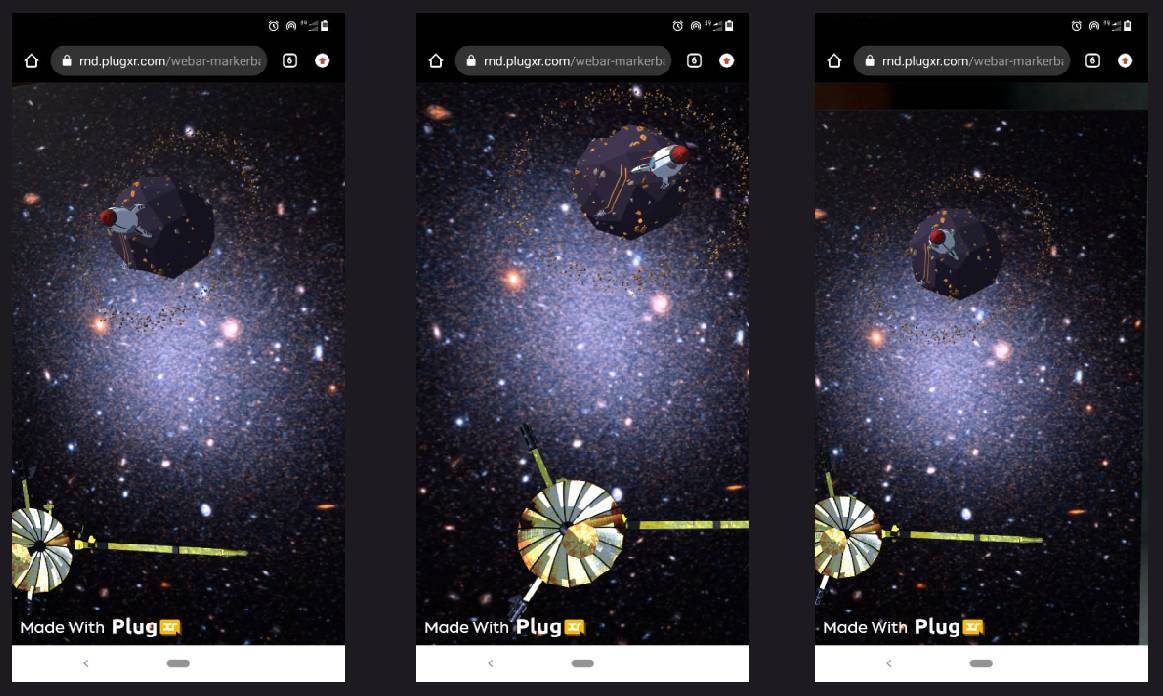
Preview Experience
This experience will be previewed in Mobile browsers only.